Built-In Series Overlay Door Panel Retro-Fit Kit - For Over/Under Models
(7003402, 7003403)
7007804 / Rev A / January, 2008
Page 3 of 3
BEFORE BEGINNING WORK ON THE PANEL GRILLE
ASSEMBLY, READ THESE IMPORTANT NOTES:
• The existing 600 Series grille front panel, spacer panel
and backer panel will need to be cut down by 1” (25 mm)
in height in order to fit into the Built-in Series panel grille
frame.
• If cutting the grille panel assembly down is not an option,
then an alternate Built-in Series louvered grille assembly
or stainless steel grille assembly should be considered.
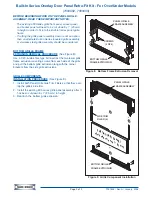
BOTTOM GRILLE FRAME
EXTRUSION REMOVAL PROCEDURE
(See Figure 8)
:
Use a T-20, 6-lobe Torx type bit to extract the two lower grille
frame extrusion mounting screws from each side of the grille
and pull the bottom grille extrusion along with the corner
brackets from the side grille extrusions.
GRILLE COMPONENTS
INSTALLATION PROCEDURE
(See Figure 9)
:
1. Install both Panel Grille Side Trim Fillers so that they over-
lap the grille’s side trim.
2. Install the existing 600 series grille panel assembly after it
has been cut down by 1” (25 mm) in height.
3. Reattach the bottom grille extrusion.
BOTTOM GRILLE
FRAME EXTRUSION
PANEL GRILLE
FRAME ASSEMBLY
SCREWS
(2 OF 4)
Figure 8. Bottom Frame Extrusion Removal
BOTTOM GRILLE
FRAME EXTRUSION
PANEL GRILLE
FRAME ASSEMBLY
EXISTING GR
ILLE P
ANEL
after being cut down
1” (25 m
m)
SIDE TRIM
FILLER (2)
1
1
2
3
Figure 9. Grille Component Installation


