Style selections ES-323-10 Instruction Manual Download Page 3

3

Please read and understand this entire manual before attempting to assemble, operate or install the product.

1.  Read all instructions before using this appliance.
2.  This appliance is hot when in use. To avoid burns, do not let bare skin touch hot surfaces.  

If provided, use handles when moving this appliance. Keep combustible materials such as  

furniture, pillows, bedding, papers, clothes and curtains at least 3 ft. (914 mm) from the front  

of this appliance and keep them away from the sides and rear.

3.    

CAUTION: Extreme caution is necessary when any heater is used by or near 


 children or invalids and whenever the heater is left operating unattended.

4.  If possible always unplug this appliance when not in use.
5.  Do not operate any heater with a damaged cord or plug or after the appliance malfunctions, 

has been dropped or damaged in any manner.

6.  Any repairs to this appliance should be carried out by a qualified service person.
7.  Under no circumstances should this appliance be modified. Parts having to be removed for 

servicing must be replaced prior to operating this appliance again.

8.  Do not use outdoors.
9.  This item is not intended for use in bathrooms, laundry areas and similar indoor locations.Never 

place this appliance where it may fall into a bathtub or other water container.

10.  Do not use this item in elevated locations, such as on shelves, raised platforms, etc.
11.  Do not run cord under carpeting. Do not cover cord with throw rugs, runners or the like.  

Arrange cord away from traffic areas and where it will not be tripped over.

12.  To disconnect this appliance, turn controls to the off position, then remove plug from outlet.
13.  Connect to properly grounded outlets only.
14.  This appliance, when installed, must be electrically grounded in accordance with local codes, 

with the current CSA C22.1 Canadian Electrical codes or for USA installations, follow local 

codes and the National Electric Code, ANSI/NFPA No. 70.

15.  Do not insert or allow foreign objects to enter any ventilation or exhaust opening as this may 

cause an electric shock, fire or damage to the appliance.

16.  To prevent possible fire, do not block air intakes or exhaust in any manner. Do not use on soft 

surfaces, like a bed, where openings may become blocked.

17.  This appliance has hot and arcing or sparking parts inside. Do not use it in areas where  

gasoline, paint or flammable liquids are used or stored. This appliance should not be used as  

a drying rack for clothing, nor should Christmas stockings or decorations be hung on or near it.

18.  Use this appliance only as described in this manual. Any other use not recommended by the 

manufacturer may cause fire, electric shock or injury to persons.

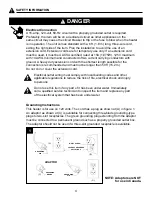
19.  Always plug heaters directly into a wall outlet/receptacle. Never use with an extension cord or 

relocatable power tap (outlet/power strip) because of the risk of overheating the cord and the 

risk of fire. Extension cords are for temporary use only. If an extension cord must be used, it  

must be UL/CSA certified, rated at 15A (1,875W), 125V maximum with 14 AWG minimum  

and constructed of two current carrying conductors with ground. A heavy duty extension cord  

with the shortest length possible for the connection is recommended and must not be longer 

than 50 ft. (15.2 m). Do not coil or cover the extension cord.

20.  Do not use this item with missing, damaged, or broken legs.

SAFETY INFORMATION 

SAVE THESE INSTRUCTIONS 


Summary of Contents for ES-323-10

Page 1: ...R LOSS OF LIFE IMPORTANT INSTRUCTIONS PLEASE READ THIS MANUAL BEFORE INSTALLING AND USING APPLIANCE Francais p 15 ATTACH YOUR RECEIPT HERE Serial Number ________________________________ Purchase Date...

Page 2: ...oid the warranty TABLE OF CONTENTS Safety Information 3 Package Contents 6 Hardware Contents 6 Stove Dimensions 7 Preparation 8 Assembly Instructions 8 Operating Instructions 9 Care and Maintenance 10...

Page 3: ...e off position then remove plug from outlet 13 Connect to properly grounded outlets only 14 This appliance when installed must be electrically grounded in accordance with local codes with the current...

Page 4: ...d A heavy duty extension cord with the shortest length possible for the connection is recommended and must not be longer than 50 ft 15 2 m Do not coil or cover the extension cord Electrical outlet wir...

Page 5: ...6 mm Floor 0 in 0 mm Top 36 in 914 mm Front 36 in 914 mm Rear 0 in 0 mm WARNING Stove is heavy and should be assembled near its desired location It is recommended that two people move the assembled s...

Page 6: ...6 PACKAGE CONTENTS A A Electric Stove 1 B Leg 4 PART DESCRIPTION QUANTITY B HARDWARE CONTENTS shown actual size Screw Qty 8 AA...

Page 7: ...7 Stove Dimensions TECHNICAL SPECIFICATIONS Voltage 120V AC Frequency 60Hz Amps 12 5A Rating 1500W 11 in 27 94 cm 23 in 58 42 cm 20 in 50 8 cm...

Page 8: ...es Tools Required for Assembly not included Phillips screwdriver PREPARATION 1 ASSEMBLY INSTRUCTIONS Hardware Used 1 Lay stove A upside down on a padded surface with the underside accessible Attach le...

Page 9: ...d out let see Safety Information Flame Effect Toggle POWER I 0 switch ON The POWER indicator light will glow Flame effect will be visible through the front mesh Heat Low With the POWER I 0 switch ON t...

Page 10: ...eated by two 40 watt light bulbs with an E 12 small socket base Use only this type of light bulb If the flame effect does not work the bulbs may have come loose or been damaged during shipping WARNING...

Page 11: ...lacing any electrical component or wiring the original wire routing color coding and securing locations must be followed DANGER Any electrical repairs or rewiring of this unit should be carried out by...

Page 12: ...Defective heater switch 3 Defective heater assembly 4 Loose wiring 5 Dirty or clogged vents 1 Make sure the stove is plugged in to a standard 120 volt outlet 2 Check additional appliances on the circ...

Page 13: ...red by this warranty nor shall the manufacturer assume responsibility for same Further the manufacturer will not be responsible for any incidental indirect or consequential damages except as provided...

Page 14: ...EFES323006ST 7 Bottom Panel EFES323007ST 8 Access Panel EFES323008ST 9 Flame Reflector EFES323009ST 10 Door Mesh EFES323010ST 11 Door EFES323011ST Some parts and specifications may change without not...

Page 15: ...PR SENT MANUEL POUR PR VENIR LES CHOCS LECTRIQUES LES INCENDIES LES DOMMAGES AINSI QUE LES BLESSURES GRAVES OU MORTELLES CONSIGNES IMPORTANTES VEUILLEZ LIRE CE MANUEL AVANT D INSTALLER OU D UTILISER L...

Page 16: ...arantie Table de mati res Consignes de s curit 31 Contenu de l emballage 27 Quincaillerie incluse 34 Dimension du foyer 35 Pr paration 36 Instructions pour l assemblage 36 Directives d utilisation 37...

Page 17: ...tirez la fiche de la prise 13 Branchez le cordon uniquement une prise correctement mise la terre 14 Lors de l installation veillez ce que le foyer soit mis la terre conform ment aux codes locaux la pl...

Page 18: ...deux conducteurs de courant et d une mise la terre Nous vous recommandons d utiliser une rallonge aussi courte que possible d au plus 15 2 m 50 pi N enroulez pas la rallonge et ne la couvrez pas Le c...

Page 19: ...in 0 mm Dessus 36 in 914 mm Avant 36 in 914 mm Arri re 0 in 0 mm AVERTISSEMENT Comme le foyer est lourd nous vous recommandons de l assembler pr s de l endroit o vous souhaitez l installer Nous vous...

Page 20: ...20 A Foyer lectrique 1 B Pied 4 Contenu de l emballage A PI CE DESCRIPTION QUANTIT B QUINCAILLERIE INCLUSE grandeur r elle illustr e Vis Quantit 8 AA...

Page 21: ...21 DIMENSION DU FOYER Fiche technique Tension 120V AC Fr quence 60Hz Intensit 12 5A Puissance Nominale du Radiateur 1500W 11 in 27 94 cm 23 in 58 42 cm 20 in 50 8 cm...

Page 22: ...res pour l assemblage non inclus tournevis cruciforme PR PARATION 1 INSTRUCTIONS POUR L ASSEMBLAGE Quincaillerie utilis e 1 D posez le foyer A l envers sur une surface matelass e de mani re ce que le...

Page 23: ...de 120 Volts 15 AMP lisez les mesures de pr caution la page 25 et 26 Les flammes Mettez L INTERRUPTEUR I 0 MARCHE Le voyant de mise en MARCHE s allumera Les flammes seront visibles travers la vitre C...

Page 24: ...t un technicien qualifi V rification et remplacement d ampoule Les deux ampoules de 40 Watts petit culot E 12 activent les flammes artificielles Il faut seulement utiliser ce type d ampoule Il se peut...

Page 25: ...ou dans le cas des installations aux U au code national de l lectricit ANSI NFPA N 70 En cas de r paration ou de remplacement d un composant ou d un c ble lectrique respectez l acheminement des c bles...

Page 26: ...desserr 5 vents sale ou bouch 1 Assurez vous que le foyer est branch dans une prise standard de 120 V 2 V rifiez si d autres appareils sont ali ment s par le m me circuit Id alement le foyer devrait...

Page 27: ...d autres frais connexes d coulant des pi ces d fectueuses de la r paration du remplacement ou d une intervention du m me type ne sont pas couverts pas la pr sente garantie et l entreprise n assume au...

Page 28: ...S323006ST 7 Panneau inf rieur EFES323007ST 8 Panneau d acc s EFES323008ST 9 R flecteur de flamme EFES323009ST 10 Grille pour porte EFES323010ST 11 Porte EFES323011ST Certaines pi ces et caract ristiqu...

Page 29: ...ntes de volver a la tienda comun quese con nuestro departamento de Servicio al Cliente llamando al 877 888 8225 de 8 a m a 8 p m hora central est ndar de lunes a viernes C US ADJUNTE SU RECIBO AQU N m...

Page 30: ...a ndice Informaci n de seguridad 17 Contenido del paquete 20 Aditamentos 20 Dimensiones de la chimenea 21 Preparaci n 22 Instrucciones de ensamblaje 22 Instrucciones de operaci n 23 Cuidado y mantenim...

Page 31: ...agado y luego retire el enchufe del tomacorriente 13 Conecte s lo a tomacorrientes con la debida puesta a tierra 14 Cuando est instalado este electrodom stico se debe poner a tierra seg n los c digos...

Page 32: ...corriente con puesta a tierra Se recomienda una extensi n el ctrica para trabajo pesado de la menor longitud posible para la conexi n que no sobrepase los 15 24 m 50 pies No enrolle ni cubra la extens...

Page 33: ...Piso 0 in 0 mm Parte superior 36 in 914 mm Parte delantera 36 in 914 mm Trasero 0 in 0 mm CUIDADO La estufa es pesada y debe ensam blarse cerca de su ubicaci n deseada Se recomienda que dos personas...

Page 34: ...34 CONTENIDO DEL PAQUETE A A Estufa el ctrica 1 B Pata 4 PIEZA DESCRIPCI N CANTIDAD B ADITAMENTOS Se muestra en tama o real Tornillo Cantidad 8 AA...

Page 35: ...35 DIMENSIONES DE LA CHIMENEA Especificaciones t cnicas Voltaje 120V AC Frecuencia 60Hz Amperaje 12 5A Potencia de Servicio del Calentador 1500W 11 in 27 94 cm 23 in 58 42 cm 20 in 50 8 cm...

Page 36: ...se incluyen Destornillador Phillips PREPARACI N 1 INSTRUCCIONES DE ENSAMBLAJE Aditamentos utilizados 1 Coloque la estufa A de manera invertida sobre una superficie acolchada con el lado inferior acce...

Page 37: ...guridad en las paginas 14 15 y 16 Effecto de la llama Ponga el boton de encendido I 0 power en ON La luz del indicador del boton de encendido se encendera El efecto de llamas sera visible a traves del...

Page 38: ...l efecto de la llama no funciona los pueden estar flojos o da ados durante el transporte CUIDADO Los focos se calientan durante el uso Espere por lo menos 10 minutos para que los focos se enfrien ante...

Page 39: ...y para las instalaciones en EE UU de acuerdo con el c digo nacional de electricidad ANSI NFPA No 70 Si se repara o reemplaza cualquier componente el ctrico o cableado se deben seguir las rutas origin...

Page 40: ...ntilaci n sucio u obstruido 1 Ventilador defectuoso 2 Asamblaje de la estufa defectuoso 1 Aseg rese de que la chimenea est enchufada a un tomacorriente est ndar de 120 V 2 Compruebe si hay otros elect...

Page 41: ...reembolsando el precio al por mayor de la pieza defectuosa 5 Esta garant a no cubrir ning n costo de instalaci n mano de obra construcci n transporte o de otro tipo que surja de la pieza defectuosa su...

Page 42: ...nferior EFES323007ST 8 Panel de acceso EFES323008ST 9 Reflector de llamas EFES323009ST 10 Malla de la puerta EFES323010ST 11 Puerta EFES323011ST Algunas piezas y especificaciones est n sujetas a cambi...

Reviews: