Style selections 1260936 Manual Download Page 5


PROPANE (LP) DANGERS AND WARNINGS


LP GAS

LP gas is flammable and hazardous if handled improperly. Become aware of the characteristics before using any LP gas product.

Propane Characteristics:

• Flammable, explosive under pressure, heavier than air and set

tles in pools in low areas.

• The LP gas supply tank must be constructed and marked in a

cco

rdance with the Specifications for LP gas tanks of the U.S. 

n (DOT) or the National standard of Canada, CAN/CSA-B339, LP ga

s

 tanks, Spheres and 

es for the Transportation 

of Dangerous Goods.

• LP gas tank must be arranged for vapor withdrawal.
• The LP gas tank must have a listed overfilling prevention device (OPD) and a QCCI or Type I (CGA810) LP gas tank connection.

Department of Transportatio

Tub

• The LP gas tank must have a tank collar to protect the tank valve.

• Never use an LP gas tank with a damaged body, valve, coll

ar

,

 or footing. Dented or rusted LP 

gas tanks may be hazardous 

 supplier prior to use.

• The LP gas tank should not be dropped or handled roughly.
• Tanks must be stored outdoors out of the reach of children. Do NOT store in a building, garage, or any other enclosed area.
• Never store your LP gas tank where temperatures can reach 

o

ve r 125°F.

• Do not store the LP gas cylinder in direct sunlight or near a

 source of heat or combustion.

• Never keep a filled LP gas tank in a hot car or car trunk. Hea

t will cause the gas pressure to 

increase, which may open the 

pe.

• Place dust cap on valve outlet whenever the LP gas tank is 

not in use. Only install the type of 

dust cap on the LP gas tank 

the LP gas tank valve. Other types of caps or plugs may result in leakage

 of propane.

      a. Do not store a spare LP gas cylinder under or near this appliance.

      b. Never fill the LP gas cylinder beyond 80% full.
      c. If the information in (a) and (b) is not followed exactly, a fire causing death or serious

          injury may occur.

• LP gas cylinders should be filled only by a certified LP gas de

aler.

• The pressure regulator is set for 11 inches of water column ( pressure).

• Never attempt to attach this appliance to the self-contained LP gas system of a camper trailer, 

motor home or house.

• Always use the pressure regulator and hose assembly provi

ded with the appliance to connect 

to a LP gas cylinder. Never 

.       For technical support  contact Lowes at 1-877-888-8225.

• Hand turn the manual gas control valve. Never use tools. If the valve will not turn by hand, do 

not try to repair it. Call a 

f force or any self attempted repair 

may result in a fire or explosion.

Connecting your gas cylinder:

  Before connection, be sure that there is no debris caught in the head of the gas cylinder, head of the regulator valve or in the 

ports. Connect regulator valve and hand-tighten fi

rmly. Disconnect the propane cylinder from 

the regulator valve when the fire table is not in use. DO NOT obstruct the 

flow of combustion 

air and ventilation air to the 

burner.

LP

 gas cylinder must contain a shut-o

f

f valve as specified in the standard for compressed gas cylinder valve outlet and inlet

and inlet connection,


ANSI/CGA-

V

-1-1977, CSA B96.

and should be checked by your LP gas

relief valve and allow gas to esca

valve outlet that is provided with 

connect to an unregulated LP gas supply.

Certified Gas Technician. The use o

head of the burner and burner 

LP GAS WARNINGS:

• Cylinders must be stored outdoors in a well-ventilated area o

ut of reach of children.

• Disconnected cylinders must have threaded valve plugs tig

htly installed and must not be 

stored in a building, garage or any 

• Never use a propane cylinder with a damaged body, valve, c

ollar or footing.

• Dented or rusted propane cylinders may be hazardous and s

houl

d be checked by your 

propane gas supplier.

• Be sure to use only one 20 lb (9.1 kg) LP gas cylinder with a  Type 1 valve with this appliance as required by the American 

Steering Committee.

• Only tanks marked “propane” may be used.

other enclosed area.

National Standards Institute (ANSI) and the Canadian Stand

ards 

• In its natural state, propane has no odor. For your safety, a

n odorant has been added.

• Contact with propane could burn your skin.

• Propane is extremely flammable and hazardous if handled i

mproperly.


• 

The maximum inlet propane gas pressure for this outdoor fire table is 250 psi.  


• 

The minimum inlet propane gas pressure for this outdoor fire table is 25 psi.


• 

The maximum inlet natural gas pressure for this outdoor fire table is 10.5 inch w

.c.


• 

The minimum inlet natural gas for this outdoor fire table is 3.5 inch w

.c.

5

Summary of Contents for 1260936

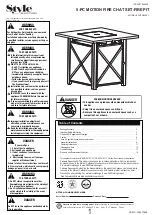
Page 1: ...y of this or any other appliance 2 An LP cylinder not connected for use shall not be stored in the vicinity of this or any other appliance 4 After leaving the area call your gas supplier or fire depar...

Page 2: ...se Polyester Cover Bottom Bowl Burner Ring Pilot Housing Manual Electric Igniter Control Knob Regulator Hose Assembly 1 1 1 1 1 1 1 1 1 1 1 1 1 1 1 1 1 2 3 4 5 6 7 8 9 11 12 13 14 15 16 Side Panel D L...

Page 3: ...e reference If you are assembling this unit for someone else give this manual to him or her to read and keep for future reference This gas fire table must be used ONLY outdoors in a well ventilated sp...

Page 4: ...cceptable for this purpose the re table and to replace any part or control system DO NOT use in windy conditions Keep all electrical cords away from a hot outdoor fire table Certain areas of this outd...

Page 5: ...e pressure regulator and hose assembly provided with the appliance to connect to a LP gas cylinder Never For technical support contact Lowes at 1 877 888 8225 Hand turn the manual gas control valve Ne...

Page 6: ...done when outdoor fireplace is cool and with the fuel supply disconnected 2 Do not clean any outdoor fireplace part in a self cleaning oven the extreme heat will damage the finish 3 Do not enlarge va...

Page 7: ...not use tools to tighten the CGA No 791 connection nut onto the LP gas cylinder service valve Hand tighten only 5 Be careful to not cross the threads on the connection when tightening the CGA No 791...

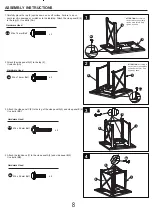
Page 8: ...ENTION Assembly is easiest when you partially tighten bolts at first Only tighten by hand 2 Attach the side panel A 3 to the top 2 Use bolts AA 3 3 Attach the side panel C 5 to the leg of the side pan...

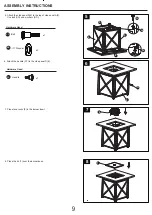
Page 9: ...de panel A 3 Use bolt CC and washers DD 5 6 Attach the handle FF to the side panel D 6 17 Washer DD 7 7 Place lava rocks 9 in the burner bowl 6 CC Bolt Hardware Used x 1 x 2 3 4 5 6 CC DD DD 8 8 Place...

Page 10: ...and twist the button cover on to igniter housing Do not overtighten 9 10 10 Place the polyester cover 8 in the burner bowl after finishing use 8 WARNING Batteries may contain mercury Do not put batter...

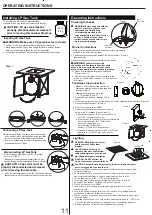
Page 11: ...Figure 4 5 Close the firepit door panel Figure 5 6 Turn LP gas tank valve to OPEN 7 Spoon several drops of solution or use a squirt bottle at all X locations Figures 1 and 2 Operating Instructions Fig...

Page 12: ...nd liquids 2 Do not obstruct the flow of the combustion of LP gas and the ventilation of air 3 Keep the ventilation opening s of the LP gas tank area free and clear from debris 4 Visually check the bu...

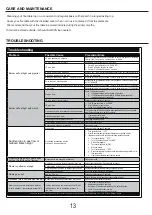
Page 13: ...hose Disengagement of burner to valve Re engage burner and valve Spider webs or insect nest in burner venturi tube Clean burner venturi tube Burner ports clogged or blocked Clean burner ports Sudden...

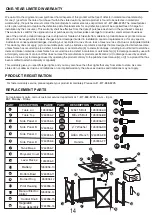
Page 14: ...ee of charge for installation by the consumer This warranty shall be effective from the date of purchase as shown in the purchaser s receipt This warranty is valid for the original end user purchaser...

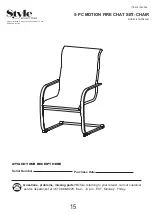
Page 15: ...ing parts Before returning to your retailer call our customer service department at 1 877 888 8225 8 a m 8 p m EST Monday Friday ATTACH YOUR RECEIPT HERE Serial Number Purchase Date FHTS80021 MODEL St...

Page 16: ...6 CHAIR OF CONTENTS Package Contents 17 Hardware Contents 18 Safety Information 18 Preparation 18 Assembly or Installation Instructions 19 Care and Maintenance 20 Warranty 20 Replacement Parts List 20...

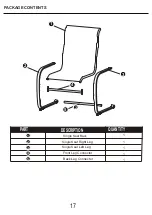
Page 17: ...17 PACKAGE CONTENTS 1 1 1 Front Leg Connector Single Seat Left Leg 1 1 Back Leg Connector PART ESCRIPTION D QUANTITY Single Seat Right Leg 1 2 3 4 5 Single Seat Back 2 1 2 3 4 5...

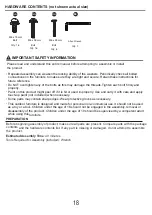
Page 18: ...se and carry it with care and apply touch up paint not included when necessary Some parts may contain sharp edges Wear protective gloves as necessary This outdoor furniture is designed and made for pe...

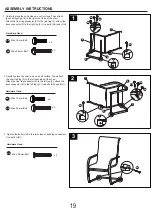
Page 19: ...ack leg connectors Use bolts HH M6 x 15 mm Bolt AA Hardware Used M6 x 25 mm Bolt HH Hardware Used x 2 x 2 ASSEMBLY INSTRUCTIONS Hardware Used M6 x 15 mm Bolt AA x 2 M6 x 35 mm Bolt GG x 2 Carefully pl...

Page 20: ...embling or disassembling the product Exclusions Items used for commercial contract or other non residential purposes or items damaged due to acts of nature vandalism misuse or improper assembly are no...

Page 21: ...e ne doit tre rang e proximit de l appareil ou de tout autre appareil 4 Une fois que vous avez quitt le lieu communiquez avec votre fournisseur de gaz ou les pompiers Tout manquement suivre ces instru...

Page 22: ...Anneau du br leur Bo tier de la veilleuse Bouton d allumage Bouton de commande Ensemble de r gulateur 1 1 1 1 1 1 1 1 1 1 1 1 1 1 1 1 1 2 3 4 5 6 7 8 9 11 12 13 14 15 16 Panneau lat ral D Pierres de l...

Page 23: ...cendie Veuillez conserver les pr sentes instructions pour vous y r f rer ult rieurement Si vous assemblez l appareil pour une autre personne remettez lui le guide pour qu elle puisse le consulter ult...

Page 24: ...ant d utiliser la table avec foyer au gaz int gr L ensemble de tuyau peut seulement tre remplac par un ensemble de tuyau pr cis par le fabricant Veuillez communiquer avec Creative Outdoor Solutions en...

Page 25: ...ravane d une caravane motoris e ou d une r sidence Utilisez toujours le r gulateur de pression et l ensemble de tuyau inclus avec l appareil pour le relier une bouteille de GPL Ne reliez jamais l appa...

Page 26: ...urs tre effectu s une fois que le foyer ext rieur est refroidi et que l alimentation en gaz a t coup e 2 Ne nettoyez pas les pi ces du foyer ext rieur dans un four autonettoyant la chaleur extr me end...

Page 27: ...icant b V rifiez le joint d tanch it l int rieur du robinet de service CGA no 791 sur la bouteille de GPL lorsque vous remplacez la bouteille ou au moins une fois par ann e S il y a quelconque signe d...

Page 28: ...us facile lorsque vous serrez partiellement les boulons en premier Serrez seulement la main 2 Fixez le panneau lat ral A 3 au plateau 2 Utilisez les boulons AA 3 3 Fixez le panneau lat ral C 5 aux pie...

Page 29: ...oulon CC et les rondelles DD 5 6 Fixez la poign e FF au panneau lat ral D 6 Rondelles 17 DD 7 7 Placez les pierres de lave 9 dans la cuvette du br leur 6 CC Boulon Quincaillerie Utilis e x 1 x 2 3 4 5...

Page 30: ...allumeur en le tournant vitez de serrer excessivement 9 10 10 Placez la housse en polyester 8 sur la cuvette du br leur lorsque vous avez termin d utiliser le foyer 8 AVERTISSEMENT Les piles peuvent...

Page 31: ...et 2 Instructions pour op ration Figure 1 Figure 2 20 lb 9 Kg 17 9 in 45 5 cm 12 2 in 31 cm tape 1 D branchement de la bouteille de GPL Raccord de la bouteille de GPL 31 a Si des bulles se forment to...

Page 32: ...ion du GPL et de ventilation d air 3 Enlevez tout d bris obstruant les orifices d a ration entourant la bouteille de GPL 4 Examinez visuellement les flammes du br leur pour vous assurer que votre foye...

Page 33: ...fin de le prot ger contre les intemp ries Nous vous conseillons d entreposer votre foyer ext rieur l int rieur pendant les mois d hiver Il sera prot g contre les fissures occasionn es par le froid ext...

Page 34: ...mmages caus s par l utilisation d un composant d un tiers ou d un produit qui ne satisfait pas aux caract ristiques techniques du produit pr cis es par le fabricant d les dommages caus s par un accide...

Page 35: ...pi ces manquantes Avant de retourner l article au d taillant appelez notre service la client le au 1 877 888 8225 entre 8 h et 20 h EST du lundi au vendredi JOIGNEZ VOTRE RE U ICI Num ro de s rie Dat...

Page 36: ...e des mati res Contenu de l emballage 37 Quincaillerie incluse 38 Consignes de s curit 38 Pr paration 38 Instructions de montage ou d installation 39 Entretien 40 Garantie 40 Liste des pi ces de recha...

Page 37: ...LAGE 1 1 1 Tige de raccord des pattes avant Patte gauche de si ge une place 1 1 Tige de raccord des pattes arri re PI CE DESCRIPTION Quantit Patte droite de si ge une place 1 2 3 4 5 Dossier de si ge...

Page 38: ...le produit avec soin et appliquez y de la peinture non incluse pour les retouches lorsque cela est n cessaire Certaines pi ces peuvent avoir de bords coupants Au besoin portez des gants protecteurs C...

Page 39: ...Utilisez les boulons HH Boulon M6 de 15 mm AA Quincaillerie Utilis e Boulon M6 de 25 mm HH Quincaillerie Utilis e x 2 x 2 INSTRUCTIONS POUR L ASSEMBLAGE Quincaillerie Utilis e Boulon M6 de 15 mm AA x...

Page 40: ...Exclusions les articles utilis s des fins commerciales locatives ou non r sidentielles et les articles endommag s par des ph nom nes naturels des actes de vandalisme un usage inappropri ou un assembla...

Reviews: