background image

How to configure and to install the Xcom-LAN

©

 Studer Innot

ec S

A - v

er

sion 1.2.1_EN

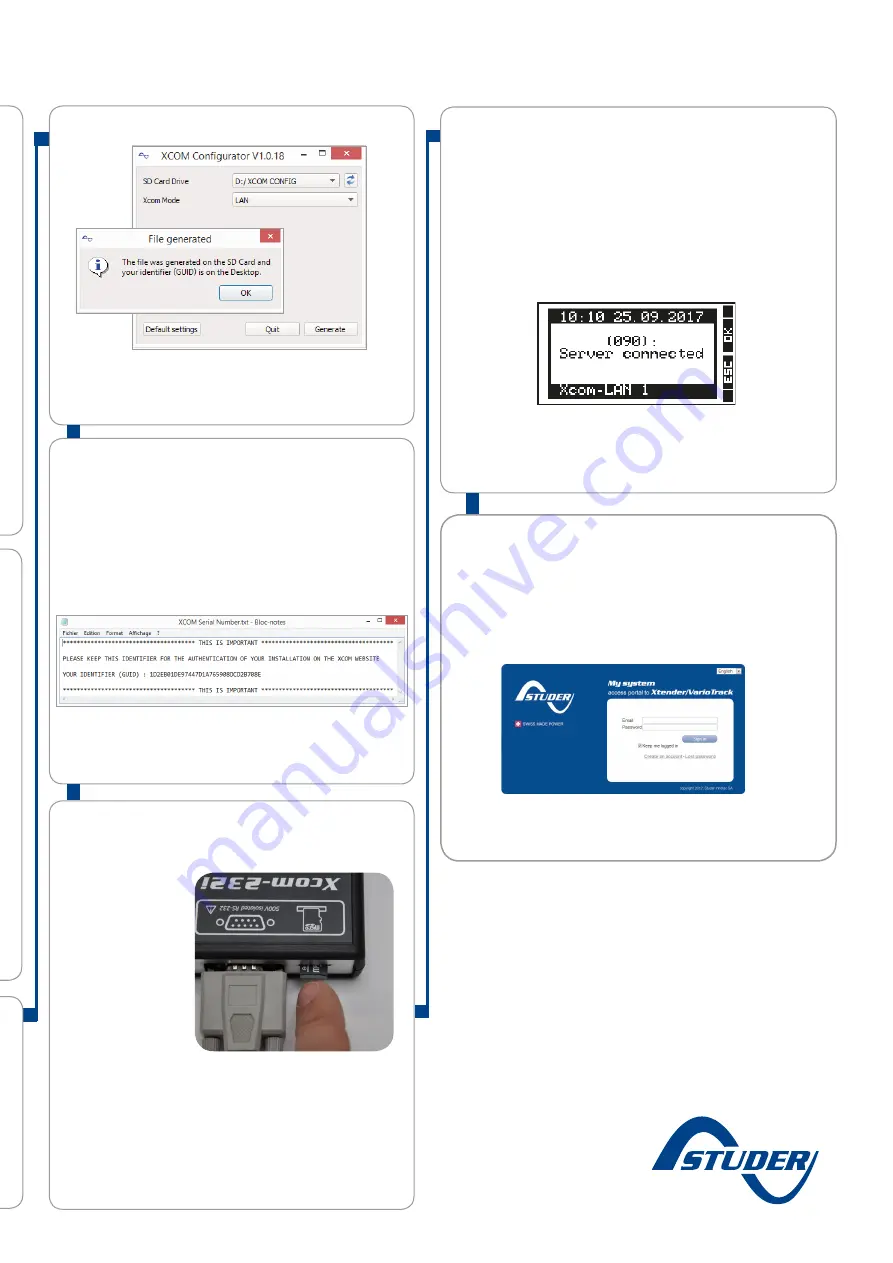
Insert the Micro SD card into the Xcom-232i

Xcom connects to the server

Remove the SD card 

from the PC and insert 

it into the Xcom-232i. 

The setup process will 

start automatically 

and normally takes 1 

second. 

When the LED stops 

blinking red, the setup 

is finished.

ATTENTION! 

The Xcom-232i needs to be powered during the setup pro-

cess. Otherwise, the configuration will not be taken into 

account.

After the parameters are set and applied, the Xcom–LAN 

will automatically connect to the server and send a con

-

firmation message to the RCC. If there is no message, the 

Xcom is not connected to the server. Use the FAQ of this 

Quick guide to see what could have gone wrong.

10.

11.

It is very important to set the terminations correctly for the functionning of the system. 

With one device in the system the termination on the Studer device should be put to T as in "Termi

-

nated". With more than one device in the system all Studer devices should be put to O as in "Open" 

apart from the devices at the end of the communication chain. These devices should be put to T 

as in "Terminated".

The termination switch next to the two RJ45 connectors on the Xcom-232i must be set in position T.

Run the Xcom-configurator

8.

Choose "LAN" as Xcom mode. No other parameters are re

-

quired. The gateway is already configured. Press "Generate" 

to save the parameter settings. A window will automatically 

confirm the successful file generation.

Take note of your GUID file

Close the message box and a text file with your identifier 

(GUID) will appear. This file is saved on your "Desktop" or in 

"My documents". The unique identifier (GUID) is required to 

link your installation with your account on the Xcom portal. 

Keep it safe.

9.

The Xcom-LAN is successfully 


installed!


Register the installation at: https://xcom.studer-innotec.com in 

order to control it remotely with the Xcom-LAN.

Summary of Contents for Xcom-LAN

Page 1: ...Remote communication set for Xtender systems Xcom LAN Quickguide Copyright Studer Innotec SA V 1 2 1 4O9E7 ...

Page 2: ...ance between the Xcom 232i and the Studer system should not exceed 10 meters The distance between the Xcom 232i and the Ethernet gateway should not exceed 0 25 m All cables you need are provided in the set ATTENTION The metallic casing of the Ethernet gateway is connected to the negative battery pole Therefore it is necessary to isolate its casing from any metallic surface Wiring Set the terminati...

Page 3: ...here is no message the Xcom is not connected to the server Use the FAQ of this Quick guide to see what could have gone wrong 10 11 i n T T Run the Xcom configurator 8 Choose LAN as Xcom mode No other parameters are re quired The gateway is already configured Press Generate to save the parameter settings A window will automatically confirm the successful file generation Take note of your GUID file ...

Page 4: ...c support in order to replace your set Xcom portal I can t register my new installation What should I do To register a new installation the installa tion needs to be 1 Configured correctly and in accord ance with the user manual 2 Have been connected to the server at least once In order to validate that the installation has been correctly configured the Xcom sys tem info available on the RCC conne...

Page 5: ...a logger If the Xcom 232i detects an error the signalisation LED is continuously red Blinks Ton 10 Toff 90 MicroSD card full If the Xcom 232i detects that the MicroSD card is full the signalisation LED blinks in red with a cyclical ratio of 10 Green Always on Data logging When the data logging function is activated the signalisa tion LED is green Blinks continuously Ton 20 Toff 80 Communication vi...

Page 6: ... one year starting from the date of purchase The updates are no longer guaranteed beyond this date and a hardware upgrade may be required Please contact your reseller for any additional information on compatibility SAFETY PRECAUTIONS Generalities Carefully read all safety instructions before pro ceeding with the installation and commissioning of the device Failure to follow these instructions migh...

Reviews: