background image

Page 6 of 23 


CAUTION


STACKER USE AND CARE 


Do not force the stacker. Products are safer and do a better job when used in the manner for 

which they are designed. Plan your work, and use the correct product for the job. 


Check for damaged parts before each use. Carefully check that the product will operate properly 

and perform its intended function. Replace damaged or worn parts immediately. Never operate the 

product with a damaged part. 


Store the stacker when it is not in use. Store it in a dry, secure place out of the reach of children. 

Inspect the tool for good working condition prior to storage and before re-use. 


Use only accessories that are recommended by the manufacturer for use with your product. 

Accessories that may be suitable for one product may create a risk of injury when used with 

another tool. Never use an accessory that has a lower operating speed or operating pressure than 

the tool itself. 


Keep guards in place and in working order. Never operate the product without the guards in place. 

Specific Operation Warnings 

WARNING


Do not exceed the rated load capacity of 500lbs. 


Do not use to transport people or animals. 


Do not stand under or allow personnel under the load. 


Do not lower the load unless the area below is clear of personnel and obstructions. 


Before moving the load, assure that the load is centered and secured with a load restraining 

device. 


Check work area for overhead obstructions or other possible hazards. 


Do not use a machine with a worn, frayed, kinked or damaged cable. 


Do not use a damaged or malfunctioning machine. 


Do not use a machine with less than 4 wraps of cable on the winch drum when the carriage is fully 

lowered. 

FALL HAZARD 


Do not use as a personnel lifting platform or step. 


Do not stand or sit on forks, load platform, or boom.


Do not climb on machine. 

TIP-OVER HAZARD 


Do not raise load unless leg lock pins have been properly inserted into legs. 


Do not raise load unless the correct length legs are properly installed. 


Do not operate machine unless wheel/leg/caster configuration is properly installed. 

Summary of Contents for 61134

Page 1: ...ch Stacker Owner s Manual WARNING Read carefully and understand all ASSEMBLY AND OPERATION INSTRUCTIONS before operating Failure to follow the safety rules and other basic safety precautions may result in serious personal injury Item 61134 ...

Page 2: ...hat you read the entire manual to become familiar with this product before you begin using it This hand winch stacker is designed for certain applications only Northern Tool and Equipment is not responsible for issues arising from modification or improper use of this product such as an application for which it was not designed We strongly recommend that this product not be modified and or used for...

Page 3: ... Specifications 4 Important Safety Information 4 Specific Operation Warnings 6 Main Parts of Stacker 8 Assembly Instructions 9 Before Each Use 14 Operating Instructions 15 Maintenance 18 Troubleshooting 18 Parts Diagram 19 Parts List 20 Replacement Parts 21 Limited Warranty 22 ...

Page 4: ...ification Load Capacity lb 500 Fork Length in 22 1 2 Overall Dimensions L x W x H in 34 29 64 x 24 x 67 Platform Size L x W in 34 7 8 x 2413 16 Front Wheel Size in 2 5 Rear Wheel Size in 8 Lowered Height in 3 17 32 Raised Height in 71 Outside Fork Width in 24 Fork Width in 20 7 8 Important Safety Information WARNING Read and understand all instructions Failure to follow all instructions may result...

Page 5: ... handle the product Be aware of all power lines electrical circuits water pipes and other mechanical hazards in your work area Some of these hazards may be hidden from your view and may cause personal injury and or property damage if contacted WARNING PERSONAL SAFETY Stay alert watch what you are doing and use common sense when operating the tool Do not use the tool while you are tired or under th...

Page 6: ...in place and in working order Never operate the product without the guards in place Specific Operation Warnings WARNING Do not exceed the rated load capacity of 500lbs Do not use to transport people or animals Do not stand under or allow personnel under the load Do not lower the load unless the area below is clear of personnel and obstructions Before moving the load assure that the load is centere...

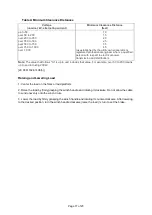
Page 7: ...er potential pinch points Do not place arms hands or fingers through the frame Keep hands and feet clear of the platform when lowering the load ELECTRIC SHOCK HAZARD This machine is not electrically insulated and will not provide protection from contact Maintain safe distances away from electrical power lines and apparatus in accordance with applicable governmental regulations and table A Allow fo...

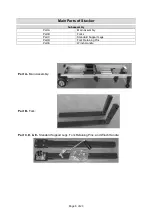
Page 8: ...acker Subassembly Part A Main Assembly Part B Forks Part C Standard Support Legs Part D Fork Retaining Pins Part E Winch Handle Part A Main Assembly Part B Fork Part C D E Standard Support Legs Fork Retaining Pins and Winch Handle ...

Page 9: ...e retaining pegs to allow the legs to slide further into the openings Fig 2 Fig 2 3 Slowly release the pegs You may have to wiggle the leg to get the peg to drop 4 Pull upwards on each of the support legs to ensure that they are held in place by the pegs The legs should not be able to slide out of the opening If a leg comes out of the opening the corresponding peg did not engage properly ...

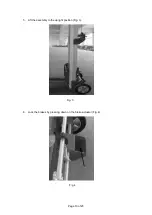
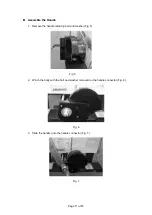
Page 10: ...Page 10 of 23 5 Lift the assembly to the upright position Fig 3 Fig 3 6 Lock the brakes by pressing down on the brake actuator Fig 4 Fig 4 ...

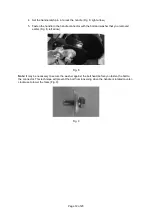
Page 11: ...ssemble the Handle 1 Remove the handle retaining bolt and washer Fig 5 Fig 5 2 Winch the body with the bolt and washer removed on the handle connector Fig 6 Fig 6 3 Slide the handle onto the handle connector Fig 7 Fig 7 ...

Page 12: ...nector with the bolt and washer that you removed earlier Fig 8 left arrow Fig 8 Note It may be necessary to secure the washer against the bolt head before you fasten the bolt to the connector This technique will prevent the bolt from loosening when the handle is rotated counter clockwise to lower the forks Fig 9 Fig 9 ...

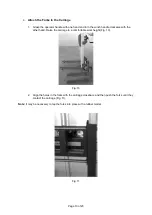
Page 13: ...inch handle clockwise with the other hand Raise the carriage to a comfortable work height Fig 10 Fig 10 2 Align the holes in the forks with the carriage crossbars and then push the forks until they contact the carriage Fig 11 Note It may be necessary to tap the forks into place with a rubber mallet Fig 11 ...

Page 14: ...o lower the forks Lower the forks until they are a few inches above the support legs and then push the stacker to the desired location Before Each Use Performing the Function Test Select a test area that is firm level and free of obstructions 1 Set up a Tilt the machine back b Slide each fork onto the carriage and secure with a fork lock pin c Slide each leg into a base socket until the leg lock p...

Page 15: ...hine Result The wheels should not roll a Pull up on the foot pedal to release the brake b Push the machine Result The machine should move Operating Instructions WARNING Do not exceed the rated load capacity of 500lbs Do not use to transport people or animals Do not stand under or allow personnel under the load Do not lower the load unless the area below is clear of personnel and obstructions Check...

Page 16: ...d to the machine BODILY INJURY HAZARD Do not grasp the cable Keep hands and fingers away from pulleys the carriage and other potential pinch points Do not place arms hands or fingers through the frame Keep hands and feet clear of the platform when lowering the load ELECTRIC SHOCK HAZARD This machine is not electrically insulated and will not provide protection from contact Maintain safe distances ...

Page 17: ... transmission and distribution Note The value that follows to is up to and includes that value For example over 50 to 200 means up to and including 200kV 29 CFR 1926 1408 h Raising and Lowering Load 1 Center the load on the forks or load platform 2 Raise the load by firmly grasping the winch handle and rotating it clockwise Do not allow the cable to wind unevenly onto the winch drum 3 Lower the lo...

Page 18: ...ve the forks and legs and reverse the winch handle Select a safe storage location It should have a firm level surface be weather protected and clear of obstructions and traffic Keep the stacker clean Troubleshooting Use the following table to troubleshoot problems before contacting service personnel or your local dealer If the problem continues after troubleshooting call your local dealer for assi...

Page 19: ...Page 19 of 23 Parts Diagram ...

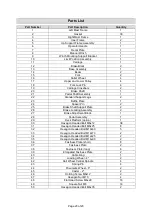
Page 20: ...2 23 Baffle Plate 1 24 Spacer Pin 2 25 Brake Shaft Support Plate 2 26 Brake Locating Assembly 2 27 Brake Adjustment Block 1 28 Pedal Assembly 1 29 Deck Platform option 1 30 Hexagon Headed Bolt M6x12 38 31 Hexagon Headed Bolt M8x25 8 32 Hexagon Headed Bolt M10x60 5 33 Hexagon Headed Bolt M12x70 2 34 Hexagon Headed Bolt M12x25 2 35 Hexagon Headed Bolt M14x90 2 36 Fastness Plate short 8 37 Fastness P...

Page 21: ...ns provided are a convenient reference to the location and position of parts in the assembly sequence When ordering parts the following information will be required item description item model number item serial number item lot date code and the replacement part reference number The distributor reserves the rights to make design changes and improvements to product lines and manuals without notice ...

Page 22: ...y claim contact Us at 1 800 222 5381 identify the product by make and model number and follow the claim instructions that will be provided The product and the purchase receipt must be provided to Us in order to process Your warranty claim Any returned product that is replaced or refunded by Us becomes our property You will be responsible for return shipping costs or costs related to Your return vi...

Page 23: ...Page 23 of 23 Distributed by Northern Tool Equipment Company Inc Burnsville Minnesota 55306 www northerntool com Made in China ...

Reviews:

Related manuals for 61134