PART 1
z
English
32
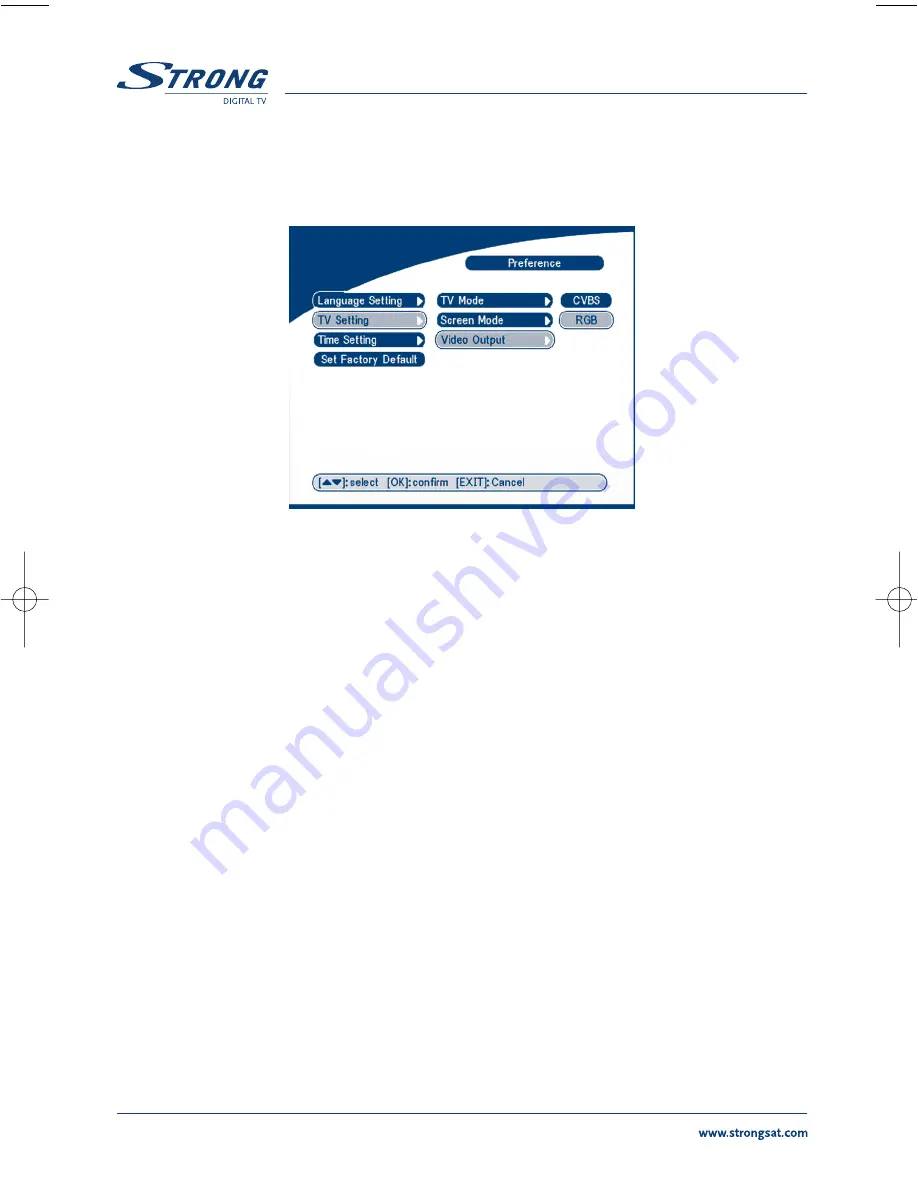
Video output
The Video output Screen will appear as follows:
SCREEN 35
Press
OK/RIGHT
to select CVBS or RGB, press
OK
to confirm.
UM DVB-S English 16/9/05 10:23 AM Page 32
Page 1: ...Picture simulated...
Page 2: ...Digital Audio Amplifier 11 3 3 Connecting to Satellite Dish 11 3 4 Connecting to serial cable for downloading software 13 4 0 Starting up 14 5 0 Main Menu 18 5 1 Channel Organiser 19 5 2 Installation...
Page 3: ...he receiver is not used for a long period of time you should unplug the power cord from the wall socket Do not use a damaged power cord It may cause a fire or an electrical shock Do not touch a power...
Page 4: ...multi lingual DVB subtitling and audio track support Multi lingual support on screen menu OSD English German French Italian Spanish Turkish Bulgarian Czech Edit functions for TV or Radio programme nam...
Page 5: ...ll through the ventilation slots because this could cause fire or an electric shock Wait a few seconds after switching off the receiver before you move the receiver or discon nect any equipment Please...
Page 6: ...e sure that the SCART cable connections are well shielded Make sure that the outdoor components of the antenna are in good condition 2 0 Your Receiver 2 1 Front Panel FIGURE 1 Front Panel 1 Mode indic...
Page 7: ...o TV Radio Mode N V V Use to increase or decrease the receiver volume level O P P Page up and down in menu list FIGURE 2 Remote Control Unit C AV Toggle between TV and AV mode D 0 9 Changes channel an...
Page 8: ...e list of available audio languages for the channel you are watching In addition it sets the current channel audio to stereo z left mono z or right mono z S EDIT Program edit T SAT Switch the satellit...
Page 9: ...g a scart cable Your video signal will now be looped through your receiver to your TV set 5 RS 232 Serial Port This serial port can be used to connect your PC with your receiver to download new versio...
Page 10: ...n your TV set FIGURE 4 Basic connection with a Scart cable Advanced connection of the receiver to the TV set and VCR 1 Connect the satellite signal from the LNB to the LNB IN connector 2 Connect the T...
Page 11: ...nd the other end directly to the LNB IN connector of your receiver FIGURE 7 Connecting a fixed satellite dish to your receiver Connecting multiple fixed dishes to your receiver using a DiSEqC 1 0 swit...
Page 12: ...ounting a dish to a motorized DiSEqC 1 2 positioner Have your dealer mount the dish to the positioner set the correct angle of the elevation and let him set the center point for your positioner Connec...
Page 13: ...r to the Serial port of your computer using a serial cable 2 Instructions how to download software can be found on our website www strongsat com support download However this receiver can download new...
Page 14: ...ll outlet Turn on the receiver The following picture is shown the first time you switch on the receiver It is recommended that you perform the first time installation following the Installation Wizard...
Page 15: ...button on your remote control Below screen will appear SCREEN 3 Follow instruction written on screen When you have fixed your dish at correct direction choose NEXT and press the OK button The channel...
Page 16: ...and control Polarisation control DiSEqC Switch and Antenna mode SCREEN 5 2a If you have a fixed dish then set Antenna mode to Fixed select NEXT and press the OK button The Adjust antenna screen as sho...
Page 17: ...l appear as shown on screen 7 SCREEN 7 You should select transponder receivable at your location choose Transponder field and select transponder by pressing LEFT RIGHT button Then choose field Move Di...
Page 18: ...ion automatically and exit to the normal play state 5 0 Main Menu All the important settings and features of your receiver can be operated in Main Menu The Main Menu consists of five sub menus which a...
Page 19: ...er and then press OK to enter the Channel Organiser menu SCREEN 10 The Channel Organiser menu consists of two sub menus Channel Manager and Favorites Manager 5 1 1 Channel Manager In this menu you can...
Page 20: ...a z name z a Free CA Fav NO Fav or Default type SCREEN 12 Edit YELLOW button Select the channel that you wish to edit press the YELLOW Edit button to move into the modify pro gram menu SCREEN 13 In th...
Page 21: ...he program name dialog will shown as below SCREEN 14 Use the LEFT RIGHT button to move the cursor to the character you wish to edit Use the UP DOWN button to change character scroll alphabet If you wi...
Page 22: ...s move the channel to its new location and press the OK button to confirm the new location Repeat this for every channel that you want to move Delete channel SCREEN 16 Press the UP DOWN keys to point...
Page 23: ...ys to point the focus to the favorite group Press the OK button to add the selected channel to the Favorite group To remove the channel from the favorite group repeat same operation SCREEN 17 5 2 Inst...
Page 24: ...delete a satellite in this menu SCREEN 19 Add satellite If you want add a new satellite press the RED key in this menu a satellite list will appear on the screen Press RIGHT LEFT to select the satell...
Page 25: ...u must set the parameters of the satellite such as LNB type LNB low Freq LNB High Freq Transponder LNB Power 22 k Tone DiSEqC and Motor Position SCREEN 21 Delete satellite If you want to delete a sate...
Page 26: ...GREEN key to set the scan mode to Free or Free CA Press the YELLOW Key to set the Blind Scan to ON or OFF Press the BLUE Key to set the scan type to NIT OFF or NIT ON When the set up is completed pres...
Page 27: ...tch satellites with the RED button SCREEN 25 Add Transponder In this menu you can add a new transponder to the system Press the GREEN button the Add Transponder sub menu will appear on screen SCREEN 2...
Page 28: ...nder sub menu will appear on screen SCREEN 27 Delete Transponder Press the BLUE button to delete a transponder The warning massage will be shown as below SCREEN 28 Press LEFT RIGHT to select OK press...
Page 29: ...PART 1 z English 29 5 3 System setting In this menu you can configure the systems such as language Setting OSD style Parental Control TV Settings and Time Setting SCREEN 29 5 3 1 Preference SCREEN 30...
Page 30: ...f the OSD and Audio Press UP DOWN to select the OSD language or Audio language Press OK RIGHT to enter the language list and Press UP DOWN to select the language Press OK to confirm SCREEN 31 5 3 1 2...
Page 31: ...follows SCREEN 33 Press OK RIGHT to select PAL or NTSC press OK to confirm If you don t know which standard your TV has please select AUTO Screen mode The TV format Screen will appear as follows SCREE...
Page 32: ...PART 1 z English 32 Video output The Video output Screen will appear as follows SCREEN 35 Press OK RIGHT to select CVBS or RGB press OK to confirm...
Page 33: ...OFF Set Data and Set Time item are displayed To set the time value manually move the cursor to the time item and use the numeric buttons on the remote control SCREEN 36 5 3 1 4 Set Factory Default Ple...
Page 34: ...receiver will return to its factory default state and all user data will be deleted Note Your PIN code will change back to the factory setting 0000 5 3 2 OSD Style In this menu you can set the Menu Co...
Page 35: ...EN 39 Channel Lock Set the system channel lock to ON or OFF If the channel lock is on the user has to enter the parental PIN code correctly before watching the locked channel SCREEN 40 Menu Lock Press...
Page 36: ...l PIN code correctly before watching the locked channel SCREEN 41 Use the UP DOWN keys to select the channel you want to lock Press the OK button to lock the channel Change PIN Modifying the PIN You m...
Page 37: ...u will copy software and keep slave STB off Navigate in the menu of master STB and select System Update STB to STB c When the status displays Detecting slave STB power on slave STB after the master ST...
Page 38: ...ications Hyper terminal Then choose COM1 or COM2 according to which port you are using in the computer and port setting as follows Bits per Second 115200 Data bits 8 Parity None Stop bits 1 Flow Contr...
Page 39: ...date and time displays the chan nel and then switches off at the designated date and time The value set at the end time Power Off The receiver powers off at the designated date and time Cycle You can...
Page 40: ...nu user can select the game item and press OK to play the game Or you can press the GAME key in normal play state into the game menu directly SCREEN 46 5 5 1 Tetris SCREEN 47 Key function LEFT RIGHT k...
Page 41: ...PART 1 z English 41 5 5 2 Calendar UP DOWN months LEFT RIGHT years range from 1900 to 2100 SCREEN 48...
Page 42: ...current program information such as the satellite name program name program number local fre quency polarity 22K tone DiSEqC down frequency symbol rate video PID and audio PID You also can view the s...
Page 43: ...EPG button The EPG Menu will appear SCREEN 51 Press UP DOWN to choose the channel Press RIGHT into EPG for schedules of the current channel SCREEN 52 In EPG schedules menu Press the UP DOWN keys to ch...
Page 44: ...ng OK in the EPG schedule screen To set up an timer event 1 Press UP DOWN to move the cursor to the event for which you want to add a timer 2 Press OK to add a timer SCREEN 58 shows you current event...
Page 45: ...lect the audio language as show in Screen 58 Select the LEFT RIGHT MIX or STEREO press OK to make one selection SCREEN 55 6 5 Teletext function With menu off press TEXT SCREEN 56 In TEXT on OSD Press...
Page 46: ...PART 1 z English 46 If current the program has no Teletext the screen below will appear SCREEN 57...
Page 47: ...ng TV power off The receiver can t receive the signal Incorrect values of some tuner parameters Wrong direction of the dish The batteries of the remote controller are not inserted or exhausted Remedy...
Page 48: ...9 Resolution 720 x 576 PAL 720 x 480 NTSC Video output level 1 0 Vpp 75 Ohm Audio decoder Standard MPEG MusiCam layer I II Output mode Stereo Joint Stereo Dual Mono Mono Sampling frequency 32 44 1 48...
Page 49: ...tand by Power 8 W 6 Physical Specification Size W x H x D 260 x 40 x 140 mm Weight 1 2 kg 7 Environmental Conditions Operating Temperature 0 40 C Storage Temperature 30 C 80 C Operating Humidity Range...
Page 50: ...er MPEG The Moving Picture Experts Group is founded by the ISO MPEG is a standard method for digital transmission of video and audio Network A network which is also known as a bouquet is a set of chan...
Page 51: ...king unlocking e g with the parental control feature Polarization Allows several programmes to be fitted into the same frequency band The signals from a satellite are transmitter either with linear ve...
Page 52: ...ucts in your area User of this service will be free to you Within the scope of the European legislation on Waste Electrical and Electronic Equipment Directive 2002 96 EC valid as of August 2005 STRONG...