background image

STREAMIT INTERNET RADIO  


 User’s manual 

May 2008 

Version  1.0 

10 


 Using  power  adapters  other  than  the  one  recommended  for  your  SIR  radio,  can  result  in 

overheating  and  damage  you  device.  This  can  cause  fire,  electrical  shocks  and  other  hazards. 
Only use the supplied power adapter. 

 Applying your SIR to situations with rapid changing temperatures can result in condensation 

(small amount of water) on the inner and outer surface of your device. To ensure a long lifetime of 
your  SIR,  this  should  be  prevented.  In  case  of  such  a  scenario,  wait  until  you  device  is  ‘dry’ 
before you use it again. 


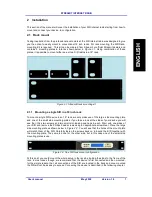
2.3.3  Connecting the Ethernet cable 

 
Use  the  provided  Ethernet  cable  to  connect  your  SIR  with  your  cable  modem,  ADSL  modem  or 
router. If everything is ok (and the power supply  has also been connected) the yellow  led of the 
Ethernet  connector  will  light-up  yellow  continuously  while  being  connected.  The  green  led  will 
blink randomly.  


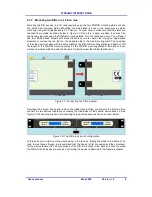
2.3.4  Connecting the audio output 

 
The audio output of your SIR internet radio will be connected to the Line input of a HiFi amplifier 
or some audio installation  it will be  coupled to. No audio cables are included with your SIR. The 
type of cable that should be used to connect your SIR will totally depend on which output you will 
use (RCA or XLR) and on the type of connector in your audio installation. 


2.3.5  Connecting the USB service cable 

 
The  USB  connection  is  used  for  service  purposes,  which  include  programming  your  device, 
software update, and monitoring of the communication between the SIR and the internet. The B-
connector  of  the  USB  cable  is  plugged  in  the  device,  while  the  A-connector  is  intended  for 
connecting to your Windows PC. Before making this connection we recommend that the Streamit 
Terminal  Program  is  first  installed.  For  more  information  on  STP,  including  installation  and  user 
manual, please see [1]. 
 

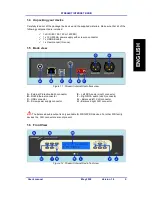
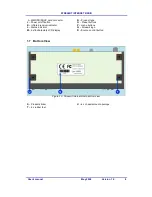
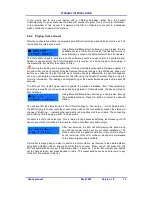
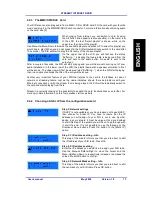
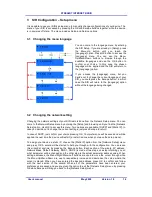
2.4  Switching your SIR for the first time 

 
The first time you switch your SIR internet radio on, a configuration wizard will start. This wizard 
will prepare  your  device for operation and  set up the default configurations. In Figure 2.5 below, 
the  menu  buttons  of  your  SIR  are  depicted.  Appended  to  the  right  are  the  names  they  are 
referred to as in this manual. 


1 – OK button  
2 – Escape button 
3 – Menu-Up button 
4 – Menu-Down button 
5 – Menu-Left button 
6 – Menu-Right button 
7 – Alt button 
8 – Preset buttons 


Figure 2.5: The SIR menu buttons 


Summary of Contents for SIR100

Page 1: ...STREAMIT INTERNET RADIO User s manual May 2008 Version 1 0 i Streamit Internet Radio SIR series of devices User s manual ENGLISH ...

Page 2: ...Streamit Internet Radio SIR series of devices User s manual ENGLISH Version 1 0 Date May 2008 ...

Page 3: ......

Page 4: ...nge without notice Streamit assumes no liability for damages incurred directly or indirectly from errors omissions or discrepancies between the internet radio and the manual EU Declaration of Conformity This product carries the CE Mark in accordance with the related European Directives CE marking is the responsibility of Streamit B V Flight Forum 3543 5657 DW Eindhoven Netherlands This is a class ...

Page 5: ... 2 3 4 Connecting the audio output 10 2 3 5 Connecting the USB service cable 10 2 4 SWITCHING YOUR SIR FOR THE FIRST TIME 10 2 4 1 The Configuration Wizard 11 2 4 2 Playing from a stream 12 2 4 3 The MMC SD SDHC Card 13 2 4 4 Choosing a Static IP from the configuration wizard 13 2 4 5 Choosing to turn the Keylock ON from the configuration wizard 14 3 SIR CONFIGURATION SETUP MENU 16 3 1 CHANGING TH...

Page 6: ...ce This program can be downloaded from our website free of charge Through its unique ID code a SIR can identify itself so the user is able to get access to closed user group web casts The MMC SD or SDHC card optional can be used as an additional buffer facility This provides for adequate fall back in case of network or streaming failures For more information on Streamit products and technologies w...

Page 7: ...cable 1 x User manual this one 1 5 Back view Figure 1 1 Streamit Internet Radio back view A External Protective Earth connector B RJ45 Ethernet connector C USB connector D Screw power supply connector E Left RCA audio cinch connector F Right RCA audio cinch connector G Balanced left XLR connector H Balanced right XLR connector The balanced audio output is only available for SIR120PRO devices For o...

Page 8: ...ff button K Infrared receiver indicator L Status indicator M 2x16 characters LCD display N Product type O Preset buttons P menu buttons Q Streamit logo R Source control button 1 7 Bottom View Figure 1 3 Streamit Internet Radio bottom view S Product sticker T 4 x rubber feet U 4 x chassis mount openings ...

Page 9: ...he large side mounting plate and one of the small side mounting plates If you take a look at the sides of your device you will see that it has two screws and two small slot looking openings in each Start with one sides of your SIR and remove the Phillips head screws using an appropriate screwdriver Place the large side mounting plate as shown below in Figure 2 2 You will see that the holes of the ...

Page 10: ...e same width as the SIR SIR mounting plates and depth of half the length of the SIR SIR mounting plates Fit the SIR SIR mounting plates in the slots and you will see its wholes matching with the device s Carefully screw the rubber feet back on Figure 2 3 Connecting two SIRs together Now take the second device and remove the rubber feet just like you did with the first one then connect the two devi...

Page 11: ...ive wire The following steps are followed Unscrew the connectors head until you see the complete hole in the connector Put the stripped part of the conductive wire in the hole Screw the connector head back on Make sure that the wire is fixed Connect the other side of the wire to the chassis of your computer or the frame of the rack You could use a DMM digital multi meter to verify that there is in...

Page 12: ...will be coupled to No audio cables are included with your SIR The type of cable that should be used to connect your SIR will totally depend on which output you will use RCA or XLR and on the type of connector in your audio installation 2 3 5 Connecting the USB service cable The USB connection is used for service purposes which include programming your device software update and monitoring of the c...

Page 13: ...can control the actual heard volume from the audio equipment the SIR is hooked to Menu Left and Menu Right are used to decrease and increase the volume respectively Press button OK when ready Step 4 Bass setting It is also possible to set the bass output level of your SIR radio which is numerically represented from values 0 16 with 0 as the minimum and 16 as maximum We recommend the default value ...

Page 14: ... software may take up to about 20 seconds The SIR will then restart again and will update the station s database from Channelservice According to weather your device was already registered in Channelservice the device will get a list of stations Using Menu Up Menu Down buttons you can browse through the available stations Press OK button to select the desired station You will see that the status s...

Page 15: ...own Another very important feature of your SIR that relates to the card is the fallback in case of network or streaming failure Just as the name indicates should there be problems with your Ethernet connection or with the stream that is being played the SIR will automatically switch to the card and starts playing from there Streamit is currently looking at the possibility to expand the card functi...

Page 16: ...erver Use the Menu Left Menu Right to move the cursor and the Menu Up Menu Down to respectively increase or decrease the values Press OK button to confirm Step 2 9 DNS 2 setting Info This step of the wizard informs you that you are about to edit the address of your second DNS server if available Press OK button Step 2 10 DNS 2 setting When a second DNS server is available you can enter its address...

Page 17: ...use the preset buttons are used to enter the pin After entering you PIN code press OK button to confirm Step 6 3 Keylock is ON You have successfully locked the keypad of your device with a PIN code Press OK to continue with the wizard Congratulations You have completed the SIR startup wizard Press OK to finish The device will automatically restart and the wizard settings will be set up as default ...

Page 18: ...tering the Setup and browsing until you find the Network Setup option Use OK to access this menu Two options are available DHCP and Static IP In case you decide not to change the current settings just press Escape to return In case of DHCP just confirm your choice pressing OK Your preference will be saved and will be applied the next time the device will restart a restart is done when you leave th...

Page 19: ... the maximum You can change the volume level from the Volume menu Enter the Setup and browse until you find the Volume option Press OK to access this menu The Menu Right and Menu Left buttons are used to respectively increase and decrease the volume level When you have chosen the desired level press OK button to confirm your choice and get back to the Setup menu You can also exit the Volume menu w...

Page 20: ... and 16 as maximum treble You can change the treble level from the Treble menu Enter the Setup and browse until you find the Treble option Press OK to access this menu The Menu Right and Menu Left buttons are used to respectively increase and decrease the treble level When you have chosen the desired level press OK button to confirm your choice and get back to the Setup menu You can also exit the ...

Page 21: ...verride the value above the cursor Press OK to confirm you PIN code A screen is shown to inform you that the Keylock was turned On Press OK to confirm and complete the wizard The changes are now applied to your device You can also exit the Keylock wizard without any changes being applied by pressing Escape button 3 6 2 Turning Keylock OFF The keylock algorithm obeys to a number of rules which mean...

Page 22: ...N code and press OK to confirm your entry When the entered PIN is correct you will be informed that the Keylock is now turned OFF Press OK to confirm and complete the wizard The changes are now applied to your device You can also exit the Keylock wizard without any changes being applied by pressing Escape button 3 6 3 Forcing Keylock OFF Should it happen that you forget your PIN code it is not pos...

Page 23: ... button will bring you back to the Service Menu Your SIR also shows you the version it is running in this example version 00 03 04 It is sometimes important for the technical support people at Streamit to know this information in order to help you properly in case help is required This R Selftest shows the result of the last selftest you performed on your SIR which must be PASS for your device to ...

Page 24: ...STREAMIT INTERNET RADIO User s manual May 2008 Version 1 0 22 OK for reset to start On the LCD the text Resetting is show The device will then enter the wizard mode ...

Reviews: