background image

ISTM-ALL MDVR-2012_Q2_Ver 1.0

23/27

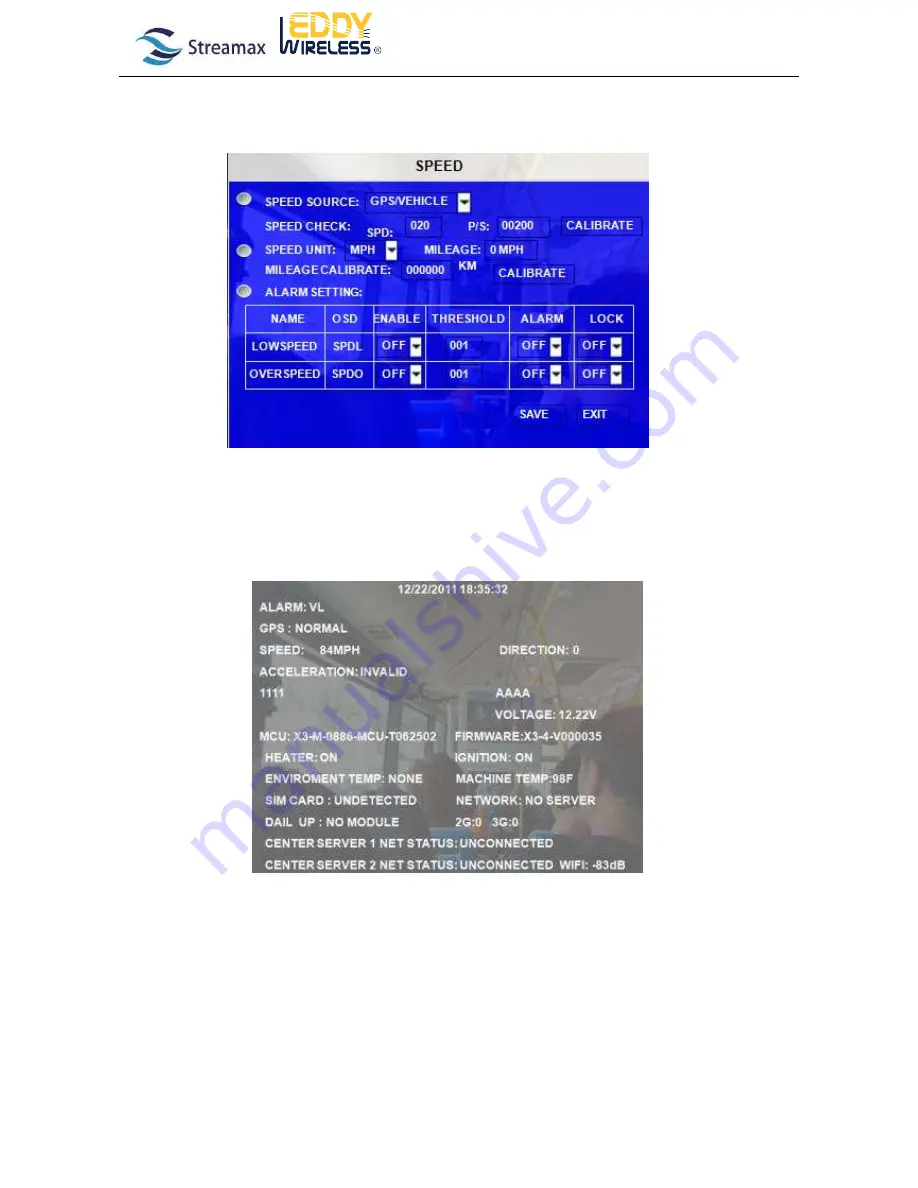
Please input 40MP/H for SPD, when vehicle speed last 40MP/H for half minute. Please press the “CHECK”, A value will

appear automatically from P/S. For example:20, the rate confirmed between Pulse value and driving speed of sensor. Direct

inputting SPD for the same model vehicle, no more adjustment.

1.4.4

Wireless Network Testing

When the MDVR is in the QUAD view interface, please press “Enter” Key on the remote control entering into the OSD to

check whether the wireless module is working fine or not.

If you cannot find out the GPS and network information here, please check following:

1)Whether the antenna connection is correct

2)Whether you setup the right parameter for network

3)The SIM card inserting is correct or not

4)Does the SIM card support huge data transfer (Note: Some of the SIM card are just used for cell phone

service, not for data transmission)

1) GPS function setting

Summary of Contents for MDVRs

Page 1: ...ISTALLATON M ALL MDVR 2012_Q2_Ver 1 0 1 27 Installation Manual For All Streamax MDVRs Mobile Digital Video Recorder Copyright 2012 2014 Streamax Video Technology Co Ltd All Rights Reserved ...

Page 2: ... 2 5 Antenna GPS WIFI 3G Connection 14 2 6 Monitor Installation 15 2 7 How to connect the I O Sensors 16 2 8 How to Connect Alarm System 17 2 9 How to Deal with the Connection for Cables and Wire 19 Part 2 The Whole System Testing after Installation 19 1 MDVR Device Testing 20 1 1 Inspection before Power Connection 20 1 2 Trial Testing after the System Gets the Power 20 1 3 Accessories Testing 21 ...

Page 3: ...DVR in a dry location shielded from direct contact with excessive humidity and moisture rain or other sources of liquid spills Do not install on a recessed surface where liquids may accumulate or under surfaces where liquids may drip 7 Do not handle the MDVR with wet hands while standing in water or while in contact with other sources of water or moisture that could create a shock hazard 8 Install...

Page 4: ...lled 2 In which part of the vehicle can install the MDVR How big the size is 3 Cables and installation tools for example electric drill screw driver screws multimeters etc 4 Manpower distribution 5 General concept for wiring 6 Draft the specific installation guide for specific vehicle Rough Installation Steps as below Step 1 Preparation Step 2 Installing Point Test Step 3 Installing Step 4 Testing...

Page 5: ...t installation is correct and safe Installer Qualification 1 He must be trained and qualified for installation 2 He must comply with safety rules and use the installation tools safely 3 He must be very familiar with the vehicle working principle and the internal electronic equipment 1 3 Pre installation Investigation and Installation Plan Making Before installation the installer must do the invest...

Page 6: ... power for the MDVR 3 Drill bit 2 8mm To drill the hole for cameras monitor bracket etc 4 Philli ps screwdriver for screwing manually 5 digital multimeter for voltage testing and short circuit 6 power cable and Extention W 7 wire stripper for cable spliting and connecting 8 Ribbon 9 Thread Forming To fix the camera and monitor bracket 10 Log Bolts for fixing MDVR machine and proection box 11 Insul...

Page 7: ...fully tested before installation to guarantee the installation can be competed fast and easier and more convenient for post installation maintenance 1 MDVR working environment The installer must know that MDVR works in harsh environment everyday and they have high requirements for the environment and installer s skill a Anti vibration The MDVR device must be installed the place with week vibration...

Page 8: ... must be installed by this way b The MDVR and accessories must be fix firmly to avoid strong vibration c The IR receiver and the LED should on the front panel of the MDVR be toward to the direction with easy operation 2 1 The Hard Disk Installation Each MDVR is shipped with the hard disk installation manual Please read it very carefully The wrong installation will shorten the life of the hard disk...

Page 9: ...ce like fuse must be added between the device and battery 2 3 MDVR Device installation The installation diagram Positive polarity Negative polarity Fuse Vehicle Battery Device to control the ignition of vehicle MDVR power input negative polarity MDVR power input positive polarity red Mobile DVR The lock for removable hard disk case lock it before booting up the MDVR The ACC signal cable yellow The...

Page 10: ...ry to deal with the insulation between MDVR device and the accessories 3 It is very necessary for 12V battery powered vehicles to deal with the insulation between the MDVR device and the accessories of MDVR 5 ACC cable requirements 1 ACC wire working principle Actual wire red is positive black is negative yellow is ignition signal The MDVR device does not work if yellow ignition signal wire is con...

Page 11: ...nds on the vehicle size Please make sure the camera 4 Angle is big enough to cover all parts of the vehicle excluding some special application 5 The camera should be fixed well to avoid any human moving effecting the monitoring image 6 The camera should be installed in the point with good luminance Otherwise the infrared light working too long time will affect the camera life 3 Camera Installation...

Page 12: ...r Door Front Door 1 2 4 3 Driver s seat MDVR Rear Door Front Door 1 2 4 3 4 The Installation Photos for Reference Mainly the installation point for camera is really depends on different vehicle and different application Here please see some photos for reference ...

Page 13: ...police car taxi or some other vehicles the camera installation point will be different Here are some photos for reference The rear camera For taxi installation Install 2 cameras on the roof of the police car The PTZ for police car application ...

Page 14: ...ency is 2 4G HZ This signal distance for this system is from 200 to 400 meters 2 802 11a Speed is 54M Frequency is 5G HZ 3 802 11g Speed is 54M and 11M optional This system is compatible with 802 11b and 802 11a The frequency is 2 4GHZ But when this system is compatible with 802 11a the frequency is 5GHZ 2 The Photos for Reference 3 How to Connect GPS Antenna GPS should be installed on the roof of...

Page 15: ...icone for fixing and waterproof 6 On the cable of the antenna there is one SMA connector please connect it with the module firmly If drilling hole is not allowed by bus company or bus operator then please install the antenna just inside of the vehicle 6 Installation Tips 1 The WIFI antenna must be fixed by the glass cerement and the WIFI antenna bottom plane must be parallel with the vehicle roof ...

Page 16: ...raking turning left or right open or close the door reverse etc In MDVR GUI you can setup different sensor inputs as following You can define any or the sensor inputs to be different function For example if you define sensor 1 is for panic button please connect panic button with sensor 1 signal on the alarm box the photo is below Please just make sure you connect the sensor correctly with the alar...

Page 17: ...s function is used to deal with some emergency For example if some accidents happens the driver or the passengers can press the button to trigger the alarm video to centre server by 3G network The alarm system is very typical for bus application There are 2 different panic button used for bus One is for driver and another is for passenger 1 Driver alarm system installation Generally the alarm syst...

Page 18: ...low Generally the alarm system for passenger are installed near by the passenger and the wiring should go with Any sensor inputs Supposed sensor Any sensor inputs Supposed sensor 4 For high level power input Fuse Fuse The connectors on the back of the button Pin 2 Power Positive polarity Red Pin 4 Power negative polarity Black Pin1 Alarm input Green Pin3 Alarm output White ...

Page 19: ...connected by the wire connector 3 Please use the wire stripper model HS I01 0 5 10mm for connection 4 The cold pressing process is striping the cable cover 10mm 15mm connecting all the copper wire together cutting off the raw edge and put them into the suitable wire connector and then pressing connect by the wire stripper 5 After the compression please wrap the cables together by ribbon 2 Welding ...

Page 20: ...king the voltage for power connector is from 8V to36v higher or lower voltage will bring damage for the MDVR machine 2 Checking all kinds of antennas are well connected as photo showed 3 Check video outputting connector 4 Check the camera no short circuit and electrical ground phenomenon 4 System Inspection and testing 1 Check the cable connection is strong and firm 2 Check the connection of power...

Page 21: ...VR Recording Testing a Ignition recording Active the ignition recording function and check whether MDVR can record as scheduled In a given time 10 minutes shut down and check the machine off or not for post recording of 1 300 mins in Ignition video it is better to test 1 min post recording When the working time no more than 10 mins the machine will delay 5min to shut down b Time recording setting ...

Page 22: ...the flashing will disappear also if the security set as OFF I E no need enter password to re login just pressing ENTER can disappear the flashing LOG Press ENTER to select YES NO to enable or disable the input sensor to put as event log file the EVENT LOG is recorded in EVENT search file e g If set as ON using EVENT SEARCH option even sensor triggered there is event file on this menu LOCK To enabl...

Page 23: ...ing When the MDVR is in the QUAD view interface please press Enter Key on the remote control entering into the OSD to check whether the wireless module is working fine or not If you cannot find out the GPS and network information here please check following 1 Whether the antenna connection is correct 2 Whether you setup the right parameter for network 3 The SIM card inserting is correct or not 4 D...

Page 24: ...e OSD interface to check the longitude and latitude 2 Internet function Testing local IP WIFI 3G For the details please check the Streamax CMS and 3G connection manual 1 4 5 Software Upgrade 1 Create a folder named dvrupgrade in the thumb drive and then copy the firmware upgrade file to this folder 2 Insert the thumb drive into the USB port on the front panel of MDVR 3 Select SETUP SYSTEM UPGRADE ...

Page 25: ...mware upgrade is completely successful please check if the firmware has the latest version after MDVR is being restarted 1 4 6 Setup Machine Registration Information Please check the details in the MDVR GUI manual 1 4 7 Storage Format HDD or SD Card Format the storage before using or replacing the storage Please check the details from the DVR GUI manual ...

Page 26: ...ISTM ALL MDVR 2012_Q2_Ver 1 0 26 27 Appendix Bus Application ...

Page 27: ... 25 100 30 120 5 3 8 140 50 60 25 100 30 120 7 5 11 170 50 60 25 100 30 120 8 5 12 200 50 60 25 100 30 120 9 5 12 230 50 60 25 100 30 120 9 6 13 260 50 60 25 100 30 120 10 7 13 290 50 60 25 100 30 120 11 7 14 320 50 60 25 100 30 120 12 7 15 350 50 60 25 100 30 120 12 7 15 380 50 60 25 100 30 120 13 9 15 410 50 60 25 100 30 120 14 9 16 440 50 60 25 100 30 120 15 10 18 470 50 60 25 100 30 120 16 11 ...

Reviews: