background image

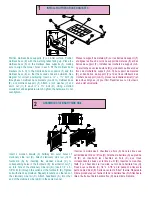
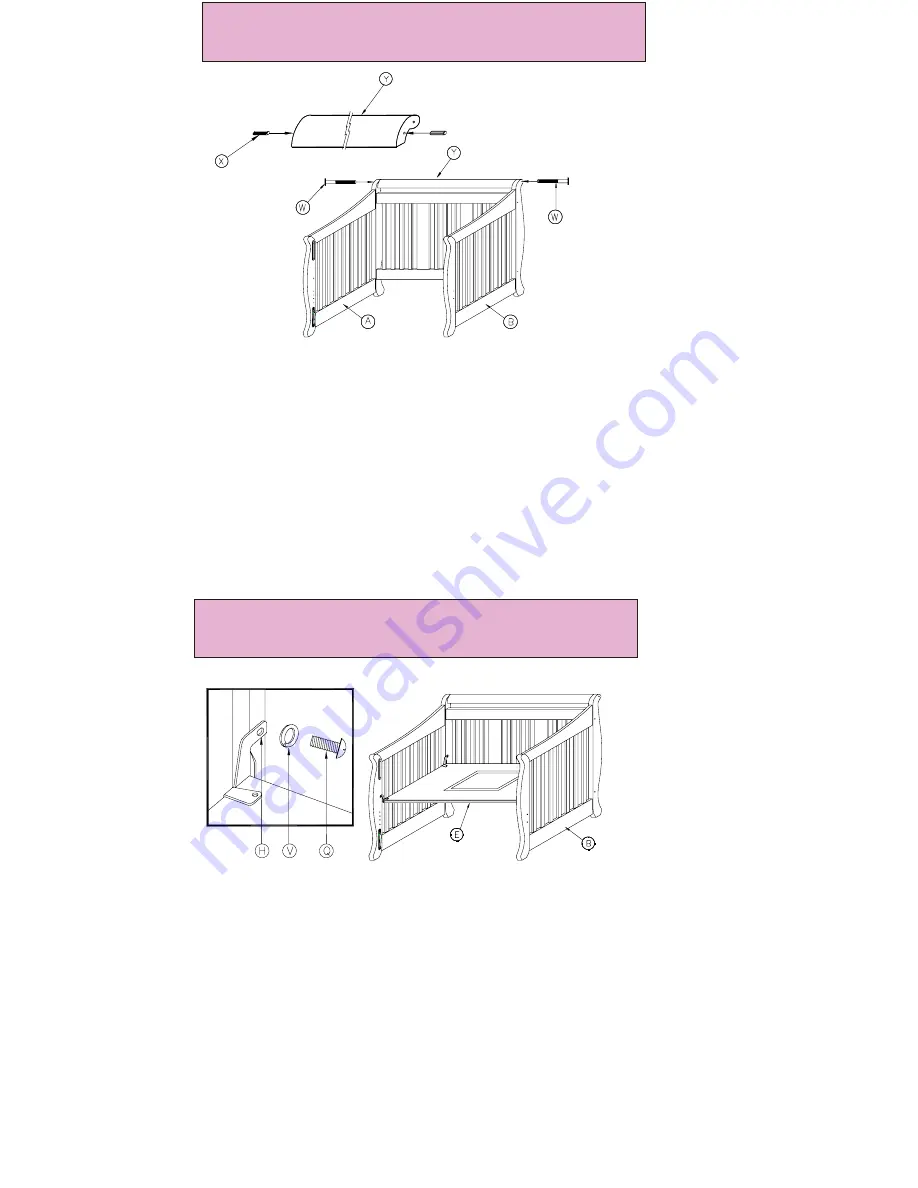
Insert  two  wooden  dowels  (X)  halfway  into  both  ends  of  the 
shaped  cross  rail  (Y).  Loosen  the  bolts  of  the  stationary 
side  rail  (D)  without  completely  dis-assembling  the  rail. 
Position  the  shaped  cross  rail  (Y)  between  the  headboard 
(A)  and  footboard  (B)  with  the  wooden  dowels  inserted  into 
the  lower  holes.  Attach  shaped  back  rail  (Y)  using  the  two 
1/4”  x  2-3/8  (W)  bolts.  Tighten  the  bolts  using  the  allen  key 
provided.

Insérrez  les  2  manchons  de  bois  filetés  (X)  à  moitie  dans  les  2  bouts 
de  la  barres  courbée  (Y).  Dévissez  un  peu  les  boulons  de  côté  fixe 
(D)  sans  démonter  complement  le  rail.  Placez  la  barre  courbée  (Y) 
entre  la  tête  de  lit  (A)  et  le  pied  du  lit  (B)  en  insérrant  les  manchons 
de  bois  filetés  dans  les  trous  plus  bas.  Attachez  la  barre  courbée 
utilisant  2  boulons  1/4”  x  2-3/8”  (W).

ASSEMBLE  SHAPED  CROSS  RAIL

3

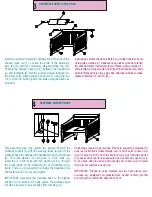
This  assembly  step  may  require  two  people.  Position  the 
mattress  support  (E)  with  the  warning  label    facing.  Fit  the 
mattress  base  (E)  between  the  headboard  (A)  and  footboard 
(B).  Fit  a  lock  washer  (V)  onto  each  ¼”  x  5/8”  bolts  (Q). 
Insert  the  ¼”  x  5/8”  bolts  with  lock  washer  (Q  &  V)  through 
the  holes  inside  of  the  footboard  (B)  and  headboard  (A). 
(Note:  There  is  a  pre-inserted  nut  inside  the  headboard  (A) 
and  footboard  (B).  Do  not  over-tighten. 
   
IMPORTANT:  Assemble  the  mattress  base  in  the  highest 
position  for  a  newborn.  As  baby  grows,  the  mattress  base 
should  be  lowered  to  prevent  baby  from  climbing  out. 

Cette  étape  requiert  2  personnes.  Placez  le  support  de  matelas  (E) 
avec  les  instructions  d’assemblage  vers  le  haut,  entre  la  tête  de  lit 
(A)  et  le  pied  de  lit  (B).  Avec  les  boulons  (Q)  et  les  rondelles  d’arrêt 
(V)  passez  dans  les  trous  supérieurs  des  crochets  de  support  (G  & 
H)  et  vissez  dans  les  écrous  pre-insérrés  de  la  tête  (A)  et  du  pied 
(B)  de  lit.  Ne  resérrez  pas  de  trop. 
     
IMPORTANT:  Placez  le  porte  matelas  au  plus  haut  niveau  pour 
nouveau-né,  abaissant  progréssivement  quand  l’enfant  grandit 
pour  empêcher  l’enfant  de  descendre  du  lit.

4

ASSEMBLE  MATRESS  BASE

Summary of Contents for 20405-012

Page 1: ...LENNOX STAGES Assembly manual LIT D ÉTAPES LENNOX Instructions de montage Reviewed May 2008 Stork Craft Manufacturing Inc 7433 Nelson Road Richmond B C Canada V6W 1G3 ...

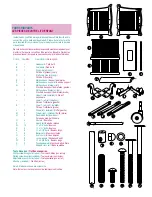
Page 2: ...s Barre de support Crochets du support de matelas gauche Crochets du support de matelas droite Côté en T superieure Côté en T inférieure gauche Côté en T inférieure droite Griffe gauche Griffe droite Poteau du pied de lit double Roulettes Barre de retenue Boulons Boulons Boulons longs Manchons filetés Écrous borgnes Rondelles d arrêt Boulons longs Manchon de bois filete Barre courebée Outils neces...

Page 3: ...acorn nut U to each x 1 bolt R Using a slotted screwdriver and adjustable wrench tighten the hardware Do not over tighten Insert 4 wooden dowels X halfway into outer holes of stationary side rail D Attach stationary side rail D to footboard B by inserting the wooden dowels X to corresponding holes in the footboard B Insert barrel nut T up into hole of the stationary side rail D Insert 1 4 x 3 1 8 ...

Page 4: ...ss support E with the warning label facing Fit the mattress base E between the headboard A and footboard B Fit a lock washer V onto each x 5 8 bolts Q Insert the x 5 8 bolts with lock washer Q V through the holes inside of the footboard B and headboard A Note There is a pre inserted nut inside the headboard A and footboard B Do not over tighten IMPORTANT Assemble the mattress base in the highest p...

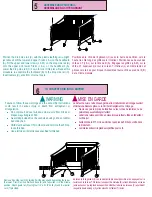
Page 5: ...gleachild Guardrail provided must be used when using crib as a toddler bedordaybed Childmustbeatleast15monthsoldandnotmorethan50lbs tousethisbed Useafullsizecribmattressasspecifiedforthisbed Le défaut de suivre cette mise en garde et les instructions de montage pourrait entraineruneblessuregraveoulamortparétranglementoucoinçage Ne placez pas le lit prés de fenètres ou les cordes de tentures ou de ...

Page 6: ...nt la nouvelle tête de lit double Devissez les griffes L M du côté glissant C Attacher les poteaux de lit double C1 aucôtéglissant C utilisantlesboulons longs 1 4 x 3 1 8 S et les manchons filetés T inclus Assurez vous que les trous de bas des poteauxsoienttournesdumêmecôté N N C S T TO CONVERT CRIB OR DAYBED INTO DOUBLE BED HEADBOARD AND FOOTBOARD POUR CONVERTIR DE LIT DE BEBE OU LIT DE JOUR EN L...

Page 7: ...issez le côté DO NOT remove any part that is attached with wood screws including the T rails and claws The stationary side rail mattress base and drop side rail can all be disassembled for storage Simply review the assembly instructions for each and reverse the order to disassemble When removing the drop side rail be sure to press the tab on the bottom T rail to lift the drop side rail to all the ...

Page 8: ...lace items with a string around a child s neck such as hood strings or pacifier cords Do not suspend strings over a crib or attach strings to toys When child is able to pull up to standing position set mattress to lowest position and remove bumper pads large toys and other objects that could serve as steps for climbing out DO NOT leave child in crib with side lowered Be sure side is in the raised ...

Page 9: ...iculations deserrées de pièces manquantes ou de bords tranchants U UTILISEZ PAS le lit de bébé si certaines pièces sont manquantes ou brisées Pour obtenir des pièces de rechange et des instructions signalez le numéro inscrit sur l etiquette d enregistrement ci dessous Ne substituez pas de pièces N utilisez pas le lit de bébé si l enfant est capable d en sortir sans aide ou s il mesure plus de 35 p...

Page 10: ...rmales d utilisation en raison d un vice de matériau ou de fabrication pendant la période de garantie d un an La société Stork Craft Baby réparera ou remplacera gratuitement les pièces défectueuses pendant la période de garantie d un an La date d achat du produit doit être établie en présentant votre reçu de caisse ou une autre prevue satisfaisante POUR UN SERVICE RAPIDE ET EFFICACE Communiquer av...

Reviews: