

Please read the instructions carefully before the first use! Clean with lukewarm water, a soft sponge and a mild washing-up
liquid before the first use and after each use. Do not use abrasive sponges. Do not place on a hot cooktop. Do not place any
accessory parts (except the pan) on a hot cooktop. Do not use over an open flame. Do not use in the microwave. To avoid danger
of suffocation, keep the plastic packaging away from babies and children. Never allow children to touch or play with the device.
Please keep these operating instructions for future reference!
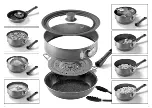
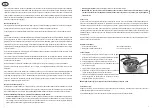
Attaching the handle (A - E):
Slide the button backwards and push the handle, slightly from above, onto the fixing. Press the handle downwards and release the
button. Check that the handle is secure.
In order to avoid injuries caused by an incorrectly engaged handle, only carry the pan with content with the help of a mat.
Cooking:
Before first use clean with a soft cloth or sponge, a little water and a mild washing-up liquid, and boil 2 - 3 times. Using a paper
towel, spread some cooking oil on the coating (you do not have to use fat or oil the next time it is used). Let your cookware cool
before attempting to clean it, never pour cold water in your hot cookware. Thanks to Easy Clean Effect, simply wipe out the
cookware with a cloth and hot water or clean by hand with a small amount of a mild detergent. Never use steel wool or abrasive
scouring agents.
In order to ensure good heat transfer, place the cookware centrally on the hotplate. Always keep a close eye on the cooking
process. Avoid overheating, e. g. by boiling dry.
When cooking with induction cookers, the liquid evaporates extremely fast. When used on induction hotplates, unusual humming
sounds can occur due to technical reasons if the temperature steps are adjusted too high.
Should fat overheat and ignite, never use water to extinguish the flames, use a blanket or a metal lid.
Use only kitchen gadgets and cooking utensils made of plastic, wood or silicone. Do not use any electrical appliances such as
mixers or blenders in your cookware.
Check your cookware before the first use for possible material residues, especially at the bottom of the cookware in order to avoid
possible scratches. Do not slide your cookware on the hob but always lift it for moving.
No warranty caused by: Neglect, remaining oil + fat on the hob and bottom of the pan / Overheating or boiling dry / Scratching with
unsuitable cooking utensils made of metal (knives, forks, mixers or blenders) / Aggressive cleaners in dishwashers
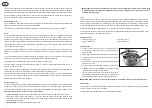
Fitting the spring form (F - J):
On the opposite side to the handle, position the spring ring so that the spring ring groove slots into place directly over the lip of the
pan. Hold the spring ring with your left hand so that the groove is positioned at the height of the pan lip all round. Then close the
spring ring with your right hand. Make sure that the spring ring sits firmly on the pan before you begin cooking.
IMPORTANT instructions for using the pan with the spring ring:
•
Cooking with liquids:
Do not fill the pan more than half full with liquid. The spring ring is NOT watertight!
•
Frying:
Do not fill the pan more than 1/3 full with fat. Use the fitted spring ring and the lid as protection against splashes. Fit
the spring ring prior to heating the fat in the pan. In spite of the high spring ring, hot fat can squirt even higher.
•
Do NOT carry
the pan with hot liquids, let them cool down first.
•
IMPORTANT: Do NOT open the spring ring during the cooking/baking process! Only remove the spring ring from the pan
after everything has cooled down completely. Make sure that the content (e.g. the cake dough) is solid before opening.
Baking:
If baking dough with high sugar content or to get a nice browning, we recommend greasing the pan and the spring form with butter
or margarine before usage! Do not use oil, but butter or margarine. Tip: Grease the pan and the spring form before beginning to
prepare the dough. Place the greased tin into the refrigerator until dough is ready. The butter layer forms a separating layer to the
sugar containing dough in the first minutes of baking, and hence supports the non-stick effect. In addition, butter gives the dough
a nice browning, makes the cake crunchy and improves the taste.
Please note that the handle and the pan / spring form are hot after the baking process. Use potholders / ovengloves to lift it out
of the oven.
Heat Resistance:
- Pan (without handle) 200 °C
- Spring form 200 °C
- Detachable pan handle 150 °C
- Glass lid 180 °C
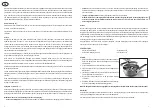
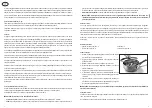
Steaming:
1. Set the steaming insert into the pan so that the feet touch the bottom
of the cookware. Attach the spring ring to the pan.
2. Fill with water until just below the steaming insert.
3. Place the vegetables on the steaming insert and put the glass lid on.
4. Bring the water to the boil and then reduce the heat so that it continues
to simmer.
5. Steam the vegetables until the desired degree of softness is reached.
6. CAUTION: ALWAYS remove the vegetables with cooking tongs. Risk
of scalds due to hot steam
7. Let the steam insert cool before removing it. Never touch the side
flaps of the steam insert to take out the vegetable from the cookware
– danger of burns!
IMPORTANT: Repeatedly keep checking the filling level of the water inside the cookware to prevent empty cooking.
Glass lid
Lid knob: The screw on the glass cover must not be too tight, as the lid might otherwise break! Periodically check the screw and
tighten when needed.
Do not shock the hot lid with cold water, but allow it to cool beforehand.
EN
7
6
Summary of Contents for 19788
Page 1: ...www stoneline de...
Page 2: ...3 2...