background image

Oscilloscope waveforms

UM0922

12/23

Doc ID 17259 Rev 1

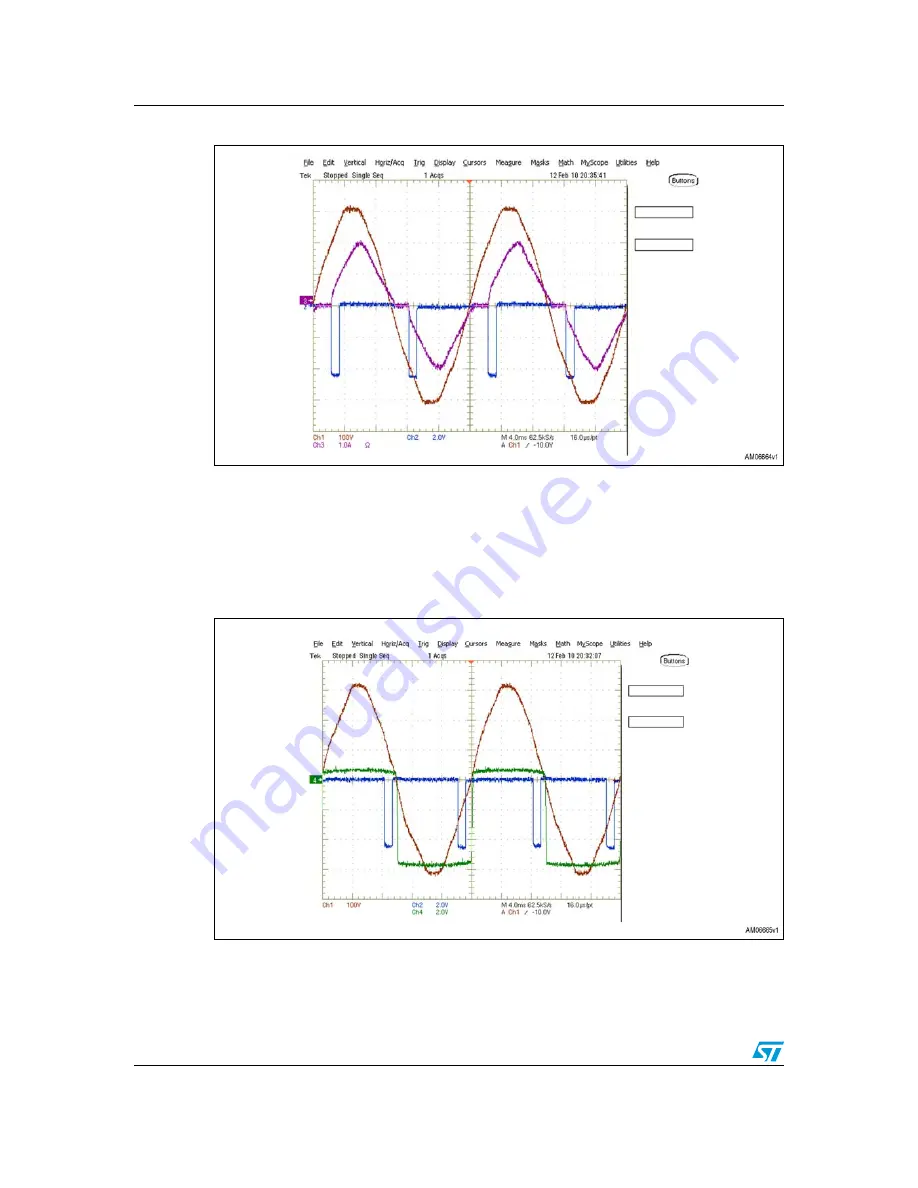
Figure 6.

Motor working at the highest power level

The gate pulse (blue) is now applied to the Triac with a firing angle of 2.5 ms with respect to 
the voltage mains (brown). Once the pulse is applied, the Triac turns on and begins 
delivering power to the motor. At this point the purple waveform shows a higher current 
flowing through the motor.

The demonstration board is now working at level 5, delivering the maximum power to the 
motor.

Figure 7.

Zero-voltage switching (ZVS)

The green waveform shows the zero-voltage switching signal (ZVS) applied to the MCU. 
The signal is toggled every time the voltage mains crosses zero.

Summary of Contents for STEVAL-IHM029V1

Page 1: ...s and 640 bytes E2 PROM The power supply circuitry is based on the VIPer16LN an off line converter with an 800 V avalanche rugged power section operating at 60 kHz The STEVAL IHM029V1 can control any...

Page 2: ...7 5 Schematic diagram and bill of material 8 6 Functional description 10 7 Oscilloscope waveforms 11 8 EMC test results 14 9 How to connect the STEVAL IHM029V1 15 10 How to operate the STEVAL IHM029V...

Page 3: ...tic 8 Figure 4 Phase angle control 10 Figure 5 Motor running at the lowest power level 11 Figure 6 Motor working at the highest power level 12 Figure 7 Zero voltage switching ZVS 12 Figure 8 Soft star...

Page 4: ...isolating distances altered during the transportation handling or use No contact must be made with electronic components and contacts The STEVAL IHM029V1 contains electrostatically sensitive component...

Page 5: ...wer 2000 W 20 pin 8 bit STM8S103F2 MCU as main controller Employs zero voltage switching ZVS to synchronize MCU events with the voltage mains Motor driven by T1235H high temperature Triac in phase ang...

Page 6: ...6 23 Doc ID 17259 Rev 1 3 Target applications As a universal motor control demonstration the STEVAL IHM029V1 is mainly target at the home appliance market for applications including vacuum cleaners f...

Page 7: ...regulator which in turn provides a reference voltage of 5 VDC The negative power supply is highly recommended when driving a Triac directly with a microcontroller ZVS The zero voltage switching signa...

Page 8: ...3 B6 3 6 7 0 B 3 6 1 7 0 B B 2 3 6 63 B6 3 6 63 B026 3 8 57 B 3 6 3 6 1 7 0 B B 75 3 6 1 7 0 B 6 3 B6 3 3 6 63 B0 62 3 6 6 0 8 57 B7 1 3 6 8 57 B5 1 3 6 1567 26 1 3 26 287 3 966 9 3 9 8 670 6 3 0 16 0...

Page 9: ...DL5 DL6 10 mA 3 mm radial red D1 D2 1N4007 D3 D4 D5 STTH1R06 STMicroelectronics D6 P6KE400CA Transil STMicroelectronics J1 J2 CON 2 pin 5 mm J3 Strip line 4 pin 2 54 mm L1 1 mH radial Coilcraft L2 470...

Page 10: ...t directly to an MCU input pin which is set as external interrupt The Triac is turned on by sending a pulse to the Triac gate The Triac turns off when the voltage mains crosses 0 V The firing angle de...

Page 11: ...niversal motor connected to the demonstration board The only signal to change is the output current which depends on the selected working level and motor size Figure 5 Motor running at the lowest powe...

Page 12: ...ulse is applied the Triac turns on and begins delivering power to the motor At this point the purple waveform shows a higher current flowing through the motor The demonstration board is now working at...

Page 13: ...th the voltage mains The ZVS signal ranges from 0 6 V and 5 6 V This is due to the cutting diodes inside the MCU I O port Figure 8 Soft start The waveform shows the output current behavior from start...

Page 14: ...but the board recovers without external intervention C Reset occurs but the board cannot recover without external intervention Test results for IEC 61000 4 5 Surge immunity are as follows Test passed...

Page 15: ...ard overview Referring to Figure 9 on the left side of the board connect the mains voltage to the upper connector and the motor to the lower connector The output power is controlled by the potentiomet...

Page 16: ...adjusted by using potentiometer P1 Power regulation is broken into 5 power levels from 1 minimum power to 5 maximum power A green LED shows the current power level Turning potentiometer P1 clockwise...

Page 17: ...1 Firing angle table The firing angles are set by software and depend on the mains frequency Table 3 Firing angles Working level 50 Hz mains frequency 60 Hz mains frequency 1 8 5 ms 7 0 ms 2 7 0 ms 6...

Page 18: ...9V1 layout The STEVAL IHM029V1 is a standard double layer coppered PCB with a copper thickness of approximately 45 m The PCB material is FR 4 PCB dimensions Length 100 mm Width 50 mm Thickness 1 55 mm...

Page 19: ...UM0922 The STEVAL IHM029V1 layout Doc ID 17259 Rev 1 19 23 Figure 12 STEVAL IHM029V1 bottom layer...

Page 20: ...dering information The 2000 W universal motor control demonstration board is available through the standard STMicroelectronics ordering system through order code STEVAL IHM029V1 The kit includes an as...

Page 21: ...n and specifications for the ST devices featured in the STEVAL IHM029V1 demonstration board refer to the datasheets for the following products 1 STM8S103F2 2 T1235H 3 VIPer16 4 L7905C 5 STTH1R06 6 P6K...

Page 22: ...Revision history UM0922 22 23 Doc ID 17259 Rev 1 15 Revision history Table 4 Document revision history Date Revision Changes 24 May 2010 1 Initial release...

Page 23: ...ARRANTIES OF MERCHANTABILITY FITNESS FOR A PARTICULAR PURPOSE AND THEIR EQUIVALENTS UNDER THE LAWS OF ANY JURISDICTION OR INFRINGEMENT OF ANY PATENT COPYRIGHT OR OTHER INTELLECTUAL PROPERTY RIGHT UNLE...

Reviews: