background image

6

To reduce the risk of fire, electric shock or injury, always follow basic safety precautions 
and accident prevention measures when using this appliance, including the following:

Electrical safety 

•  Voltage: Plug the appliance in a properly earthed power outlet, which must be in 

good working order. Make sure your outlet voltage and circuit frequency correspond 
to the voltage stated on the appliance rating label. 

•  Power connection: Do not use an adaptor; do not use an extension cord. Plug 

the power plug directly into a separate power point that cannot easily be turned off 
accidentally, and that is easily accessible so you can switch it off when required.

•  Power cord: Do not kink or damage the power supply cord. Do not leave it exposed 

or dangling. Secure it behind the appliance so no one steps on or places anything 
on the power supply cord or against it. A squashed or damaged power plug may 
overheat and cause a fire.

•  Damaged cord: Do not use a cord that shows cracks or abrasion damage along 

its length or at either end. Any damage to the cord may cause a short circuit, fire 
and/or electric shock. If the power cord is damaged, it must be replaced by the 
manufacturer or its service agent. Contact the after sales support line for advice. 

•   

WARNING!

 The light bulb supplied with this appliance is a special use bulb, which 

is only suitable for use with this appliance, it is not usable for domestic lighting. Do 
not operate the appliance without the lamp installed. Do not touch the light bulb if it 
has been on for a long period of time, as it could be very hot.

•  Disconnection: Never unplug the unit by pulling the cord. Always grip the plug 

firmly and pull straight out from the power point.

•  Electrical work: If the installation of this appliance requires any electrical work, 

make sure it is carried out by a qualified electrician.

General Safety Instructions (Cont.)

Installation

•  Heavy: This appliance is heavy, take care when moving it. To avoid back or other 

injury, consider a two person lift or mechanical aid when installing it. Failure to do so 
can result in back or other injury.

•  Damage: When unpacking, check the appliance carefully for damage. If it is 

damaged, do not install the appliance. Contact our after sales support centre for 
advice on examination or return of the damaged appliance. 

•  Protect from moisture: Install the appliance in an indoor area protected from wind, 

rain, water spray or drips. 

•  Protect from heat: Do not install it next to an oven, grill or other source of high 

heat, or where it will be exposed to direct sunlight for prolonged periods of time.

•   

WARNING:

 Ventilation: To ensure proper ventilation, keep any ventilation openings, 

in the appliance enclosure or in the built-in structure, clear of obstructions. Ensure 
adequate air circulation around the appliance to prevent overheating. 

•  Level: Install the appliance level in order to ensure proper operation.

AFTER SALES SUPPORT

1300 886 649

[email protected]

AUS

MODEL: STR-H115VBF   PRODUCT CODE: 52814   03/2016

Summary of Contents for STR-H115VBF

Page 1: ...l Number STR H115VBF N13275 116L Bar Fridge IM Version No V1 2 Issue Date 08 January 2015 INSTRUCTION MANUAL AFTER SALES SUPPORT 1300 886 649 info tempo org AUS MODEL STR H115VBF PRODUCT CODE 52814 03 2016 ...

Page 2: ...the highest standards of performance and safety and as part of our philosophy of customer service and satisfaction are backed by our comprehensive 3 Year Warranty We hope you will enjoy using your purchase for many years to come AFTER SALES SUPPORT 1300 886 649 info tempo org AUS MODEL STR H115VBF PRODUCT CODE 52814 03 2016 ...

Page 3: ...ctions 08 Product Overview 10 Getting Started 13 Instructions 15 FAQs and Troubleshooting Guide 17 Other Useful Information 23 Repair and Refurbished Goods or Parts Notice AFTER SALES SUPPORT 1300 886 649 info tempo org AUS MODEL STR H115VBF PRODUCT CODE 52814 03 2016 ...

Page 4: ...t the consumer has under the Competition and Consumer Act 2010 and similar state and territory laws Our goods come with guarantees that cannot be excluded under the Australian Consumer Law You are entitled to a replacement or refund for a major failure and to compensation for any other reasonably foreseeable loss or damage You are also entitled to have the goods repaired or replaced if the goods f...

Page 5: ...nd type of refrigerant in the appliance can be found in the Technical Specifications on page 21 and on the appliance rating plate IMPORTANT SAFETY INSTRUCTIONS READ CAREFULLY AND KEEP FOR FUTURE REFERENCE Read this manual thoroughly before first use even if you are familiar with this type of product The safety precautions enclosed herein reduce the risk of fire electric shock and injury when corre...

Page 6: ... for domestic lighting Do not operate the appliance without the lamp installed Do not touch the light bulb if it has been on for a long period of time as it could be very hot Disconnection Never unplug the unit by pulling the cord Always grip the plug firmly and pull straight out from the power point Electrical work If the installation of this appliance requires any electrical work make sure it is...

Page 7: ...mmended here may result in fire electric shock and or personal injury We accept no liability for any eventual damages due to improper use or noncompliance with these instructions Cleaning and maintenance Disconnect Unplug the appliance before cleaning or servicing Failure to do so can result in electric shock injury or death Do not connect or disconnect the plug when your hands are wet Flames Do n...

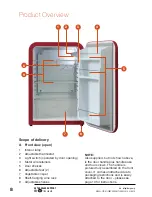
Page 8: ...hanging wine rack 9 Adjustable shelves NOTE Also supplied but not shown above is the door handle plus handle base and four screws The handle is pictured fully assembled on the front cover It comes unattached due to packaging restrictions and is easily attached to the door please see page 10 for instructions AFTER SALES SUPPORT 1300 886 649 info tempo org AUS MODEL STR H115VBF PRODUCT CODE 52814 03...

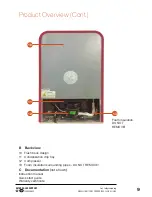
Page 9: ...2 Compressor 13 Foam insulation surrounding pipes DO NOT REMOVE C Documentation not shown Instruction manual Quick start guide Warranty certificate Foam insulation DO NOT REMOVE AFTER SALES SUPPORT 1300 886 649 info tempo org AUS MODEL STR H115VBF PRODUCT CODE 52814 03 2016 10 11 12 13 ...

Page 10: ...e if the appliance or its cord have been damaged or are not working properly In case of damage contact our after sales support line for advice on examination repair or return of the damaged product Clean Make sure the bar fridge is disconnected from the power supply before cleaning the interior surfaces and all internal accessories with lukewarm water a soft cloth and a neutral mild soap detergent...

Page 11: ...sections on electrical safety and installation on page 6 Then follow the instructions below and opposite Location Install the appliance in an area where the ambient temperatures correspond to the climate class T indicated on the rating plate 16 C 32 C Floor surface Place the bar fridge on a sturdy level floor for quieter operation Ensure that the floor is strong enough to support the fridge when i...

Page 12: ...ong from the power cord If the plug does not fit your outlet consult a licensed electrician for advice to have the outlet changed Plug the unit into a dedicated properly installed and earthed wall outlet Ensure that your outlet voltage and circuit frequency correspond to the voltage stated on the appliance rating label Secure the power supply cord behind the unit Do not leave it exposed or danglin...

Page 13: ... refrigerator is unplugged turned off or has lost power you must wait 3 to 5 minutes before restarting the unit If you attempt to restart before this time delay the refrigerator will not start Thermostat settings Thermostat O position indicates the refrigerator is turned off although power is still being supplied By turning the thermostat dial clockwise the refrigerator will turn on automatically ...

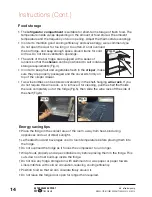
Page 14: ...tored conveniently in the shelf hanging wine rack If you do not require this wine rack or to remove it for cleaning pull the shelf that holds the rack completely out of the fridge Fig 5 then slide the wine rack off the side of the shelf Fig 6 Fig 4 Energy saving tips Place the fridge in the coolest area of the room away from heat producing appliances and out of direct sunlight Let heated food and ...

Page 15: ...rances There are vibrations The fridge is not level The fridge seems to make too much noise The rattling noise may come from the flow of the refrigerant which is normal As each cycle ends you may hear gurgling sounds caused by the flow of refrigerant Contraction and expansion of the inside walls may cause popping and crackling noises The fridge is not level The door will not close properly The fri...

Page 16: ... warmer than room temperature This is normal while the compressor works to transfer heat from inside the fridge cabinet The compressor runs continuously The temperature is set too cold select a lower warmer setting The door is open or something is obstructing proper door closure The door gaskets are worn dirty or damaged Large quantities of food have been added to the fridge The room temperature i...

Page 17: ...s is an entirely normal part of operation For efficient operation and minimum energy consumption the refrigerator must be defrosted and cleaned when the frost on the evaporator has built up to about 3mm thickness Turn the temperature control to the minimum position unplug the appliance and remove all food items from inside the fridge Leave the door open for quick defrosting Place an old towel unde...

Page 18: ...Power failure Most power failures are corrected within a few hours and should not affect the temperature inside your fridge if you minimise the number of times the door is opened However if the power is going to be off for a longer period of time you need to take proper steps to protect your food Going away Short vacation Leave the fridge operating during vacations of less than a month Long vacati...

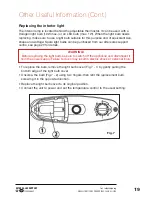
Page 19: ...e the bulb remove the light bulb cover Fig 7 1 by gently pulling the bottom edge of the light bulb cover Unscrew the bulb Fig 7 2 using two fingers then refit the replacement bulb screwing it in the opposite direction Replace the light bulb cover to its original position Connect the unit to power and set the temperature control to the usual setting WARNING Before replacing the light bulb be sure t...

Page 20: ...r advice Spare parts Our after sales support centre stocks the following spare parts for the STR H115VBF STIRLING 116L Bar Fridge To purchase a part call the centre on 1300 886 649 or email us at info tempo org Compressor drip tray Controller Controller knob Door hinge Door hinge cover Feet Gasket Glass shelf and trim upper and bottom Lamp shade light bulb cover Light bulb Light switch Socket Vege...

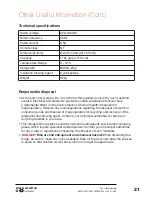
Page 21: ...tions regarding the disposal of electrical consumer goods and dispose of it appropriately for recycling and recovery of the refrigerant and blowing agent Contact your municipal authorities for advice on recycling facilities in your area This refrigeration appliance contains flammable refrigerants and insulation blowing gases which require specialist waste disposal Contact your municipal authoritie...

Page 22: ...22 This page has been left blank intentionally AFTER SALES SUPPORT 1300 886 649 info tempo org AUS MODEL STR H115VBF PRODUCT CODE 52814 03 2016 ...

Page 23: ...g goods we may replace them with refurbished goods of the same type or use refurbished parts in the repair process Please be assured though refurbished parts or replacements are only used where they meet ALDI s stringent quality specifications If at any time you feel your repair is being handled unsatisfactorily you may escalate your complaint Please telephone us on 1300 886 649 or write to us at ...

Page 24: ...ales Support Centre on 1300 886 649 before returning it to the store for a refund For an electronic copy of this manual go to www stirlingappliances com au and download a copy Instruction Manual Revision Index Version No Issue Date Description V1 0 13 November 2015 Original release V1 1 07 December 2015 Minor updates plus handle installation instructions added V1 2 08 January 2016 Minor update AFT...

Reviews: