background image

SPXM1

14

15

StingerElectronics.com

StingerElectronics.com

®

AUX Input

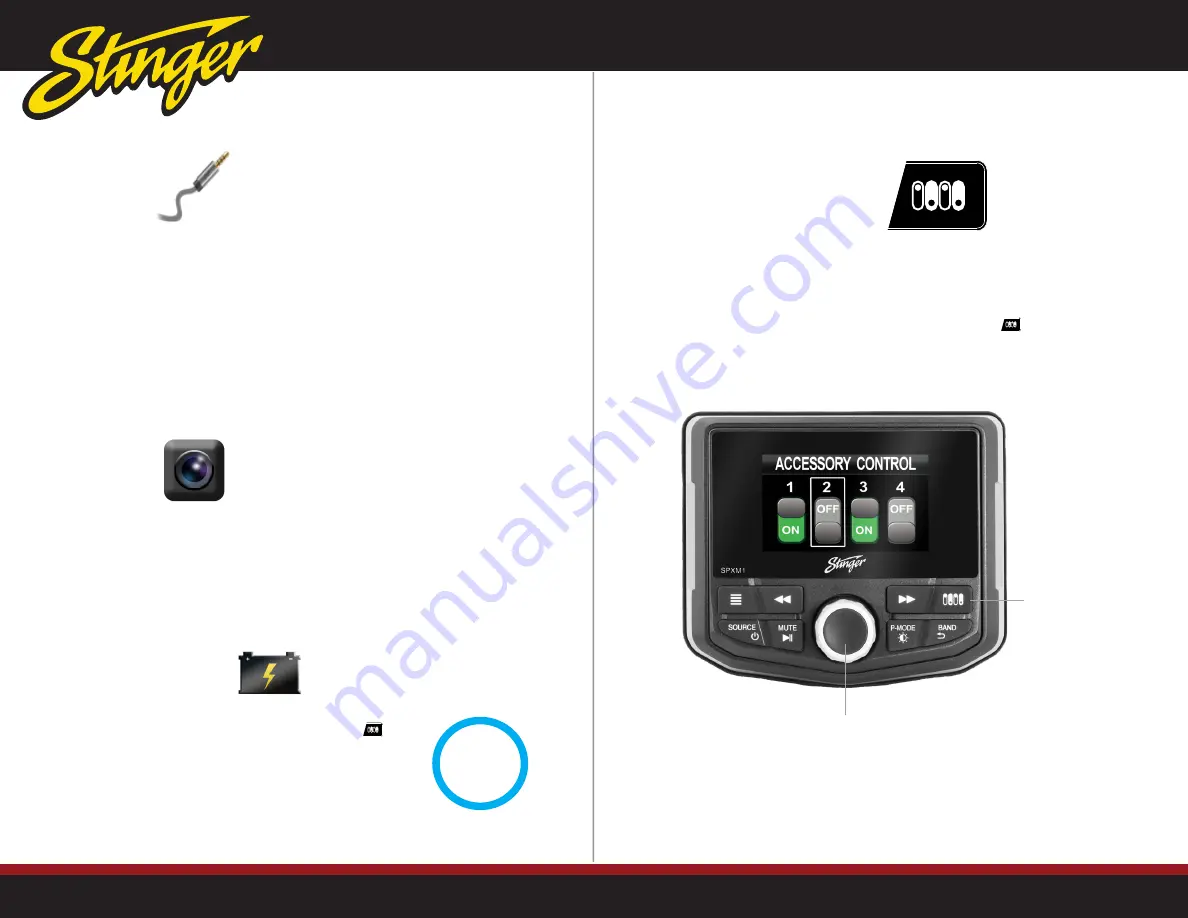
Accessory Control

(Switch Command)

Camera

Battery Voltage

NOTE!

 The AUX source is selectable even if there is no 

device connected.

If a audio source is connected to the auxillary input (AUX), 
press the [SOURCE] button and select AUX.

Volume can be controlled through the device and with 
SPXM1 volume knob.

The SPXM1 is capable of controlling up to 4 external devices when 
used in conjunction with the optional SwitchHUB (SPXSH440) four 
output solid state switcher. 

To access the controls, press the Accessory Control button 

The SPXM1's camera input can be activated by a trigger wire
or accessed by selecting Camera as the source.

NOTE!

 The camera connected to the input must have power 

for the video signal to be displayed.

Pressing and holding the Accessory Control button
will display the current battery voltage.

NOTE!

 The SPXM1 will display a WARNING message 

when the battery voltage drops below 10.5 volts.

Rotate the [M-KNOB] to cycle through the four switch controls. 

Press the [M-KNOB] to toggle the highlighted switch ON/OFF.

Rotate to cycle through the four switch controls. 

Press to toggle the highlighted switch ON/OFF.

Press to access
Accessory Control 

13.1

VOLTS

Summary of Contents for SPXM1

Page 1: ...1 StingerElectronics com POWERSPORTS AND MARINE MEDIA PLAYER IPX RATED SWITCH COMMAND SPXM1 USER GUIDE...

Page 2: ...not agree please discontinue use and contact STINGER This product is intended for off road use and passenger use only Visit StingerElectronics com for updates and accessories Made for iPod Made for i...

Page 3: ...s depending on the source or menu When listening to a Source Rotate to adjust Volume Volume Level 0 20 will be shown on screen Press to adjust Subwoofer Level Rotate to adjust Subwoofer Level 0 20 Whe...

Page 4: ...red on and the device is within range There are 2 types settings source specific and global Source specific are settings pertaining to the active source and can be accessed by pressing the MENU button...

Page 5: ...radio station to save as a preset Press and Hold the P MODE button for 3 seconds Rotate M KNOB and highlight desired preset position P1 P6 Press and Hold M KNOB for 3 seconds to save preset Recalling...

Page 6: ...ect a song Pressing the BACK button exits the current folder and a different folder can highlighted and selected REPEAT Highlight REPEAT and press the M KNOB to select Highlight SONG FOLDER ALL Press...

Page 7: ...N Press to change tracks Fast Forward Rewind BACK Album Song Artwork Time Bar Source Music SEARCH Highlight SEARCH and press the M KNOB to select Rotate the M KNOB to scroll through the available fold...

Page 8: ...e switcher To access the controls press the Accessory Control button The SPXM1 s camera input can be activated by a trigger wire or accessed by selecting Camera as the source NOTE The camera connected...

Page 9: ...t and Rear channels AUDIO SOURCE GAIN Allows gain adjustment for individual sources Source Radio USB Bluetooth AUX Gain 3 2 1 0 1 2 3dB AUDIO INTERNAL AMP When using external amplifier s the internal...

Page 10: ...r Front Rear or Sub Preamp Voltage 2 Volts Frequency Response 20 20kHz Equalizer 7 Band Graphic Crossover High Pass Low Pass Adjustable gain for each source Tuner AM FM Weather Bands Presets 18 FM 12...

Page 11: ...TE RED SWITCH 2 12V GRAY RED SWITCH 3 12V GREEN RED SWITCH 4 12V PURPLE RED PIN WIRE COLOR DESCRIPTION 1 GREEN REAR LEFT SPEAKER 2 GREEN BLACK REAR LEFT SPEAKER 3 ORANGE WHITE ILLUMINATION 4 WHITE FRO...

Page 12: ...SYSTEM TO SECURE PANEL TO MOUNTING SURFACE BUILT IN 25 WATTS X 4 POWER AMPLIFIER 45W PEAK X 4 PLAYS MP3 WMA WAV FILES REAR AUX INPUT 4 CHANNEL PREAMP OUTPUTS 2 VOLT FRONT AND SELECTABLE REAR SUB EASY...

Reviews: