STIHL KB-KM, KW-KM
Instruction ManualNotice d’emploi
Page 1: ...STIHL KB KM KW KM Instruction Manual Notice d emploi ...
Page 2: ...G Instruction Manual 1 16 F Notice d emploi 17 33 ...
Page 3: ...roduction techniques and comprehensive quality assurance Every effort has been made to ensure your satisfaction and trouble free use of the product Please contact your dealer or our sales company if you have any queries concerning this product Your Dr Nikolas Stihl KombiSystem 2 Guide to Using this Manual 2 Safety Precautions and Working Techniques 2 Using the Unit 5 Approved KombiEngines 7 Assemb...
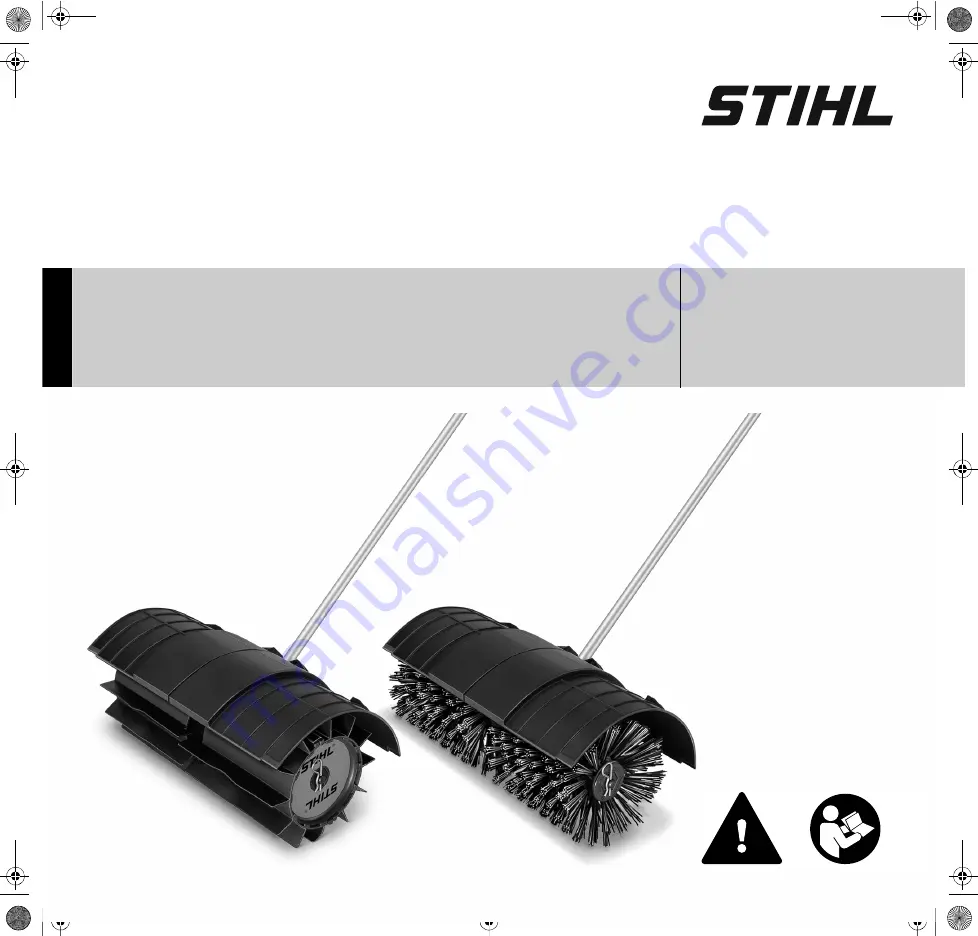
Page 4: ...hanges modifications and improvements may not be covered in this manual The machine should only be provided or loaned to people familiar with this model and its operation The KombiEngine and KombiTool User Manuals should always be handed over with the machine Use the bristle brush only for sweeping areas and paths including uneven and jointed surfaces and natural stone paving Use the sweeper drum ...
Page 5: ... hot muffler away from your body By vehicle When transporting in a vehicle properly secure your machine to prevent turnover damage and fuel spillage Before starting Check that your power tool is properly assembled and in good condition refer to appropriate chapters in the KombiEngine and KombiTool user manuals Tool correctly fitted secure and in perfect condition Both sweeping attachments must be ...
Page 6: ...erty damage The correct engine idle speed is important to ensure that the attachment stops moving when you let go of the throttle trigger Check and correct the idle speed setting at regular intervals If the sweeping attachment still rotates when the engine is idling have your dealer check your machine and make proper adjustments or repairs see KombiEngines user manual Electrostatic charges may bui...
Page 7: ...the engine before changing attachments Maintenance and Repairs Only carry out the maintenance operations and repairs described in the KB KM KW KM KombiTool and KombiEngine instruction manuals All other repairs must be performed by an authorized STIHL service shop Only use original STIHL replacement parts for maintenance and repairs Using replacement parts from other manufacturers may result in dam...
Page 8: ...tor and two extensions These devices divert material away from the machine and the operator N Push the bristle brush steadily at walking pace N Always hold and guide the tool at a shallow angle WARNING The steeper the angle shown above the more difficult it is to control the tool N Guide the bristle brush at right angles to the direction of travel 1 Sweepings are thrown forwards ahead of the opera...
Page 9: ...e Sweeping Attachment Clean away any dirt and debris that has accumulated between the sweeping attachments around the gearbox or between the sweeping attachments and the deflector Shut off the engine Pull the hitch pins out of the axle Remove the sweeping attachments from the axle and clean them Clean away dirt and debris from the machine Refit the sweeping attachments see Replacing the Sweeping A...
Page 10: ... the drive tube 3 and beyond the mark arrow Then pull the deflector back until it is flush with or just covers the mark arrow N Line up the deflector so that it is vertical and the fixing lug arrow on the drive tube points up upper magnified arrow N Tighten down the clamp screws 1 firmly WARNING Check that the deflector is secure it must not be possible to rotate it on the drive tube Mounting the ...
Page 11: ...mly WARNING It must not be possible to rotate the gearbox on the drive tube N Mount the two sweeping attachments see Replacing the Sweeping Attachmenrs N Push the lug 1 on the drive tube into the slot 2 in the coupling sleeve as far as stop When correctly installed the red line 3 arrow point must be flush with the end of the coupling sleeve N Tighten down the star knob 4 firmly Removing the KombiT...
Page 12: ...p N Balance the machine see Balancing the Machine Attaching Machine to Harness N Attach the carabiner 1 to the carrying ring 2 on the drive tube hold the carrying ring steady Disconnecting Machine from Harness N Press down the bar on the carabiner 1 and pull the carrying ring 2 out of the carabiner Throwing Off the Machine WARNING The machine must be quickly thrown off in the event of imminent dan...
Page 13: ...l the sweeping attachments touch the ground N Tighten down the screw on the carrying ring firmly Starting the Engine Always follow the operating instructions for the KombiEngine and basic power tool N Place the unit on the ground The sweeping attachments may touch the ground but no other obstacles risk of accidents N Make sure you have a firm footing either standing stooping or kneeling N Hold the...
Page 14: ...n the sweeping attachments inspect them for damage and wear N If the KombiTool is removed from the KombiEngine and stored separately Fit the protective cap on the drive tube to avoid dirt getting into the coupling N Store the machine in a dry high or locked location out of the reach of children and other unauthorized persons Bristle Brush Removing N Remove the hitch pin 1 from the end of the axle ...
Page 15: ...WARNING Always mount both sweeper drums The following intervals apply to normal operating conditions only If your daily working time is longer or operating conditions are difficult very dusty work area etc shorten the specified intervals accordingly All accessible screws and nuts N Retighten if necessary Sweeping attachments and deflectors N Visual inspection check tightness before starting work a...
Page 16: ...Deflector 8 Drive Tube Bristle Brush 9 Roller Brush PowerSweepTM 10 Sweeper Drum Definitions 1 Gearbox Reduces input speed to required axle speed 2 Axle Connects the sweeping attachment to the output shaft 3 Hitch Pin Secures the attachments and simplifies removal and installation of the attachments Main Parts 7 8 1 479BA022 KN 2 3 9 9 4 5 10 10 3 2 1 1 6 2 4 5 ...
Page 17: ...ther repairs must be carried out by a servicing dealer STIHL recommends that you have servicing and repair work carried out exclusively by an authorized STIHL servicing dealer STIHL dealers are regularly given the opportunity to attend training courses and are supplied with the necessary technical information When repairing the machine only use replacement parts which have been approved by STIHL f...
Page 18: ...nd regulations STIHL products must not be thrown in the garbage can Take the product accessories and packaging to an approved disposal site for environment friendly recycling Contact your STIHL servicing dealer for the latest information on waste disposal Disposal 000BA073 KN ...
Page 19: ...eillance de qualité les plus évoluées Nous mettons tout en œuvre pour que cette machine vous assure les meilleurs services de telle sorte que vous puissiez en être parfaitement satisfait Pour toute question concernant cette machine veuillez vous adresser à votre revendeur ou directement à l importateur de votre pays Dr Nikolas Stihl CombiSystème 18 Indications concernant la présente Notice d emplo...
Page 20: ... devons nous réserver tout droit de modification de nos produits en ce qui concerne la forme la technique et les équipements On ne pourra donc en aucun cas se prévaloir des indications et illustrations de la présente Notice d emploi à l appui de revendications quelconques Ne prêter ou louer la machine qu à des personnes familiarisées avec ce modèle et sa manipulation et toujours y joindre les Noti...
Page 21: ...ui risqueraient de se prendre dans le bois les broussailles ou les pièces en mouvement de la machine Ne pas non plus porter d écharpe de cravate ou de bijoux Les personnes aux cheveux longs doivent les nouer et les assurer de telle sorte qu ils soient maintenus au dessus des épaules AVERTISSEMENT Porter un dispositif antibruit personnel par ex des capsules protège oreilles STIHL propose une gamme ...
Page 22: ... en parfait état de fonctionnement risque d accident Pour les outils de balayage et de nettoyage positionner le réducteur de telle sorte que l arbre d entraînement de l outil se trouve en haut par rapport au tube Pour parer à toute éventualité à l utilisation d un harnais s entraîner pour savoir se dégager rapidement de la machine Lors de cet exercice ne pas jeter la machine sur le sol pour ne pas...
Page 23: ...iéreuses avant de les balayer risque d explosion de poussières Si la machine a été soumise à des sollicitations sortant du cadre de l utilisation normale par ex si elle a été soumise à des efforts violents en cas de choc ou de chute avant de la remettre en marche il faut impérativement s assurer qu elle se trouve en parfait état de fonctionnement voir également Avant la mise en route du moteur Il ...
Page 24: ...u réparation avant de procéder au montage ou au démontage des outils de balayage avant toute intervention pour éliminer un dérangement quelconque Ranger la machine comme décrit dans les Notices d emploi chapitre Rangement du dispositif à moteur Outils de balayage La gamme d outils CombiSystème pour le balayage et le nettoyage de surfaces comprend les versions suivantes balai brosse KB KM et balai ...
Page 25: ... En effet plus l angle montré sur l illustration est grand plus la machine est difficile à contrôler N mener le balai brosse à angle droit par rapport au sens de la marche 1 de l utilisateur les saletés sont projetées vers l avant dans le sens opposé à l utilisateur AVERTISSEMENT Le balai brosse exerce une poussée en direction de l utilisateur Balai racleur L outil CombiSystème balai racleur KW KM...
Page 26: ... protecteur arrêter le moteur extraire la goupille élastique de l arbre enlever les outils de balayage de l arbre et les nettoyer enlever les saletés Pour le remontage voir Remplacement de l outil de balayage montage de l outil CombiSystème Utiliser exclusivement des moteurs CombiSystème livrés par STIHL ou sur lesquels le montage de cet outil a été expressément autorisé par STIHL L utilisation de...
Page 27: ...nsuite pousser le capot protecteur dans le sens opposé jusqu à ce qu il atteigne ou recouvre tout juste la marque flèche dans l agrandissement inférieur de l illustration N positionner le capot protecteur de telle sorte qu il se trouve exactement à la verticale et que le téton flèche dans l agrandissement supérieur de l illustration du demi tube soit orienté à la verticale vers le haut N serrer fe...
Page 28: ...s vis de serrage AVERTISSEMENT Le réducteur ne doit plus pouvoir tourner sur le tube N Monter les deux outils de balayage voir Remplacement de l outil de balayage N Introduire le téton 1 du tube à fond dans la rainure 2 du manchon d accouplement Après l emmanchement correct la ligne rouge 3 pointe de la flèche doit affleurer avec le manchon d accouplement N serrer fermement la vis à garot 4 Démont...
Page 29: ... 2 se trouve environ à une largeur de paume en dessous de la hanche droite N équilibrer la machine voir Équilibrage Accrochage de la machine au harnais N Accrocher le mousqueton 1 à l anneau de suspension 2 fixé sur le tube en retenant l anneau de suspension Décrochage de la machine du harnais N Appuyer sur la languette du mousqueton 1 et sortir l anneau de suspension 2 du mousqueton Dégagement ra...
Page 30: ...ine N Desserrer la vis 3 N faire coulisser l anneau de suspension de telle sorte que les outils de balayage touchent le sol N serrer fermement la vis de l anneau de suspension Mise en route du moteur Pour la mise en route suivre impérativement les instructions données pour le moteur CombiSystème ou pour la machine de base N Poser la machine sur le sol dans une position sûre Les outils de balayage ...
Page 31: ...machine de base Pour un arrêt de travail de 3 mois ou plus N enlever les outils de balayage les nettoyer et contrôler s ils ne sont pas endommagés ou usés N si l outil CombiSystème est conservé séparément sans être accouplé au moteur CombiSystème emboîter le capuchon de protection sur le tube pour éviter l encrassement de l accouplement N conserver la machine à un endroit sec et sûr La ranger de t...
Page 32: ...onter les deux rouleaux racleurs Les indications ci après sont valables pour des conditions d utilisation normales Pour des conditions plus difficiles ambiance très poussiéreuse etc et des journées de travail plus longues il faut réduire en conséquence les intervalles indiqués Vis et écrous accessibles N Resserrage au besoin Outils de travail et dispositifs de protection N Contrôle visuel contrôle...
Page 33: ...ille de protection du tube 7 Capot protecteur 8 Tube Balai brosse 9 Brosse PowerSweepTM balai racleur 10 Rouleau racleur avec ceinture à lamelles Définitions 1 Réducteur Assure la démultiplication du régime du moteur pour donner le régime qui convient pour les outils de balayage 2 Arbre Accouple l outil de balayage à l arbre de sortie Principales pièces 7 8 1 479BA022 KN 2 3 9 9 4 5 10 10 3 2 1 1 ...
Page 34: ...tes dans la présente Notice d emploi Les réparations plus poussées ne doivent être effectuées que par le revendeur spécialisé STIHL recommande de faire effectuer les opérations de maintenance et les réparations exclusivement chez le revendeur spécialisé STIHL Les revendeurs spécialisés STIHL participent régulièrement à des stages de perfectionnement et ont à leur disposition les informations techn...
Page 35: ...es produits STIHL ne doivent pas être jetés à la poubelle Le produit STIHL la batterie les accessoires et leur emballage doivent être mis au recyclage Consulter le revendeur spécialisé STIHL pour obtenir les informations d actualité concernant l élimination écocompatible des déchets Mise au rebut 000BA073 KN ...
Page 36: ...www stihl com 04584798221A 0458 479 8221 A 0458 479 8221 A CDN GF ...