background image

4 pcs - 

H1

- 6 -

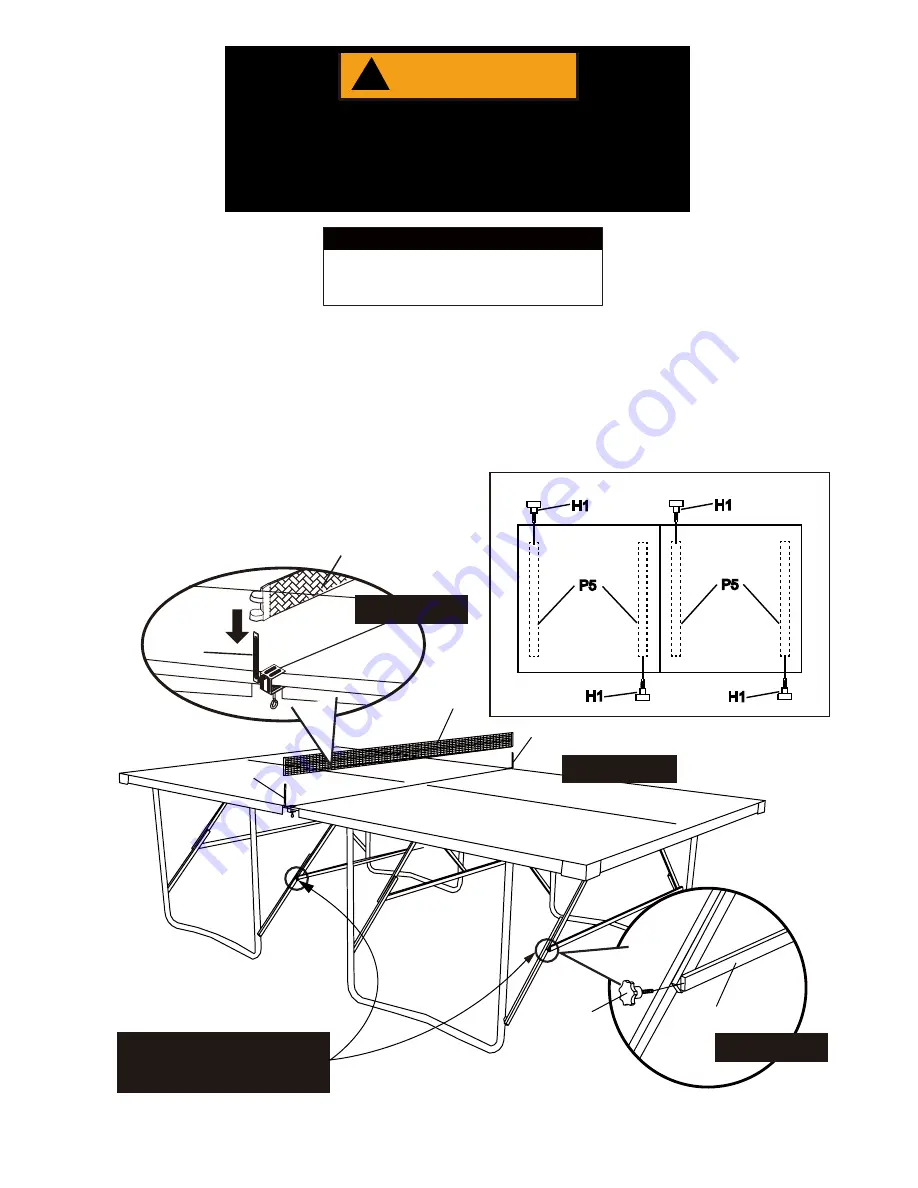
Attach one 

P6

 Net Post to the middle edge of where the table halves meet. 

Repeat this with other 

P6

 Net Post on opposite side. 

STEP 4:

PARTS  REQUIRED

2 pcs - 

P6

 Net Post

1 pc - 

P7

 Net

4 pcs - 

H1


Tensioning Knob Bolt – Short

2 pcs - 

P6

 Net Post

1 pc - 

P7

 Net

Then, slide 

P7 

Net into corresponding 

P6 

Net Post and repeat for the other side  as shown in 

DETAIL F

.  

Install  

H1 

Tensioning Knob Bolt - Short,


in one end of each  

P5 

Upper Leg Connector as shown in 

DETAIL G.

Snug Tighten these 4 pcs of 

H1 

Tensioning Knob Bolts.

!

WARNING

THIS STEP REQUIRES TWO CAPABLE ADULTS.

VERY CAREFULLY TURN THE TABLE OVER AND SET IT

ON ITS LEGS.  BE CAREFUL THE TABLE IS HEAVY . 

DROPPING THE TABLE CAN CAUSE SERIOUS INJURIES

OR PROPERTY DAMAGES. 

TOP  VIEW

P7

P6

P7

P6

P6

FIGURE 4

NOTED:

H1

DETAIL B

DETAIL F

P5

DETAIL B

DETAIL G

P5

H1

Do not overtighten.

P5

H1

H1

H1

Install and snug tighten H1 on 

other end of P5.

Summary of Contents for Play The Best T8485F

Page 1: ...NFORMANTION R Escalade Sport products may be manufactured and or licensed under the following patents 6120397 5816957 5769744 5119741 4911085 4717157 D460140 D420563 Additional patents may be pending...

Page 2: ...e THE TABLE TOP STORAGE OF YOUR TABLE To clean your table use a soft damp NOT WET cloth only To prevent damage to your table s playing surface DO NOT USE ANY CHEMICALS ABRASIVE OR CLEANING PRODUCTS on...

Page 3: ...to Scale P1 Table Tennis Table Top and Frame Assembly 2 pcs P2 Leg With Leg Caps 4 pcs Pre installed P3 P4 Lower B Leg Connector 8 pcs Pre installed P6 Net Post P5 Upper Leg Connector 2 pcs 4 pcs P7...

Page 4: ...ennis Table Top and Frame Assembly flat with playing surface facing down as shown in FIGURE 1 Unlock the SAFETY LOCK as shown in DETAIL A STEP 2 Carefully Pull open the P2 Legs as shown in FIGURE 2 FI...

Page 5: ...TEN AND CRUSH TUBES Repeat procedures for other table top STEP 3 P5 P5 P5 FIGURE 3 DETAIL B DETAIL B DETAIL B DETAIL C H2 H2 P4 P4 P3 P5 P3 P3 P4 NOTED Both P3 and P4 are pre installed H2 P3 P4 P4 DET...

Page 6: ...shown in DETAIL F Install H1 Tensioning Knob Bolt Short in one end of each P5 Upper Leg Connector as shown in DETAIL G Snug Tighten these 4 pcs of H1 Tensioning Knob Bolts WARNING THIS STEP REQUIRES T...

Page 7: ...WITH OPENING AND CLOSING INSTRUCTIONS COULD RESULT IN PERSONAL INJURY OR PROPERTY DAMAGE STORAGE OF THE TABLE STEP 1 STEP 3 Fold each Leg and half table as shown in FIGURE 7 STEP 4 Lock the table usin...

Page 8: ...C5 C5 C5 C6 C6 C8 C2 C5 C6 C7 P3 P4 C5 C3 C5 P2 P1 P5 C4 C17 C18 C18 C6 DETAIL H DETAIL G DETAIL E DETAIL D DETAIL C DETAIL B C15 C10 C10 C10 C11 8 H1 C8 C1 C9 C14 C12 C13 C16 C10 DETAIL A H2 DETAIL F...

Page 9: ...ut 8 C7 T8485SY C7 8 mm x 18 mm Plastic Bushing 8 DETAIL B C3 C5 T8485SY C3 8 mm x 50 mm Allen Head Bolt 8 T8485SY C5 8 mm x 22 mm Flat Washer 16 C6 T8485SY C6 8mm Nylon Lock Nut 8 C8 T8485SY C8 8 mm...

Page 10: ...18 T8485SY C18 6 mm x 18 mm Plastic Flat Washer 8 mm Nylon Lock Nut 16 C6 T8485SY C6 8 3 5 mm x 14 mm Round Head Screw C10 T8485SY C10 32 Metal Bracket C15 T8485SY C15 8 DETAIL G C1 T8485SY C1 3 5 mm...

Reviews: