2
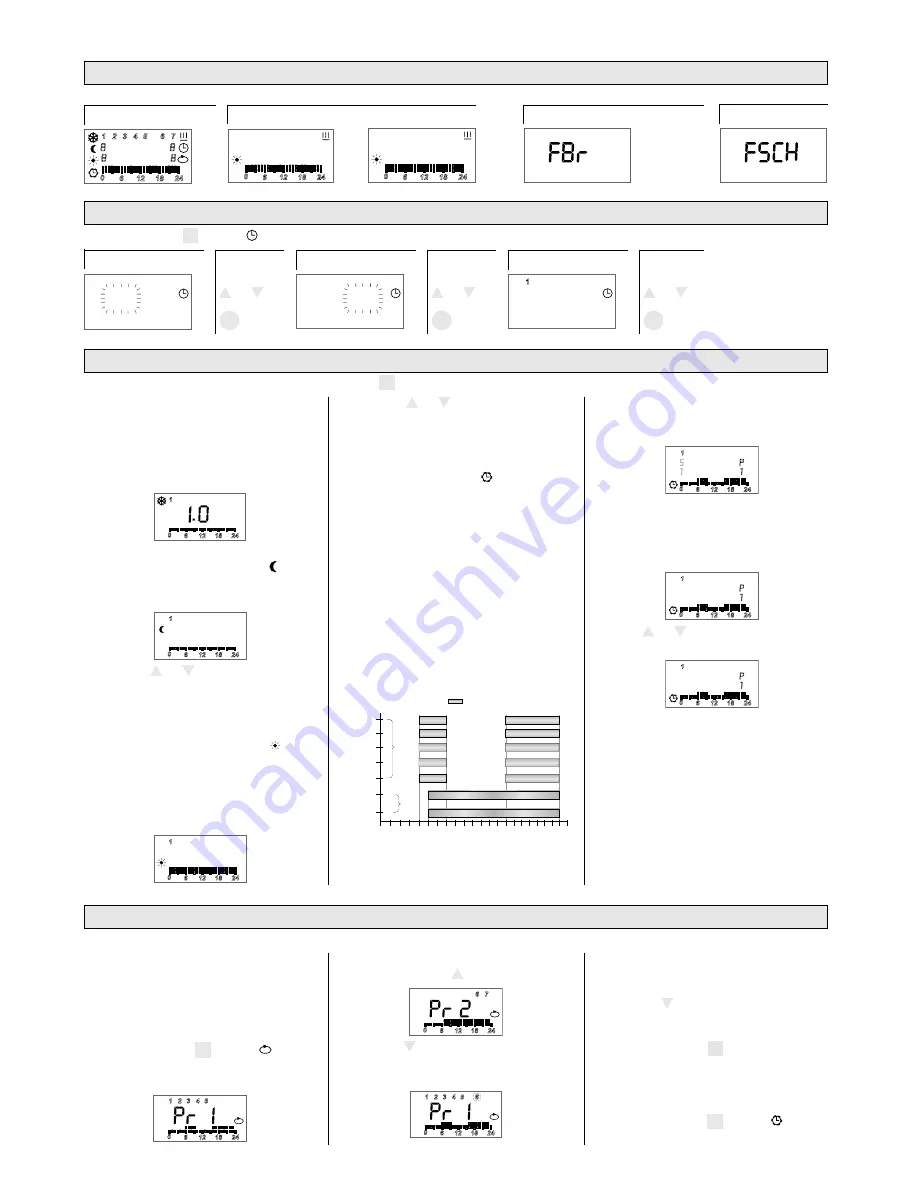
1.3 Operating modes
1.4 Changing the timer program
To call up the desired operating mode, press push-button
M
until the respective symbol appears in the display.
The switching times of the timer program can be adapted to the prevailing wishes of the user.
Allocating the daily program
A program must be allocated to each day of
the week, there is no day which doesn’t have
a program allocation. To remove a day from a
program, the day in question must be
allocated to another program.
⇒
Press push-button
M
until the
P
,
Pr 1
(Program 1) symbol and the days
allocated to the program are displayed;
1
6
12
18
24
0
P
2
3
4 5
⇒
Switch between the programs (Pr 2, Pr 3,
Pr 1, . . .) using the
+
push-button;
6
6
12
18
24
0
7
P
⇒
Press the
–
push-button, to display the days
not allocated
to the selected program, in
flashing mode;
1
6
12
18
24
0
P
2
3
4 5
6
⇒
Press the
OK
push-button to add the
selected day to the selected program, or
switch to the next as yet unallocated day
using the
–
push-button;
⇒
Repeat steps as described, until all days
have been allocated as desired;
⇒
Press push-button
M
to terminate the
process – the display changes to the frost
protection symbol.
Program switching times
⇒
Press push-button
M
until the symbol
is displayed;
1.3.1 Frost protection
7
Non-changeable setpoint value
(dispaly
1.0
),
which is activated at a floor temperature of
approx. 10 °C. All displays except the frost
protection symbol are extinguished after
approx. 20 seconds.
1
6
12
18
24
0
1.3.2 Off-peak temperature
Reduced value in comparison to the comfort
temperature, e. g. during the night-time hours.
1
6
12
18
24
0
1.8
⇒
Press the
+
or
–
push-button to change
the setpoint value. Confirm by pressing the
OK
push-button, otherwise the previously
set value will be restored after 20 seconds.
1.3.3 Comfort temperature
Here, the preferred floor temperature during
the main period of use is set. In this
operating mode, the thermostat maintains
the set value by intermittent operation of the
floor temperature heating.
1
6
12
18
24
0
2.5
⇒
Press the
+
or
–
push-button to change
the setpoint value. Confirm by pressing the
OK
push-button, otherwise the previously
set value will be restored after 20 seconds.
1.3.4 Timer program
With the built-in timer, each weekday is
allocated to a time program for automatic
changeover between comfort and off-peak
temperature. Three time programs are
available with a specified number of switching
operations during the day, the switching times
of which can be individually set:
Program 1 (P1):
2 switching operations
Program 2 (P2):
1 switching operation
Program 3 (P3):
3 switching operations
The following switching times are set at the
factory for each week (changing between
comfort and off-peak temperature):
6
3
9
15
21
Mo
P
1
S1
E1
S2
E2
S1
E1
S2
E2
S1
E1
S2
E2
S1
E1
S2
E2
S1
E1
S2
E2
E1
E1
S1
S1
P
2
We
Fr
1
3
5
Tu
Th
Sa
Su
2
4
6
7
12
18
24
time
Comfort temperature
da
y
of
the
w
eek
6
00
7
00
23
00
9
00
16
00
23
00
or
1.1 First start-up
After connecting to the mains supply, the following displays appear:
for approx. 5 seconds . . .
. . . then alternately
probe defective or not connected
1.2 First-setting the time and day of the week
Press push-buttom
M
until the function symbol is displayed.
Hour
Push-
button
+
or
–
Minutes
Push-
button
Day of the week
+
or
–
Push-
button
OK
OK
OK
+
or
–
6
12
18
24
0
2.5
6
12
18
24
0
00:00
1
2
3
4 5
6
6
12
18
24
0
7
8
8
8
8
P
88:88
00
:00
00
:00
1
After selecting the timer program, the
thermostat automatically switches to the
program set on the current day of the week.
1
6
12
18
24
0
P
1
S
1
2.5
Party function
Short-term change to the setpoint tempera-
ture within the timer program up until the
next switching time.
1
6
12
18
24
0
P
1
1.8
⇒
Press
+
or
–
push-button to make a
short-term temperature change;
1
6
12
18
24
0
P
1
2.2
⇒
Press
OK
push-button to confirm. The timer
switching program now adopts the change
temperature until the next switching time.
Sensor short-circuit


