background image

33


IMPORTANT 


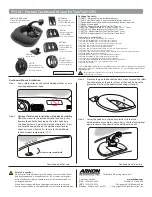
-Only use the supplied pieces and fasten them tightly.
-Do not forget to use all pieces. Install all pieces as shown on this manual.
-Do not try to modify any piece.
-Take care about the weight of the bracket while mounting in a wall. 
-If you mount the bracket in a concrete wall, make sure to use the supplied anchors.
-If you mount the bracket in a wooden wall, it is possible that you need an additional support, 
in order to bear the weight of the TV.
-At least two people are needed for installing the bracket. 
-Choose a 

fl

 at wall, in order to 

fi

 x the TV securely.

-Place a cover protection over the working surface, while you manipulate the monitor and 
the wall bracket.
-Make sure the wall bracket is securely 

fi

 xed to the wall, after the installation.

-Leave at least 15 cm around the unit, and remove all kind of objects.

This stand has double arm and can 

fi

 t LCD / LED screens from 24 to 47”, and can load up to 

44 lb. It is VESA compatible and can be extended up to 400 x 400 mm using the additional 
extensions. 
The arms can be folded at 180° and it is perfect to place it at home of

fi

 ce or TV room. 

Manufactured in low carbon steel 

fi

 nished in black colour. All required 

fi

 ttings are included 

in the package.
Maximum load: 44 lb
Swivel arms
Leveler

HIGHLIGHTS

Summary of Contents for STV-062

Page 1: ......

Page 2: ...c mo utilizar apropiadamente el producto Para apoyo compras y todo lo nuevo que tiene Steren visite nuestro sitio web www steren com Soporte ultra delgado para pantalla LED LCD 24 47 con doble brazo...

Page 3: ...ta de protecci n sobre la superficie en la que trabajar mientras manipula la pantalla y la unidad de soporte en pared Tras la instalaci n compruebe que la unidad est firmemente fijada Durante la insta...

Page 4: ...4 CONTENIDO...

Page 5: ...a de ellas 2 Dependiendo de las entradas para tornillos y dimensiones que tenga su pantalla use los tornillos y rondanas C y G o D y F para instalar la pantalla En caso de ser necesario use las extens...

Page 6: ...rforada el soporte con la pantalla usando los tornillos A 4 Para ajustar la posici n de la pantalla afloje la perilla coloque la pantalla en el ngulo que desee y vuelva a apretar la perilla 5 Tambi n...

Page 7: ...ial donde adquiri el producto Si la presente garant a se extraviara el consumidor puede recurrir a su proveedor para que le expida otra p liza previa presentaci n de la nota de compra o factura respec...

Page 8: ......

Page 9: ...iew this manual thoroughly to ensure proper installation and operation of this product For support shopping and everything new at Steren visit our website www steren com STV 062 24 to 47 ultra slim LE...

Page 10: ...at wall in order to fix the TV securely Place a cover protection over the working surface while you manipulate the monitor and the wall bracket Make sure the wall bracket is securely fixed to the wall...

Page 11: ...4 4 CONTENT...

Page 12: ...s Drill and insert anchors B in each hole 2 Depending on the size of your screen use the screws and washers C and G or D and F to install the display If necessary use the extensions included with the...

Page 13: ...ort with the screen using the screws A to previously perforated wall 4 To adjust the screen position loosen the knob place the display at the desired angle and retighten the knob 5 You can also adjust...

Page 14: ...at any of the addresses mentioned later THIS WARRANTY IS VOID IN THE NEXT CASES If the product has been damaged by an accident acts of God mishandling leaky batteries failure to follow enclosed instru...

Page 15: ......

Page 16: ......

Reviews: