Steren PAR-064, Instruction Manual
The Steren PAR-064 is a high-quality product perfect for those looking for reliable performance. Make sure to get the most out of your device by downloading the Instruction Manual for free from manualshive.com. This user-friendly manual will guide you through setup and troubleshooting, ensuring a seamless experience.
Share
Download


Reviews:
No comments
Related manuals for PAR-064

ES06461V
Brand: Home Zone Security Pages: 2

1004391988
Brand: Home Accents Holiday Pages: 2
AL409 Series
Brand: Intermatic Pages: 2

83135
Brand: Gearwrench Pages: 2

Denali Series
Brand: B-K lighting Pages: 4

Akku-LED-Lampe
Brand: REMS Pages: 116

LED Floor SLS-400 RGB DMX
Brand: EuroLite Pages: 22

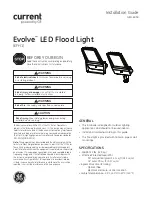
Current Evolve GEH-6033
Brand: GE Pages: 12

Evolve EFM1
Brand: GE Pages: 12
Evolve EFH1
Brand: GE Pages: 12

Ultra Sport GEH-5897
Brand: GE Pages: 8

Powerflood HLU
Brand: GE Pages: 2

PF-154
Brand: GE Pages: 4

Criterion GEH-5874
Brand: GE Pages: 4

SBF Wide Beam Floodlight
Brand: GE Pages: 2

CHLORIDE Fusion F1WIC
Brand: SIGNIFY Pages: 7

43221
Brand: EXTOL LIGHT Pages: 22
PowerPixel4-RGB
Brand: Briteq Pages: 68


