background image

ESP

AÑOL

Antes de utilizar su nuevo Multímetro Digital Económico lea 
este instructivo para evitar cualquier mal funcionamiento. 
Guárdelo para futuras referencias.

ESPECIFICACIONES GENERALES

Pantalla de 3-1/2” dígitos LCD, 13mm altura, con indicador de 
polaridad.
Selector giratorio para las diferentes escalas y las diferentes 
funciones, así como apagado.
Para que la batería tenga más tiempo de vida, colocar la perilla 
giratoria en la posición de “OFF” cuando no se este utilizando el 
multímetro.
Condiciones de operación: 0 a 50°C, menos del 80% de 
humedad relativa para 35°C, menos de 70% de humedad 
relativa para 35° a 50°C.
Condiciones de almacenaje: -10°C a 50°C.
Alimentación: Batería de 9V  alcalina o carbón zinc. (1 x 9V)
Dimensiones: 129 x 74 x 28 mm
Entradas: 3 conectores hembra (Jack) -- “Común” para insertar 
la punta de prueba color negro
(negativa)“V

Ω

 mA” para insertar la punta de prueba color rojo 

(positiva) para medir voltaje,
resistencia y corriente hasta 200 mA 
Se cambia la punta al conector marcado con 10 ADC para medir 
hasta 10 A.

PRECISION

Garantizada para 1 año a 23°C ± 5°C con 75% de humedad 
relativa.

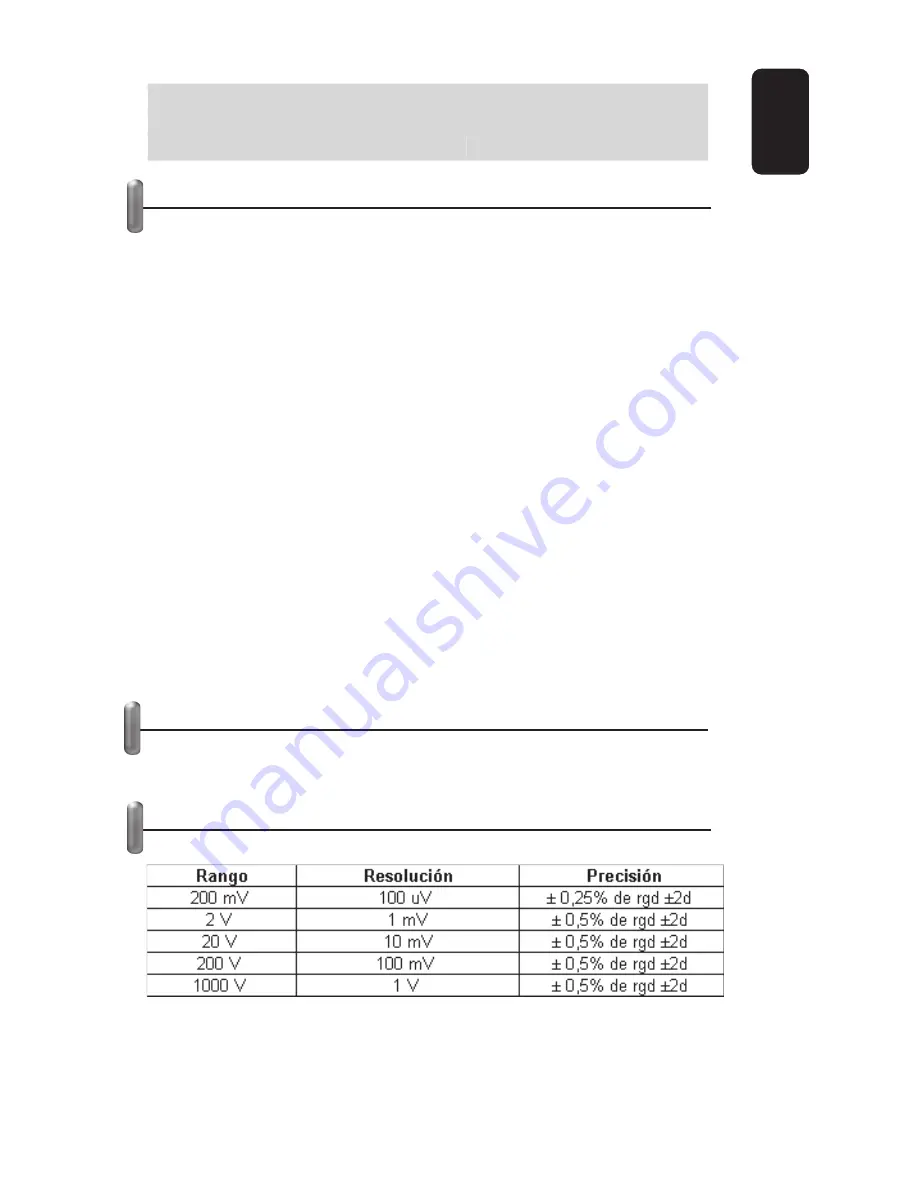
VOLTAJE DE CD ( V… )

Protección contra sobrecarga: 200 V rms CA (~) para el rango 
de 200 mV y 1000 V CD (…) o 750 Vrms CA (~) para los otros 
rangos.

ESPAÑOL-2

Antes de utilizar su nuevo Multímetro Digital Económico lea 
este instructivo para evitar cualquier mal funcionamiento.
Guárdelo para futuras referencias.

Summary of Contents for MUL-015

Page 1: ......

Page 2: ...n zinc Dimensions 129 x 74 x 28 mm Connectors 3 female jacks Common to insert the black lead negative VΩ mA to insert the red lead positive to measure voltage resistance and current up to 200mA Change the lead to 10 ADC to measure up to 10A PRECISION Guaranteed for 1year from 23 C to 5 Cwith 75 of relative humidity DC VOLTAGE Overcharge Protection 200 V rms AC for the ranges of 200mV and 1000 VDC ...

Page 3: ...ure that the testing points are in good conditions MEASURING METHODS DC AC VOLTIMETER 1 Connect the red lead to VΩ mA then connect the black lead to COM 2 Place the rotary switch in VDC or VAC position If the voltage is unknown at the moment to be measured place the selector in the highest range and while measuring reduce the range until you get the right value 3 Connect the testing leads to the d...

Page 4: ...the value in the screen DIODE METER 1 Put the read lead in VΩmA and the black lead in COM connectors 2 Place the rotary switch in the position 3 Connect the red lead to the diode s anode and the black lead to diode s cathode 4 The value will be displayed as mVolts TRANSISTOR MEASUREMENT hFE 1 Set the dial to the hFE range 2 Determine if the transistor is NPN or PNP and localize the emitter base an...

Page 5: ...ving the cover from your multimeter make sure the testing points are disconnected to avoid the risk of electrical shock ACCESORIES Operation Manual Testing Points Battery included The characteristics for this multimeter are subject to change without notice The characteristics for this multimeter are subject to change without notice ...

Page 6: ......

Page 7: ...lativa para 35 a 50 C Condiciones de almacenaje 10 C a 50 C Alimentación Batería de 9V alcalina o carbón zinc 1 x 9V Dimensiones 129 x 74 x 28 mm Entradas 3 conectores hembra Jack Común para insertar la punta de prueba color negro negativa VΩ mA para insertar la punta de prueba color rojo positiva para medir voltaje resistencia y corriente hasta 200 mA Se cambia la punta al conector marcado con 10...

Page 8: ...IENTE DE CD A Protección contra sobrecarga fusible de 200 mA 250 V en el rango de 10 A sin fundirse RESISTENCIA Ohms Voltaje máximo en circuito abierto 2 8 V Protección contra sobrecarga 15 segundos máximo a 220 V rms en todos los rangos INSTRUCCIONES DE OPERACION ADVERTENCIA 1 Para prevenir el riesgo de un choque eléctrico y o daño al instrumento NO mida voltajes que puedan exceder de 500 Volts ...

Page 9: ...loque la punta de prueba roja en la posición VΩmA y negra en posición COM para mediciones hasta 200mA para medir 10A coloque la punta roja en donde indica 10 ADC 2 Coloque el selector giratorio en la posición de DCA deseada 3 Abra el circuito a ser medido y conecte las puntas de prueba en serie con la carga en donde la corriente debe ser medida 4 Lea el valor de la corriente en la pantalla display...

Page 10: ... atribuible a un error en la operación Si el símbolo BAT aparece en la pantalla este indica que debe remplazarse la batería Para reemplazar la batería y el fusible 200 mA 250 V quite la tapa del multímetro removiendo los dos tornillos de la parte posterior del mismo Reemplace y vuelva a poner la tapa en su lugar PRECAUCION Antes de destapar su multímetro asegúrese que las puntas de prueba estén de...

Page 11: ...es to costumer as well as warranty service at any of the addresses mentioned later THIS WARRANTY IS VOID IN THE NEXT CASES If the product has been damaged by an accident acts of God mishandling leajy batteries failure to follow enclosed instructions improper repair by unauthorized personnel improper safe keeping among others a The consumer can also claim the warranty service in the purchase establ...

Page 12: ...A EFECTIVA EN LOS SIGUIENTES CASOS 1 Cuando el producto ha sido utilizado en condiciones distintas a las normales 2 Cuando el producto no ha sido operado de acuerdo con el instructivo de uso 3 Cuando el producto ha sido alterado o reparado por personal no autorizado por Electrónica Steren S A de C V El consumidor podrá solicitar que se haga efectiva la garantía ante la propia casa comercial donde ...

Reviews: