background image

INSTALACIÓN DE DRIVERS

Primeramente instale los drivers correspondientes ANTES de 
conectar la capturadora a la computadora.

1.- Inserte el disco de instalación en la unidad de CD de la 
computadora.
2.- Presione Inicio, Ejecutar en Windows e introduzca el 
siguiente comando: XX:\4eyeGrab\Driver\Setup.exe, donde XX 
es la unidad de CD-ROM.
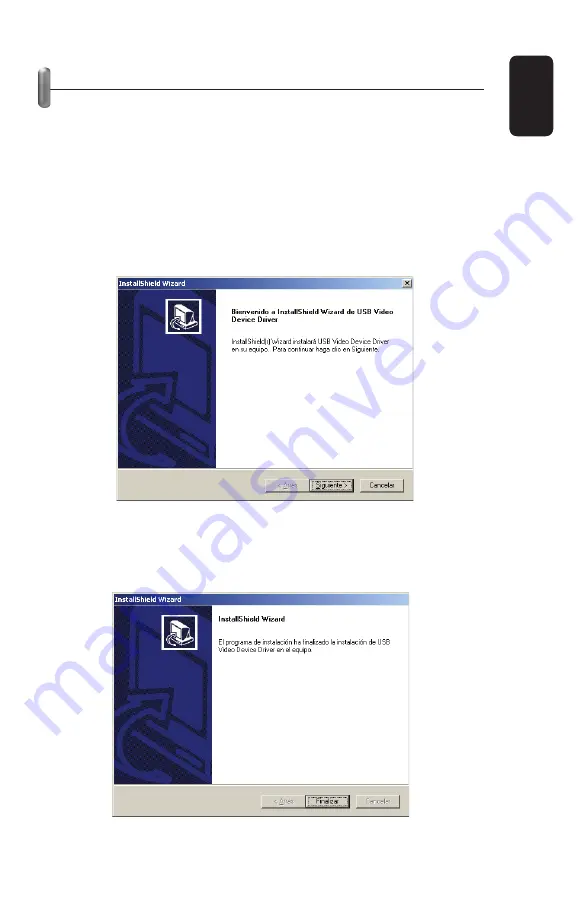
3.- En la pantalla de Bienvenida, presione Siguiente para 
continuar.

4.- El proceso de instalación comienza. 
5.- Para concluir, presione Finalizar y reinicie la computadora.

ESP

AÑOL

ESPAÑOL-5

Summary of Contents for COM-437

Page 1: ......

Page 2: ...isualization and recording of four video channels simultaneously and on a single viewable screen Visualization Supports the following visualization modes One image four images and sequence mode Supports full screen display Display for camera identification date and time Allows you to change camera names Recording Instant or programmed recording Frames per second settings Supports linear or circula...

Page 3: ... devices with video cards included in the motherboard are not recommended 1 available USB 2 0 port DirectX 9 0 or higher Intel Pentium 4 at 1 Ghz or better or equivalent AMD processor 128 MB RAM Windows 2000 with SP4 or Windows XP with SP1 or better Contained Within 1 Video Capture Device 1 CD with drivers and utilities 1 Instruction Manual ENGLISH ENGLISH 3 ...

Page 4: ...deo Input Allows for the connection of up to four video cameras with RCA connectors 2 USB jack Allows you to connect the video capture device to your computer Make sure that your computer has USB 2 0 ports before installing this device 1 2 1 2 ...

Page 5: ...e windows start menu and then the RUN option Type the following command XX 4eyeGrab Driver Setup exe where XX is the drive where the disc is located 3 On the welcome screen that appears click the NEXT button in order to continue 4 The installation process will now begin 5 In order to conclude the installation click the FINISH button You will now need to restart your computer ENGLISH ENGLISH 5 ...

Page 6: ... be completely ready for use If you wish to verify that the device has been properly installed follow these steps Open the control panel system hardware device administrator Here you should find the driver USB 2 0 A V Converter ENGLISH ENGLISH 6 If you wish to verify that the device has been properly installed follow these steps Open the control panel system hardware device administrator Here you ...

Page 7: ...ws start menu and then the RUN option Type the following command XX 4eyeGrab AP Software Setup exe where XX is the drive where the disc is located 3 On the welcome screen that appears click the NEXT button in order to continue 4 Click the NEXT button in order to select a destination folder ENGLISH ENGLISH 7 ...

Page 8: ...cessary to install Windows Media Tools A new installation window will appear on the screen Click YES in order to continue with the installation process 7 On the Windows Media Tools start window click NEXT in order to continue with the installation process ENGLISH ENGLISH 8 ...

Page 9: ...lect COMPLETE INSTALLATION and click NEXT It is possible that a warning window will appear If this is the case simply click OK 9 On the next window click FINISH The installation will begin ENGLISH ENGLISH 9 ...

Page 10: ... conclude the installation of Windows Media Tools 11 Click FINISH in order to conclude the entire installation process for the application software 12 You will find a 4 eyeGrab icon on your Windows desktop ENGLISH ENGLISH 10 ...

Page 11: ...l be displayed on your monitor The red colored text indicates a function being executed The green colored text indicates a function that can be executed The white colored text represents functions that cannot be executed at this time ENGLISH ENGLISH 11 To USB port To an external AV device ...

Page 12: ...e camera being recorded again Functions Display Camera I Camera IV Press in order to individually view each of the cameras connected to the video capture device Camera All This option allows you to view all four cameras if they are all connected at the same time Sequence Press in order to view each of the cameras in sequential order for a predetermined amount of time The sequence time can be progr...

Page 13: ...rrent version of the software Exit Quits the recording program Always on top Allows you to keep the recording program on top of all other active programs The frames per second being used will diminish when viewing all four cameras at the same time If you wish to record in real time it is recommended to use only one camera in the full screen ENGLISH ENGLISH 13 The frames per second being used will ...

Page 14: ... see four cameras on one image The file generated from the recording will be saved as YYMMDD_hhmmss avi whereYY is year MM is month DD is day hh is hour mm is minute and ss is second Fullscreen This screen displays the current camera s image on the full screen Double click the image on the full screen with the left mouse button in order to return to normal screen view ENGLISH ENGLISH 14 The file g...

Page 15: ...ll be displayed on a separate window Click the right mouse button over the captured image and you will have available the following options Save Click this in order to save the captured image on the computer s hard drive Delete Deletes the captured image Preview Displays the image in real size Print Allows you to send the captured image to the printer ENGLISH ENGLISH 15 ...

Page 16: ... a previously saved file In the search option specify the camera from which you wish to search for files and click FIND A list of previously saved files from that specific camera will be displayed on the screen If you know the exact time and date of the desired recording you can select the date and or time options If you are not sure of the exact date and time of the recording you can indicate a s...

Page 17: ...es a video that is in playback Stop Stops the current playback Slow Diminishes the current playback speed The speed options are 1 2x 1 3x and 1 4x Fast Increases the current playback speed The speed options are 2x 3x and 4x Rewind Rewinds the current playback at a predetermined speed which can be determined each time you click rewind The speed options are 1x 2x 3x and 4x ENGLISH ENGLISH 17 ...

Page 18: ...d ss is second File Information Displays information about the video that is currently in playback recording beginning time recording ending time and recording duration time Fast File Search Allows you to make a fast search for a recorded file in the record folder You must specify the date before clicking the search button Format Date YYYY MM DD Time AM PM hh mm Click in order to return to the pro...

Page 19: ...order to activate the movement record function The camera s recording will stop after 5 seconds without any movement Camera Setting With this option you will be able to change the following parameters System PAL or NTSC ENGLISH ENGLISH 19 ...

Page 20: ...s per second 5 fps views the image at 5 frames per second 6 fps views the image at 6 frames per second 7 fps views the image at 7 frames per second OSD Use this option in order to change the name of each of the cameras according to your needs Select the camera to be renamed and in the bottom area input the desired name Color Settings Allows you to adjust the brightness contrast tint saturation and...

Page 21: ...oose the sensitivity level of the detector between Low Middle or High before the recording begins Detecting Action In this menu you will be able choose the action that the camera will take when it senses movement You can either choose record or alarm Once these settings have been made click OK in order to save the changes Click CANCEL in order to exit without saving any changes and return to the o...

Page 22: ...is option is only available for one camera at a time Time Stamp Allows you to activate or deactivate the time visualization option while recording Frame Rates Allows you to choose the desired velocity for each camera Record Dir and Mode The linear option allows you to record continually until the hard drive has only 30 MB of free space ENGLISH ENGLISH 22 ...

Page 23: ...cord over the previously saved files You can also change the folder where your recorded videos will be saved Simply click and you will be able to choose a different destination folder Click OK in order to save the changes Click CANCEL in order to exit this menu without saving the changes ENGLISH ENGLISH 23 ...

Page 24: ...r to choose one it must be selected in the above options Once you have chosen a camera to program input the start date and time as well as the end date and time Once you have finished programming one camera you can use this procedure for programming the other cameras Click OK in order to save the changes Click CANCEL in order to exit without saving the changes ENGLISH ENGLISH 24 ...

Page 25: ...ard drive update your IDE ATA ATAPI controller Close all the windows you are not using Do not run programs while recording Defragment your hard drive Free up more space on your hard drive If possible use a hard drive with 7200 rpm or better Make sure that you have DirectX 9 0 or better installed on your computer Make sure the driver on your video card is updated Close all programs you are not usin...

Page 26: ...dio recording Permitted for only one camera Video input Four analog RCA inputs System NTSC and PAL Fixed image capture JPG format Fixed image resolution 640 x 480 File size 400 MB per day in 1 FPS mode Compression MPEG4 Input 5V through the USB port Product design and specifications are subject to change without previous notice ENGLISH ENGLISH 26 Product design and specifications are subject to ch...

Page 27: ......

Page 28: ...a pantalla Visualización Soporta los siguientes modos de visualización Una imagen 4 imágenes modo de secuencia Soporta desplegado de pantalla completa Desplegado de identificador de cámara hora y fecha Permite el cambio de nombre de cámara Grabación Grabación instantánea o programada Ajuste de cuadros por segundo Soporta modo linear o circular sobre escritura Permite grabación independiente con cá...

Page 29: ...a de vídeo equipos con tarjeta de vídeo incluida en la tarjeta madre no son recomendados 1 puerto USB 2 0 disponible DirectX 9 0 o superior Intel Pentium 4 a 1Ghz o superior o equivalente con procesador AMD 128Mb en RAM Windows 2000 con SP4 o Windows XP con SP1 o superior CONTENIDO 1 capturadora de vídeo 1 CD con drivers y utilidades 1 manual de instrucciones ESPAÑOL ESPAÑOL 3 ...

Page 30: ...o Permite conectar hasta 4 cámaras de vídeo con conectores RCA 2 Conector USB Permite conectar la capturadora a la computadora Asegúrese de que su computadora cuenta con puertos USB 2 0 antes de instalar el equipo ESPAÑOL ESPAÑOL 4 1 2 1 2 ...

Page 31: ...ión en la unidad de CD de la computadora 2 Presione Inicio Ejecutar en Windows e introduzca el siguiente comando XX 4eyeGrab Driver Setup exe donde XX es la unidad de CD ROM 3 En la pantalla de Bienvenida presione Siguiente para continuar 4 El proceso de instalación comienza 5 Para concluir presione Finalizar y reinicie la computadora ESPAÑOL ESPAÑOL 5 ...

Page 32: ...isto para utilizarse Si desea comprobar que el equipo se instaló correctamente siga estos pasos abra el panel de control sistema hardware administrador de dispositivos y allí encontrará el driver USB 2 0 A V Converter ESPAÑOL ESPAÑOL 6 Si desea comprobar que el equipo se instaló correctamente siga estos pasos abra el panel de control sistema hardware administrador de dispositivos y allí encontrará...

Page 33: ...la computadora 2 Presione Inicio Ejecutar en Windows e introduzca el siguiente comando XX 4eyeGrab AP Software Setup exe donde XX es la unidad de CD ROM 3 En la pantalla de Bienvenida presione Siguiente para continuar 4 Presione Siguiente para seleccionar una carpeta de destino ESPAÑOL ESPAÑOL 7 ...

Page 34: ...nte el proceso es necesario instalar Windows Media Tools por lo que una ventana de instalación nueva aparecerá en pantalla Presione YES para continuar 7 En la pantalla de inicio de Window Media Tools presione Next para comenzar ESPAÑOL ESPAÑOL 8 ...

Page 35: ... Installation y presione Next Es posible que aparezca un mensaje de advertencia acerca de PowerPoint si es el caso solo presione Aceptar 9 En la siguiente ventana presione Finish y la instalación comenzará ESPAÑOL ESPAÑOL 9 ...

Page 36: ... concluir la instalación de Windows Media Tools 11 Presione Finish para concluir todo el proceso de instalación del software de aplicación 12 Encontrará un icono de 4 eyeGrab en el escritorio de Windows ESPAÑOL ESPAÑOL 10 ...

Page 37: ...pantalla se mostrará en su monitor El texto en color rojo indica una función en ejecución El texto en color verde indica que una función puede ser ejecutada El texto en color blanco representa funciones que no se pueden ejecutar en ese momento ESPAÑOL ESPAÑOL 11 Al puerto USB A un equipo de AV externo ...

Page 38: ... la opción RECORDER FUNCIONES DISPLAY Camera I Camera IV Presione para visualizar de forma individual cada una de las cámaras conectadas a la capturadora Camera All Esta opción le permite visualizar las cuatro cámaras si están conectadas simultáneamente Sequence Presione para visualizar cada una de las cámaras en forma secuencial por determinado tiempo el tiempo de la secuencia se puede programar ...

Page 39: ...ierra el programa de grabación Always on top Permite mantener el programa de grabación siempre en primer plano por encima de otros programas activos La velocidad de los cuadros por segundo disminuye cuando se visualizan las 4 cámaras al mismo tiempo Si requiere una grabación en tiempo real se recomienda utilizar sólo una cámara a pantalla completa ESPAÑOL ESPAÑOL 13 La velocidad de los cuadros por...

Page 40: ...rchivo es decir en una imagen se visualizarán las 4 cámaras El archivo generado de la grabación se guarda como YYMMDD_hhmmss avi donde YY Año MM Mes DD Día hh Hora mm minuto ss Segundo FULLSCREEN Pantalla Completa Esta opción muestra la imagen de la cámara s actual en pantalla completa Presione dos veces sobre la pantalla completa con el botón izquierdo del ratón para regresar al modo normal ESPAÑ...

Page 41: ...pués de que presione el botón de Snapshot la imagen capturada se mostrará en una ventana aparte Presione con el botón derecho del ratón sobre la imagen capturada y tendrá las siguientes opciones Save Seleccione para guardar la imagen capturada en disco duro Delete Borra la imagen capturada Preview Muestra la imagen en tamaño real ESPAÑOL ESPAÑOL 15 ...

Page 42: ...completa PLAYBACK Reproducción Presione Playback para reproducir los archivos previamente grabados Se mostrará la siguiente pantalla Existen diferentes formas de localizar un archivo previamente grabado En la opción de Búsqueda Search especifique la cámara de la que desea buscar archivos y presione Find Se mostrará una lista de archivos grabados por la cámara especificada ESPAÑOL ESPAÑOL 16 La vel...

Page 43: ...sione dos veces sobre el archivo que desea reproducir Seleccione un archivo y presione Open para reproducir Pausa Realiza una pausa al video en reproducción Detener Detiene la reproducción actual Lento 1 2x 1 3x 1 4x Disminuye la velocidad de reproducción del video actual Rápido 2x 3x 4x Incrementa la velocidad de reproducción del vídeo actual Regresar 1x 2x 3x 4x Regresa a un momento específico d...

Page 44: ... Despliega información acerca del vídeo actual en reproducción hora de inicio de grabación hora de finalización de grabación duración de vídeo Búsqueda rápida de archivo Permite realizar una búsqueda rápida de una grabación en la carpeta de Grabación deberá especificar la fecha antes de presionar el botón de Búsqueda formato Fecha YYYY MM DD Hora AM PM hh mm Presione para regresar a la pantalla pr...

Page 45: ...activar la función de grabación por movimiento La cámara se detendrá una vez que hayan pasado 5 segundos sin que se registre algún movimiento CAMERA SETTING Ajustes de cámara Con esta opción podrá cambiar los siguientes parámetros Sistema PAL o NTSC ESPAÑOL ESPAÑOL 19 ...

Page 46: ...egundo 5frames s visualiza la imagen 5 cuadros por segundo 6frames s visualiza la imagen 6 cuadros por segundo 7frames s visualiza la imagen 7 cuadros por segundo OSD Utilice esta opción para cambiar el nombre de cada una de las cámaras de acuerdo a sus necesidades Seleccione la cámara a renombra y en el campo inferior introduzca el nombre deseado Ajustes de color Permite ajustar el brillo contras...

Page 47: ...dad entre Bajo Low Medio Middle o Alto High antes de que la grabación comience Acción de detección Detecting Action Mediante este menú podrá elegir que acción se tomará una vez que la cámara detecte movimiento Puede elegir entre grabar Record o reproducir una alarma Alarm Una vez que realizó los ajustes necesarios presione OK para guardar los cambios Presione Cancel si no desea almacenar los cambi...

Page 48: ...la vez Impresión de la hora Time stamp Permite activar o desactivar la función de visualización de la hora mientras se está grabando Velocidad de vídeo Frame Rates Permite elegir la velocidad deseada para cada una de las cámaras Modo de Grabación Record Dir And Mode La opción Linear le permite grabar de forma contínua hasta que el disco duro solo tenga 30Mb de espacio libre ESPAÑOL ESPAÑOL 22 ...

Page 49: ... a grabar desde el principio borrando archivos previamente grabados Así mismo puede cambiar la dirección donde se almacenan los vídeos grabados sólo presione y podrá elegir una carpeta de destino diferente Presione OK para guardar los cambios Presione Cancel para salir de este menú sin guardar los cambios ESPAÑOL ESPAÑOL 23 ...

Page 50: ...poder elegir una deberá estar seleccionada en las opciones superiores Una vez que eligió la cámara a programar introduzca la fecha y hora de inicio así como la fecha y hora de finalización Una vez que termine de programar una cámara podrá seguir con la programación de hasta 4 cámaras Presione OK para guardar los cambios Presione Cancel para salir de este menú sin guardar los cambios ESPAÑOL ESPAÑO...

Page 51: ...ltra DMA actualice su controlador IDE ATA ATAPI Cierre todas las aplicaciones que no esté utilizando No ejecute programas mientras esté grabando Defragmente su disco duro Obtenga mayor espacio libre en el disco duro Si es posible utilice un disco duro mayor a 7200 revoluciones por minuto Asegúrese de que tiene instalado DirectX 9 0 o superior en la computadora Compruebe de que el driver de su tarj...

Page 52: ...or segundo NTSC y PAL Grabación de audio permitido sólo para una cámara Entrada de vídeo 4 entradas análogas de vídeo RCA Sistema NTSC y PAL Captura de imagen fija Formato JPG Resolución de imagen fija 640 x 480 Tamaño del archivo 400MB por día en modo bajo a 1 cuadro por segundo Compresión tipo MPEG 4 Entrada 5V por puerto USB El diseño del producto y las especificaciones pueden cambiar sin previ...

Page 53: ...ny of the addresses mentioned later THIS WARRANTY IS VOID IN THE NEXT CASES If the product has been damaged by an accident acts of God mishandling leaky batteries failure to follow enclosed instructions improper repair by unauthorized personnel improper safe keeping among others a The consumer can also claim the warranty service in the purchase establishment b If you lose the warranty card we can ...

Page 54: ...arantía ante la propia casa comercial donde adquirió el producto Si la presente garantía se extraviara el consumidor puede recurrir a su proveedor para que le expida otra póliza de garantía previa presentación de la nota de compra o factura respectiva DATOS DEL DISTRIBUIDOR Nombre del Distirbuidor Domicilio Producto Marca Modelo Número de serie Fecha de entrega ELECTRONICA STEREN S A DE C V Camaro...

Reviews: