background image

28

HOW TO USE

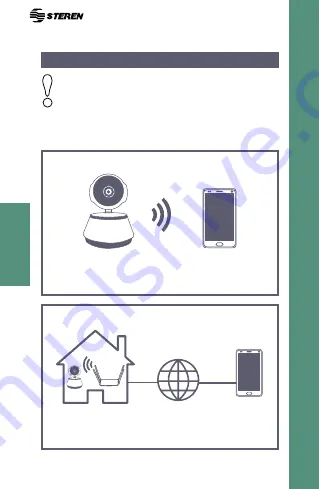
The camera is connected to a modem, this allows to 

monitor remotely, via internet.  

The camera generates their own network to connect 

with the device and allow local monitoring.

To control and monitor remotely, is necessary 

to have internet connection in the camera and 

the mobile device. You must follow this steps to 

complete the connection.

Step 1: Direct connection (Access point)

Step 2: Wi-Fi connection 

Summary of Contents for CCTV-216

Page 1: ...C mara Wi Fi Manual de instrucciones V0 0 0318v...

Page 2: ...empleen el aparato como juguete No extraiga la tarjeta micro SD mientras la c mara est grabando puede provocar mal funcionamiento y p rdida de datos La operaci n de este equipo est sujeta a las siguie...

Page 3: ...Descargue la app 6 MODO DE USO 7 Paso 1 Conexi n directa Access point 7 Paso 2 Conexi n Wi Fi 7 CONFIGURACI N 8 Conexi n directa Access point 8 Conexi n Wi Fi 11 MONITOREO 14 CONFIGURACI N DE ALERTAS...

Page 4: ...4 PARTES 1 Sensor de iluminaci n 2 Lente 3 Altavoz 4 Ranura para tarjeta micro SD 5 Entrada de alimenta ci n micro USB 6 Bot n de reinicio Reset...

Page 5: ...comenzar a grabar autom ticamente en cuanto se conecte a la energ a el ctrica Reinicie la c mara Para asegurar la correcta configuraci n de la c mara se recomienda reiniciarla Mantenga presionado el...

Page 6: ...de la c mara debe instalar una aplicaci n Descargue la aplicaci n V380s desde la tienda correspondiente al sistema operativo de su dispositivo m vil Esta aplicaci n no es propiedad de Steren la empres...

Page 7: ...para conectarse con el dispositivo y permite monitorearla de forma local es decir en un entorno cercano Para poder controlar y monitorear desde cualquier lugar es necesario tener conexi n a internet e...

Page 8: ...de identificaci n de la c mara Ejemplo MV30802803 2 Abra la aplicaci n V380s Seleccione Conexi n directa Access point Las im genes presentadas corresponden a un dispositivo con sistema operativo Andr...

Page 9: ...r dispositivo de red 4 Identifique en la etique ta que viene pegada en la base de la c mara los datos de identificaci n Introduzca el n mero de iden tificaci n ID Tambi n puede escanear el c digo QR D...

Page 10: ...ea y podr monitorearla de forma local Si desea saber c mo configurarla para controlarla de forma remota dir jase a la siguiente secci n de este instructivo Conexi n Wi Fi Presione para visualizar Se r...

Page 11: ...11 Conexi n Wi Fi 1 Una vez realizado el procedimiento de conexi n directa entre el m vil y la c mara ingrese a la opci n Ajustes 2 Elija Configuraci n de red...

Page 12: ...12 3 Cambie el modo de conexi n 4 Seleccione la red a la cual desea conectarse Ingrese la contrase a...

Page 13: ...13 La c mara emitir un par de mensajes de voz Cuando emita el siguiente mensaje significa que se ha conectado correcta mente 5 Presione Guardar Espere hasta que se establezca la conexi n...

Page 14: ...a y empezar controlarla desde el dispositivo m vil A adir dispositivos Visualizaci n y grabaci n en tiempo real Modificar nombre y contrase a Gesti n de usuarios y funciones Principal Eliminar disposi...

Page 15: ...o real En caso de que aparezca una advertencia de seguridad se recomienda crear una contrase a para la c mara Activar desac tivar sonido Grabar Tomar una fotograf a Controles de movimiento Sin funci n...

Page 16: ...2 Seleccione Ajuste de Alarma 3 Active las opciones de su preferencia y presione Guardar para guardar los cambios Activar desactivar alerta Personalizar zona de activa ci n de la alarma Sonido de ala...

Page 17: ...raf as tomadas desde la aplicaci n dir jase al submen M s funciones e ingrese a la opci n lbum Estos archivos est n almacenanados en el dispositivo m vil Si desea ver los archivos de la tarjeta micro...

Page 18: ...formaci n del modo de conexi n establecido Opciones de grabaci n Fecha y hora Configuraci n de alertas Configuraci n de IP Informaci n de la aplicaci n Aseg rese de tener configuradas correctamente la...

Page 19: ...19 INSTALACI N Elija una superficie s lida y estable para instalar la c mara Tome en cuenta el largo del cable de alimentaci n al hacer la instalaci n...

Page 20: ...esi n de video H 264 720 p Protocolo TCP IP HTTP UDP SMTP DHCP PPPoE DDNS UPnP Red inal mbrica 802 11b g n Capacidad m xima de tarjeta micro SD 64 GB Convertidor CA CC Alimentaci n 100 240 V 50 60 Hz...

Page 21: ...ESTA P LIZA NO SE HAR EFECTIVA EN LOS SIGUIENTES CASOS 1 Cuando el producto ha sido utilizado en condiciones distintas a las normales 2 Cuando el producto no ha sido operado de acuerdo con el instruc...

Page 22: ...Wi Fi camera User Manual V0 0 0318v...

Page 23: ...like a toy Don t remove the micro SD card while the camera is recording it may cause malfunction and data lose The operation of this equipment is subject to the following two conditions 1 it is possi...

Page 24: ...the camera 26 App download 27 HOW TO USE 28 Step 1 Direct connection Access point 28 Step 2 Wi Fi connection 28 CONFIGURATION 29 Direct connection Access point 29 Wi Fi connection 32 MONITORING 35 ALE...

Page 25: ...25 PARTS 1 Night vision sensor 2 Lens 3 Speaker 4 Micro SD slot 5 Micro USB power input 6 Reset button...

Page 26: ...The camera will start to record automatically when is connected to an outlet Restart the camera To ensure the correct camera settings we recommend to restart it Press and hold the reset button until...

Page 27: ...load To manage and monitor the camera function you must install the app Download the V380s app from your app store This app is not a property of Steren the company is not responsible by their function...

Page 28: ...enerates their own network to connect with the device and allow local monitoring To control and monitor remotely is necessary to have internet connection in the camera and the mobile device You must f...

Page 29: ...k with the prefix MV and the ID number of the camera Example MV30802803 2 Open the app Select Direct connection Access point The displayed images corresponding to an Android 5 0 device and the V380s a...

Page 30: ...30 3 Select Add network device 4 Identify the label in the camera base with the data ID or QR Enter the ID number or scan the QR code Leave this field empty...

Page 31: ...ill appear the camera online and you can monitor in local way If you want to know how to set the remote view refer to Wi Fi connection section of this manual Press to preview We recommend to set a pas...

Page 32: ...32 Wi Fi connection 1 Once finished the direct connection process enter to Settings option 2 Choose Network settings...

Page 33: ...33 3 Change the connection mode 4 Select the network what you want to connect Enter the password...

Page 34: ...34 The camera will emit a pair of voice messages When you listen the next message that means that the the connection is right 5 Press Save Wait until the connection is established...

Page 35: ...you can configure it and control it from your mobile device Add devices Visualizing and monitoring in real time Modify name and password Users and functions manage Main screen Delete device Alert his...

Page 36: ...main screen press to watch in real time If a warning appears in the screen it is recommendable to create a password Mute Recording Picture Move controls Without function Flip image horizontal micropho...

Page 37: ...LERT SETTINGS 1 Enter to submenu 2 Select Alert settings 3 Activate the options that you prefer and press Save Alert on off Personalize the area detection mode settings Alert tone Message voice langua...

Page 38: ...otos from the app enter to sub menu more functions and choose the Album option This files are stored in the mobile device If you want to watch the files stored in the micro SD card you must to take ou...

Page 39: ...edit the general preferences of the camera Connection mode info Recording options Date and hour Alarm settings IP settings App info Ensure that have configured the date hour and time zone to the recor...

Page 40: ...40 INSTALLATION Choose a solid and stable surface to install the camera Have in mind the power cord length before installation...

Page 41: ...compression H 264 720 p Protocol TCP IP HTTP UDP SMTP DHCP PPPoE DDNS UPnP Wireless network 802 11b g n Maximum micro SD card capacity 64 GB AC DC power converter Input 100 240 V 50 60 Hz 0 3 A Outpu...

Page 42: ...42...

Page 43: ...nents consumables and accessories to custo mer as well as warranty service at any of the addresses mentioned later THIS WARRANTY IS VOID IN THE NEXT CASES If the product has been damaged by an acciden...

Page 44: ......

Reviews: