Steiger Dynamics LEET User Manual Download Page 5

LEET™


User


Manual


– Revision


1.7

I. Quick-Start-Guide (2/6)

5

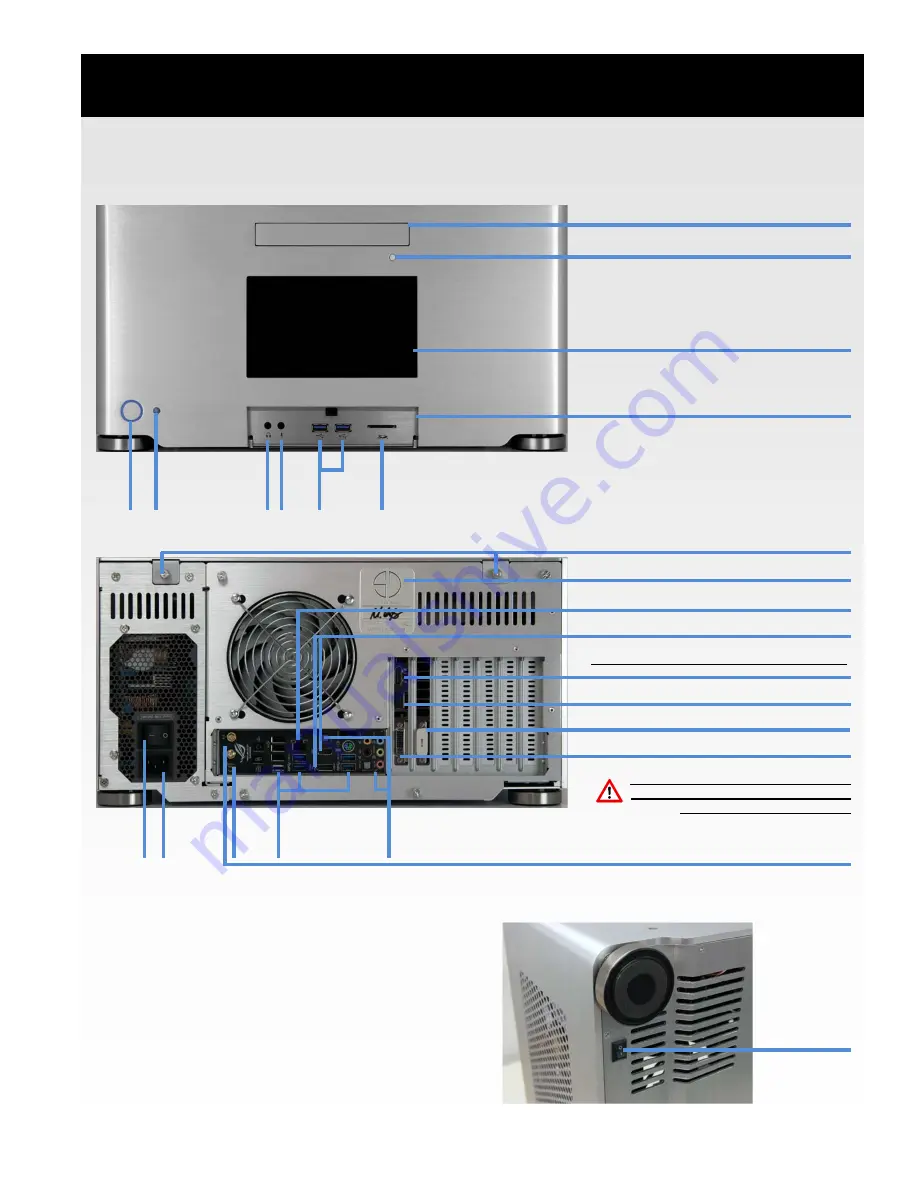
Step 2 – System Buttons & Connectors

Blu-ray drive slot

Optical drive button

(push to open/close)

Front screen

Front panel connectors

(push door to access)

HD 

Audio 

out

Mic
in

2x USB
3.0

SDHC
card 
reader

Power 

button

A. Front view

B. Rear view

IR 
receiver

Power 

supply 

switch

Power 
cable 
plug

Thun-
der-
bolt

USB 2.0 (black)
USB 3.0 (blue)

Onboard audio 
incl. optical 
digital in/out

Lid screws

Engineer Signature Badge

Primary dedicated DVI

(always connect your primary monitor/

TV to this port with the supplied HDMI

Cable and  DVI-HDMI adaptor)

FYI: DVI and HDMI are 100% lossless

compatible without signal conversion.

Dedicated HDMI

Dedicated DisplayPort

Secondary dedicated DVI

Onboard HDMI and DisplayPort

(use only if you have no dedicated graphics card)

Gigabit  Ethernet

(NOTE: Your configuration may vary!)

E. LED Light switch (optional)

LED light switch

(Behind left

front foot on

bottom left)

Wi-Fi / Bluetooth Antenna connectors

C. Power button light indicators

No light: System is off

Constant blue light: System is turned on

Blinking blue light: System is in sleep mode

D. Power button functionality

When off or in sleep mode:  Press button to turn on.

When on: Press button to put system to sleep

When on: Press button for 4 seconds for hard system 
shut down (same as if you unplug system while on)

Summary of Contents for LEET

Page 1: ...Manual May 24 2013 Revision 1 7 Latest revision of this manual is available for download on our website at www steigerdynamics com support downloads aspx COPYRIGHT 2013 STEIGER DYNAMICS LLC ALL RIGHTS...

Page 2: ...d in house by the very engineers who built yours That means you can speak directly to your builder should a problem arise Your system was built to your specifications with your needs in mind and we ar...

Page 3: ...onnecting the Peripherals 9 Step 6 Ready to Roll 9 IV Manufacturing Log 17 1 BIOS Drivers and Windows Software Settings 13 2 Software Apps 14 3 Backup Restore 15 4 Hardware 16 Phase 1 Preparation 17 P...

Page 4: ...ce Check that PCI cards are in place 1 Remove lid screws The 2 thumb screws on rear side of chassis are easily unfastened by hand 2 Remove Lid Lift up back of lid by approx 1 inch Pull lid back and ou...

Page 5: ...and DVI HDMI adaptor FYI DVI and HDMI are 100 lossless compatible without signal conversion Dedicated HDMI Dedicated DisplayPort Secondary dedicated DVI Onboard HDMI and DisplayPort use only if you h...

Page 6: ...do any of the following Gently clean system exterior and interior from dust Turn on light switch Open close optical drive Access front panel connectors Access connectors on the back D Place front scre...

Page 7: ...utlet in the wall C Avoid cable traps Route the power cable and all other cables in a way that they won t be walked on or tripped over E Connection chart without Audio Video Receiver AVR Connect LEET...

Page 8: ...connectors on the back of the system Place the antennas some feet away from the system since the aluminum chassis may distort or weaken the wireless signal Place the antennas away from other wireless...

Page 9: ...We recommend that you change your account type from a local account to a Microsoft account This will allow you to experience the full integration of Windows cloud services incl Microsoft SkyDrive To...

Page 10: ...R cable can stay attached Please follow this section if you purchased the LEET chassis by itself i e not a fully pre assembled system It is important that you follow this guide step by step since the...

Page 11: ...ables step by step 1 USB 2 0 cable to SD card reader make sure that the red wire is on the right side rear view 2 HD Audio cable to internal front panel connector 3 4 Pin Power SW LED cable to power b...

Page 12: ...tor in this document B iMon Manager recommended To fully utilize your included IR remote control we recommend to install the iMon Manager If you opt to install SoundGraph Touch Applications below then...

Page 13: ...through windows update since this may jeopardize your system performance and stability The only drivers you should ever need to update will be your graphics card drivers if you re a gamer and play lat...

Page 14: ...Mode rotation Auto Mode Speed Set how long each screen should stay in seconds when in Auto Mode rotation Change Page Hotkey Set your preferred hotkey to skip to next screen Auto Mode If selected the L...

Page 15: ...int within Windows You can restore your System partition C to a previous functional system state as follows 1 Navigate to Control Panel System System Protection A window will pop up now 2 Click on Sys...

Page 16: ...t 1 8 of a turn Note Never open the fill port and maintain your liquid loop while the system is turned on C Temperatures Temperatures of GPU will always be lower than CPU simply due to smaller thermal...

Page 17: ...___________ IRST version _______________ 15 Install Language Pack ________________ 16 Install Windows Media Center optional 17 Create Windows restore point A SD Pre Updates 18 Install Windows updates...

Page 18: ...__ Check PSU Hybrid Mode __ Clean interior __ Remove protective stickers 48 Save BIOS O C settings __ save to profile 1 __ save to SD database 49 Create Windows restore point E SD Final 50 Create syst...

Page 19: ...LEET User Manual Revision 1 7 19 STEIGER DYNAMICS LLC 2300 HOLLY DRIVE LOS ANGELES CA 90068 USA STEIGERDYNAMICS COM SUPPORT STEIGERDYNAMICS COM TOLL FREE 1 855 915 9000...

Reviews: