


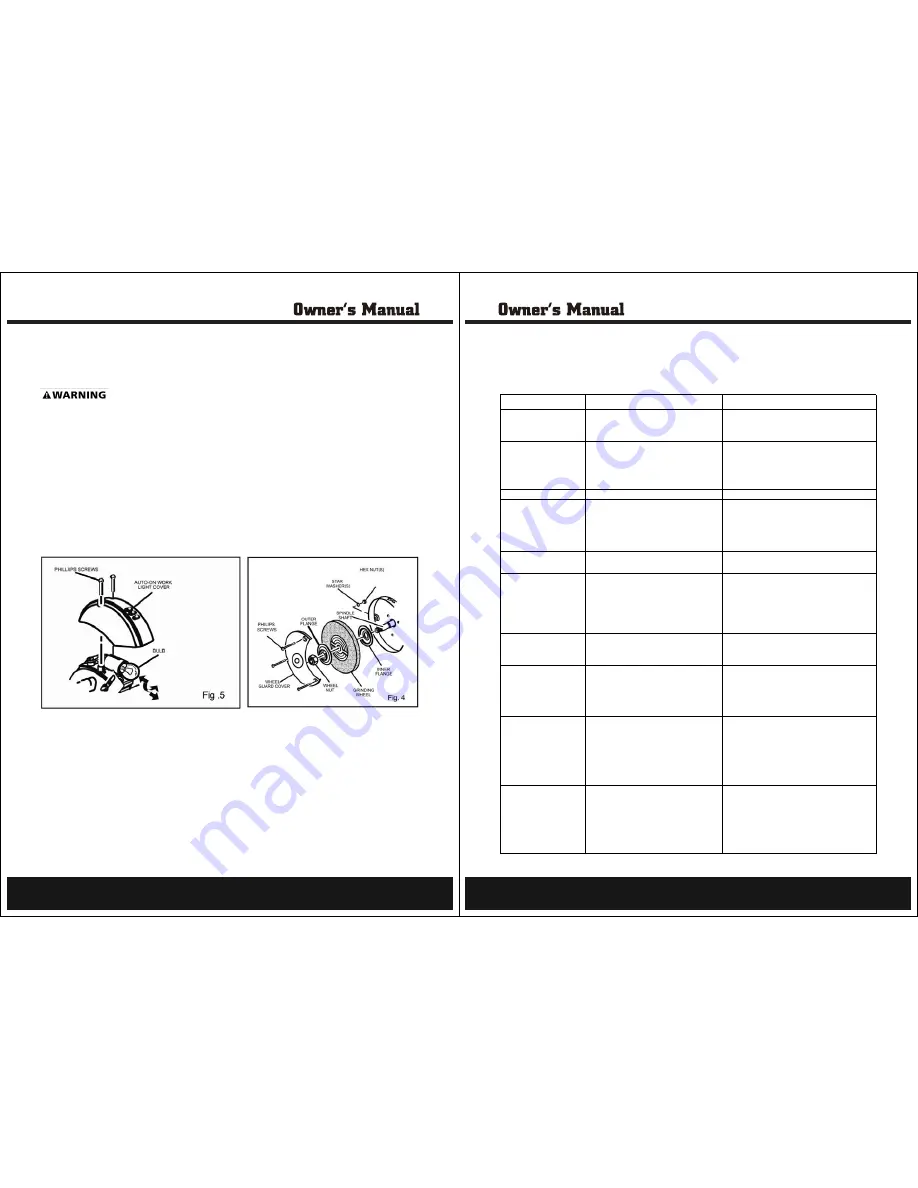
Wheel Replacement (Fig. 4)
Turn the power switch off and remove the plug from the outlet before
adjusting or maintaining the grinder. Do not attempt torepair or maintain the motor electrical
components. This should only be done by aqualified service technician.
If you must replace a grinding wheel, be sure to obtain one with a safe rated speed at least as high as
the "no load speed" RPM marked on the data plate of the grinder.To replace the grinding wheel,
remove the wheel guard cover by loosening the screws, next, loosen the wheel nut in a clockwise
direction for the left side and a counterclockwise direction for the right side. Remove the outer flange
and grinding wheel. To install a new grinding wheel. reverse the above procedure. Be sure the grinding
wheel and outer flange are properly seated on the spindle shaft.
WORKLIGHT BULB REPLACEMENT (Fig. 5)
1. Unplug the grinder.
2. Remove the two phillips screws from the top of worklight cover.
3. Remove worklight cover.
4. While gently pushing in bulb, turn bulb to left to remove.
5. Place new bulb into bulb receptacle and gently push in while turning to the right until bulb is fully
6. Reinstall the worklight cover using the two phillips screws.
NOTE: To avoid the risk of fire, always use a 12v bulb with wattage no greater than 10w.
Electric tools used on fiberglass material, wallboard, spackling compounds, or plaster are subject to
accelerated wear and possible premature failure because the fiberglass chips and grindings are highly
abrasive to bearings, brushes, commutators, etc. Consequently, we do not recommended using this
it is extremely important to clean thetool using compressed air.
ASSEMBLY AND INSTALLATION
8
tool for extended work on these types of materials. However, if you do work with any of these materials,
seated.
This section covers the most common problems encountered during operation and what to do about
them. Do not make any adjustments until machine is unplugged and moving parts have come to a
TROUBLESHOOTING
9
SYMPTOM
POSSIBLE CAUSE
CORRECTIVE ACTION
Motor will not start.
1. Check power line for proper voltage.
1. Low voltage.
2. Open ciruit in motor or loose connections.
2. Inspect all lead connections on motor for loose
Motor will not start; fuses
1. Short circuit in line cord or plug.
1. Inspect cord or plug for damaged insulation
or circuit breakers blow
2. Short circuit in motor or loose connections.
3. Incorrect fuses or circuit breakers
in power line.
3.Install correct fuses or ciruit breakers.
shorted terminals or worn insulation
shorted wires.
2.Inspect all connections on motor for loose or
Motor overheats.
1. Reduce load on motor.
1. Motor overloaded.
Motor stalls (resulting in
blown fuses or tripped
circuit).
1. Short circuit in motor or loose connections.
2. Low voltage.
3. Incorrect fuses or circuit breakers in
power line.
4. Motor overloaded.
1. Inspect connections on motor for loose or
shorted terminals or worn insulation.
2. Correct the low voltage conditions.
3. Install correct fuses or circuit breakers.
4. Reduce load on motor.
Machine slows when
operating.
workpiece into wheel.
1. Depth of cut too great.
1. Slow down the rate of movement of the
Wavy condition on
surface of workpiece.
1. Machine vibrating
2. Workpiece not being held firmly.
3. Wheel face uneven.
4. Wheel is too hard.
4.Use softer wheel,or reduce the feed rate.
1. Make sure machine s is securely mounted on
a solid surface.
3.Dress the grinding wheel.
2. Use a holding device to firmly realign the
Lines on surface of
workpiece.
1. Impurity on wheel surface.
1. Dress the grinding wheel.
2. Workpiece not being held tightly.
2. Use a holding device to firmly retain the
workpiece.
Burning spots or cracks
in the workpiece.
1. Improper type of grinding wheel.
2. Improper feed rate.
3. Coolant required.
1. Try a wheel which is softer style or a coarser grit.
2. Slow down the rate of movement of the
3. Add optional coolant system or introduce
workpiece into wheel.
a coolant by hand.
Wheel dulls quickly,
grit falls off.
1. Depth of cut too great.
2. Wheel is soft.
3. Wheel diameter too small.
harder bond.
4. Bad wheel dress.
5. Defective wheel bonding.
3. Replace the wheel.
4. Dress the wheel.
5. Consult manufacturer of grinding wheel.
1. Slow down the rate of movement of the
workpiece
2. Wheel too soft for the material being ground,
Wheel clogs and workpiece
1. Wheel is too hard.
shows burn marks
select softer bond.
2. Feed rate too slow.
3. Bad wheel dress.
4. Coolant required.
2. Increase e the rate of movement of the
3. Dress the wheel.
4. Add optional coolant system or introduce
1. Wheel too hard for the material being ground,
or open connections
workpiece
workpiece e workpiece into wheel.
coolant by hand.
complete stop.


