background image

15

• The machine is heavy, two people are required to

unpack and lift.

• Use a safety strap to avoid tip over when lifting

machine.

Check shipping carton and machine for damage before
unpackaging.  Carefully remove packaging materials,
parts and machine from shipping carton.  Always check
for and remove protective shipping materials around
motors and moving parts.  Lay out all parts on a clean
work surface.  

Remove any protective materials and coatings from all
of the parts and the dust collector.  The protective coat-

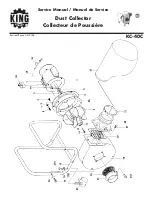
UNPACKING & INVENTORY

A. Motor and blower assembly

B. Filter bag

C. Collection bag, Plastic

D. Side support (2)

E. Support

F.

4-inch hose clamp (2)

G. Caster (4)

H. Intake port cap

I.

Filter bag hanger

J.

Lower support rod

K. Base

L.

4-inch flexible hose

M. Locking band (2)

Fig. 1-1

M

B

A

L

K

E

G

H

I

J

F

D

C

WARNING

!

WARNING

!

ings can be removed by spraying WD-40 on them and
wiping it off with a soft cloth.  This may need redone
several times before all of the protective coatings are
removed completely.  

After cleaning, apply a good quality paste wax to any
unpainted surfaces.  Make sure to buff out the wax
before assembly.

Compare the items to inventory figures; verify that all
items are accounted for before discarding the shipping
box. 

If any parts are missing, do not attempt to plug in the
power cord and turn “ON” the machine. The machine
should only be turned “ON” after all the parts have been
obtained and installed correctly. For missing parts,
contact Steel City at 1-877-SC4-TOOL.

Summary of Contents for 65110

Page 1: ...User Manual Read and understand this manual before using machine 1 HP DUST COLLECTOR STEEL CITY TOOL WORKS Manual Part No OR70081 C US Model Number 65110...

Page 2: ...y it is backed by one of the longest machinery warranties in the business This dust collector is just one of many products in the Steel City s family of woodworking machinery and is proof of our commi...

Page 3: ...modified for any reasons The drawings illustrations photographs and specifications in this user manual represent your machine at time of print However changes may be made to your machine or this manu...

Page 4: ...ove warranties in lieu of all other warranties express or implied SCTW shall not be liable for any special indirect incidental punitive or consequential damages including without limitation loss of pr...

Page 5: ...ars ___ 40 to 49 years ___ 50 to 59 years ___ 60 to 69 years ___ 70 years 7 How long have you been a woodworker ___ 0 to 2 years ___ 2 to 8 years ___ 8 to 20 years ___ over 20 years 8 How would you ra...

Page 6: ...FOLD ON DOTTED LINE FOLD ON DOTTED LINE PLACE STAMP HER SteelCityToolWorks 4 Northpoint Court Bolingbrook IL 60440 E 6...

Page 7: ...n System A dust collector connected to multiple woodworking machines utilizing various types of hose pipe and fittings ACCESSORIES AND ATTACHMENTS Use only accessories recommended for this machine Usi...

Page 8: ...TIFICATION A 4 inch Intake Port B 4 inch Flexible Hose C Filter Bag Hanger D Filter Bag E Collection Bag Plastic F Locking Band G Blower and Motor Assembly H Side Support I Base J Caster Fig 1 1 F E H...

Page 9: ...y and operation of this machine TO AVOID serious injury and damage to the machine read and follow all Safety and Operating Instructions before assembling and operating this machine This manual is not...

Page 10: ...ve or near the machine 14 DO NOT operate any machine or tool if under the influence of drugs or alcohol 15 EACH AND EVERY time check for damaged parts prior to using any machine Carefully check all gu...

Page 11: ...T SAFETY 1 Serious personal injury may occur if normal safety precautions are overlooked or ignored Accidents are frequently caused by lack of familiarity or failure to pay attention Obtain advice fro...

Page 12: ...de NEC and the Occupational Safety and Health Regulations OSHA All electrical connections and wiring should be made by qualified personnel only 13 USE only as described in this manual USE acces sories...

Page 13: ...the electric cord or plug is necessary Check with a qualified electrician or service personnel if you do not completely understand the grounding instructions or if you are not sure the tool is proper...

Page 14: ...an extension cord use a shorter and thicker cord An undersized cord will cause a drop in line voltage result ing in a loss of power and overheating WARNING CAUTION USE ONLY a 3 wire extension cord th...

Page 15: ...e clamp 2 G Caster 4 H Intake port cap I Filter bag hanger J Lower support rod K Base L 4 inch flexible hose M Locking band 2 Fig 1 1 M B A L K E G H I J F D C WARNING WARNING ings can be removed by s...

Page 16: ...16 Fig 1 2 A Hex nut 3 8 16 4 B Lock washer 3 8 4 C Lock washer 5 16 12 D Hex nut 5 16 18 9 E Hex head screw 5 16 18 x 5 8 12 A B D E C...

Page 17: ...e B three are not shown See figure 1 1 2 Place 3 8 16 hex nut and 3 8 lock washer C onto bolt of swivel caster and tighten 3 Repeat Steps 1 2 and 3 for the remaining three swivel caster assemblies 1 P...

Page 18: ...hten 4 Repeat this process for the remaining three holes tighten securely SUPPORT ASSEMBLY MAKE CERTAIN THE DUST COLLECTOR IS DISCONNECTED FROM THE POWER SOURCE 1 Place the support A inside the two si...

Page 19: ...er recessed channel of the drum and fasten clamp F securely to drum See figure 5 2 5 Place the collection bag over the lower lip of the drum Make certain the locking band is positioned in the lower re...

Page 20: ...Collection System review Static Pressure Requirements To protect yourself from a static shock ground the dust collection system to a known ground If using the Dust Collector in a Dust Collector System...

Page 21: ...protection when using compressed air Do not allow chips and dust to accumulate under dust collector Keep area clean and in safe order MAINTENANCE Turn the power switch OFF and unplug the power cord fr...

Page 22: ...eller 3 Clean all hoses bags and blower housing of chips circuit breakers and debris 4 Motor overload 4 Reduce load on motor 5 Incorrect fuses on circuit breakers 5 Have correct fuses on circuit break...

Page 23: ...23...

Page 24: ...24 PARTS...

Page 25: ...6 HEX NUT 5 16 18 4 30 OR90615 LOCK WASHER 5 16 4 31 OR90615 LOCK WASHER 5 16 4 32 OR90635 HEX HEAD SCREW 5 16 18 X 5 8 4 33 OR90635 HEX HEAD SCREW 5 16 18 X 5 8 4 34 OR90615 LOCK WASHER 5 16 4 35 OR9...

Page 26: ...26 NOTES...

Page 27: ......

Page 28: ...28...

Reviews: