background image

Functioning 

7.0 

Operating Laterals  

 7.1 

To operate the laterals: 

1. Depress the quick release button (A).
2. The lateral will swing away 180° into an open-locked position.

3.

Depress  the  quick  release  button  again  to  return  swing-away  arm  to  the  closed-

locked position.

Adjusting Adductors 

 7.2 

Standard laterals offer three points of adjustment. 

To adjust angles (B) and (C): 

1. Lightly loosen 1/4-20 x 1” flat head screws and 10-32 x 3x16" set screws

(E).

2. Set desired angles and re-tighten screws with 5/32" and 3/32" T-

Handles. Tighten the flat head screws to 140in-lbs of torque.  Tighten

the set screws to 10in-lbs of torque.  

Do not over-tighten flat head

screws or set screws.

To adjust pad height: 

1. Loosen 1/4-20 x 5/8” Button Head Screws (D).
2. Slide the pad into the desired position.
3. Re-tighten screws. 

Do not over-tighten.

(D) 

(A) 

(B)

(C)

(

E

)

(

E

)


WARNING


Not  intended  to  be  used  as  a  weight  bearing  surface.    Using  them  as  a  weight 

bearing surface during transfers can damage the laterals and 

may 

harm the user.


Summary of Contents for The World's Best Laterals

Page 1: ...USER MANUAL Lateral and Trunk Support The World s Best Laterals Stealth s User Manual and Maintenance Guide for The World s Best Laterals ...

Page 2: ...nd warnings in this document may result in property damage injury or death Product misuse due to failure of the following instructions will void the warranty Immediately discontinue use if any function is compromised parts are missing loose or show signs of excessive wear Consult with your supplier for repair adjustment or replacement Stealth Products LLC 104 John Kelly Drive Burnet TX 78611 Phone...

Page 3: ...ith and understand all safety aspects of the devices mentioned In order for our products to be used successfully you must Read and understand all instructions and warnings Maintain our products according to our instructions on care and maintenance Devices should be installed and adjusted by a trained technician Supplier Reference Supplier Telephone Address Purchase Date Model ...

Page 4: ...r supplier or Stealth Products at 512 715 9995 or toll free at 800 965 9229 Always keep the operating instructions in a safe place so they may be referenced as necessary All information pictures illustrations and specifications are based on the product information that was available at the time of printing Pictures and illustrations shown in these instructions are representative examples and are n...

Page 5: ...LC Any alteration or lack of serial number where applicable will automatically void this warranty Stealth Products LLC is liable for replacement parts only Stealth Products LLC is not liable for any incurred labor costs No person is authorized to alter extend or waive the warranties of Stealth Products LLC Stealth Products warrants against failure due to defective materials or workmanship for the ...

Page 6: ... Testing vi 7 0 Functioning 1 7 1 Operating Laterals 1 7 2 Adjusting Laterals 1 8 0 Mounting 2 8 1 Standard Track Mounting 2 8 2 Standard Cane Mounting 2 8 3 Standard Planar Mounting 3 8 4 All Season Mounting 3 8 5 Full Surface Contact Mounting 4 8 6 Tru Comfort Mounting 4 9 0 First Time Use 5 9 1 Dealer Assistance 5 9 2 User Testing 5 9 3 Conditions of Use 5 10 0 Maintenance 6 10 1 Cleaning 6 10 ...

Page 7: ...f obstacles until the user is fully capable of driving safely The World s Best Laterals should be adjusted with the user in the chair in order to promote the best position and maximum comfort for the client NOTICE Identifies important information not related to injury but possible property damage SAFETY Indicates steps or instructions for safe practices reminders of safe procedures or important sa...

Page 8: ...1 flat head screws and 10 32 x 3x16 set screws E 2 Set desired angles and re tighten screws with 5 32 and 3 32 T Handles Tighten the flat head screws to 140in lbs of torque Tighten the set screws to 10in lbs of torque Do not over tighten flat head screws or set screws To adjust pad height 1 Loosen 1 4 20 x 5 8 Button Head Screws D 2 Slide the pad into the desired position 3 Re tighten screws Do no...

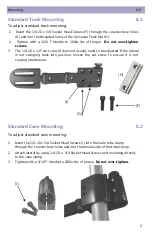
Page 9: ... not usually need to be adjusted If the lateral is not swinging back into position loosen the set screw to ensure it is not causing interference Standard Cane Mounting 8 2 To adjust standard cane mounting 1 Insert the 1 4 20 x 3 4 Socket Head Screws J into the male tube clamp through the counter bore holes and into the female side of the tube clamp 2 Attach lateral by using 1 4 20 x 3 4 Socket Hea...

Page 10: ...hten with 3 16 T Handle to 200in lbs of torque Do not over tighten All Season Mounting 8 4 To install the All Season Mounts 1 Attach the All Season Bracket to the chair by using the 1 4 20 x 1 2 Flat Head Screws A Tighten with 5 32 T Handle to 140in lbs of torque Do not over tighten 2 Use the 1 4 20 x 3 4 Socket Head Screws B to directly mount the All Season Bracket Tighten with a 3 16 T Handle to...

Page 11: ... 32 x 1 2 Socket Head Screws A with a 5 32 T Handle 2 Adjust pad mount to desired angle and re tighten screws to 79in lbs of torque Do not over tighten Tru Comfort Mounting 8 6 To install Tru Comfort mounts 1 Secure lateral to the outside of the bracket by using the 1 4 20 x 3 8 Button Head Screws A 2 Tighten with 5 32 T Handle to 125in lbs of torque Do not over tighten A A A ...

Page 12: ...r position for the client Can the user safely operate the chair in the position they are seated in Is the placement of each of the laterals in an optimal position for the user 9 3 If needed adjust the lateral to the proper position Explain to the customer any possible issues and how to address them Conditions of Use The World s Best Laterals are intended for use as installed by the dealer in accor...

Page 13: ... clean 10 2 Hardware Maintenance Periodically check the hardware for loose screws or worn areas Tighten screws as necessary following torque specifications as appropriate Gently remove dust debris and dirt with a damp cloth Check the pad cover for any breakdown Periodically add anti seize to the components every six months or as necessary WARNING Do not use bleach WARNING Do not iron SAFETY Replac...

Page 14: ...a NOTES 11 0 ...

Page 15: ...b NOTES 11 0 ...

Page 16: ...Stealth Products LLC info stealthproducts com www stealthproducts com 1 800 965 9229 1 512 715 9995 104 John Kelly Drive Burnet TX 78611 P91D276 Revision Date 2019 12 17 ...

Reviews: