background image

INSTALLATION UNSTRUCTIONS
PART #103-01X CJ-3A 1948-1953

             104-01X CJ-3B 1953-1964

       With Doors

Thank you for purchasing Specialty’s Convertible Top for your Jeep® vehicle. It has been
designed for great fit and long wear. Please read and follow, precisely, all installation instruc-
tions provided when installing top. Failure to do so may result in a poor fitting top and could
place occupants in a potentially hazardous situation.

TOOLS REQUIRED:

3/8” WRENCH                7/16” WRENCH
1/2” WRENCH

#2 PHILLIPS SCREWDRIVER

1/8” DRILL BIT

5/32” DRILL BIT

3/8” DRILL BIT

ELECTRIC DRILL

8’ TAPE MEASURE

RUBBING ALCOHOL

INSTALLATION TIPS

Before you begin installing this top, here are a few tips to
make installation easier.

This top should be installed where the temperature

is above 72 degrees Fahrenheit. Below this temperature,
the top may contract making it difficult to install.

It is normal for a top to contract and wrinkle when

stored in the shipping carton. The top will relax and
wrinkles will disappear within a few days of installation as
fabric adjusts to shape of mounting hardware.

INSTALLATION PROCEDURES:

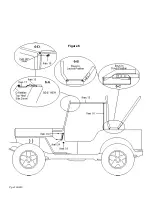
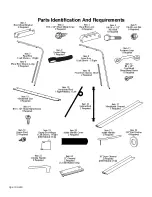
On page 4 of this instruction manual there is an assembly
drawing. Please refer to it for identification of parts and
assembly assistance. Also refer to page 6 to assure that all
parts are included in your kit.

Pg 1 103-010

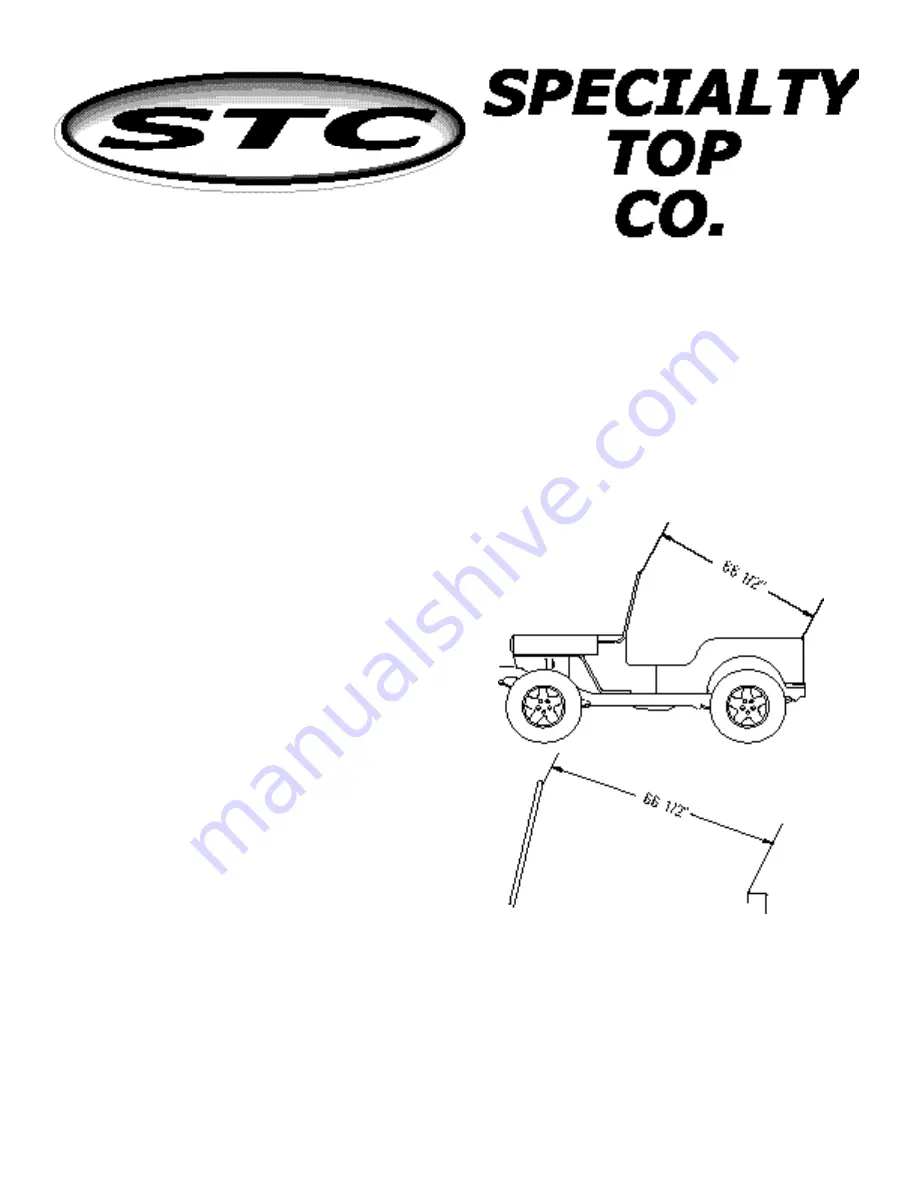
Figure 1

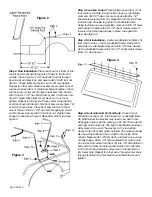
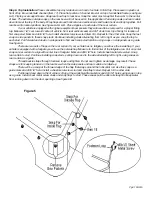
Step 1. Bow Mount.

 Measure 37 1/2” from dash to the top

of body and mark a line. This is for the positioning of the
bow mount bracket (Item 1). Place front of bow mount
bracket on this line. Using the bow mount as a template,
mark and drill 5/32” holes in top center of body flange.
Secure to body with #14 x 1/2” sheet metal screws (Item 2),
making sure that one set of holes in bow mount hang over
the inside edge of body.  See figure 2. Repeat for the other
side.

Windshield Adjustment.

 If your windshield frame is

improperly adjusted, the top will not fit or function properly.
Adjust windshield frame as shown in figure 1. Measure
from inside edge of windshield frame to inside edge of body
near tailgate opening. This measurement should be
66 1/2”. This measurement within 3/8”. If windshield is out
of adjustment you may have to adjust the mounting points

of the windshield frame to achieve the proper measure-
ment. Bending of the windshield frame may be necessary
as the last option. See figure 1.

Summary of Contents for 103-01X

Page 1: ...ing hardware INSTALLATION PROCEDURES On page 4 of this instruction manual there is an assembly drawing Please refer to it for identification of parts and assembly assistance Also refer to page 6 to assure that all parts are included in your kit Pg 1 103 010 Figure 1 Step 1 Bow Mount Measure 37 1 2 from dash to the top of body and mark a line This is for the positioning of the bow mount bracket Ite...

Page 2: ...epeat for other side Place rear bow covers Item 6 over rear bow halves Item 7 Slide bow halves together Place rear bow into center set of holes in rear bow lock Fasten with 1 4 20 x 1 1 2 hex bolts Item 4 and 1 4 20 lock nuts Item 5 Again these Items must pivot so do not over tighten Repeat for other side Place center strap Item 8 over front bow half Item 9 Slip front bow covers Item 10 over front...

Page 3: ...the top to each stud Pull forward and down on side panels to find each snap stud location using snaps on side panels as a guide See figure 5 There are two sets of flaps on the rear curtain If your vehicle has no tailgate you will use the inside flap If your vehicle is equipped with a tailgate you will use the outside flap Measure to find center of the tailgate area Pull on center snap on rear curt...

Page 4: ...Pg 4 103 010 Figure 6 ...

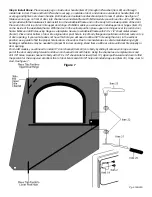
Page 5: ... as a template Secure to windshield frame with 14 x 1 2 sheet metal screws Item 2 Place rod at bottom of door into original door pivot hole in top of body flange and pull down until door rests on top of door opening If your vehicle does not have this hole you will need to drill a 3 8 hole using the door in the vertical position as a guide to find the proper hole location Close door Due to inconsis...

Page 6: ...Pg 6 103 010 ...
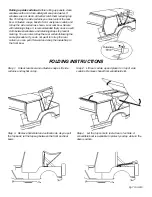
Page 7: ...aps to prevent marring You can also roll up the rear curtain following the same procedure If you do not want to roll up the rear curtain you can pull it forward and snap the inside flap to the front bow Step 1 Unlock rear bow and unfasten snaps Lift side curtains and lay flat on top Step 2 Lift rear curtain up and place it on top of side curtains Remove chanel from windshield slot Step 3 Remove ho...

Page 8: ...dows at the beginning of summer and leave them they may be ruined by fall 6 DO NOT open or roll up windows at temperatures below 45 degrees F This could cause them to crack or break 7 NEVER use ice scrapers or snow brushes on vinyl windows WARRANTY INFORMATION Specialty Top Co warrants to the original purchaser of any product it manufactures that the product will be free of defects in material or ...

Reviews: