background image

17 

-

es

it

gb

de

p

tr

cz

el

fr

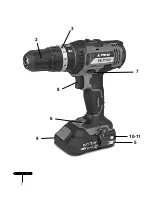
To remove the battery 5, press the battery unlocking 

button 9 and pull the battery out of the power tool toward 

the rear. 

Do not exert any force.

The battery is equipped with a NTC temperature control 

which allows charging only within a temperature range 

of between 0º C and 45º C. A long battery service life is 

achieved in this manner.
Observe the notes for disposal.

CHANGING THE TOOL

Before any work on the machine (e. g.,maintenance, 

tool change, etc.) as well as during transport and 

storage, set the rotational direction switch to the 

centre position. 

Unintentional actuation of the On/Off 

switch can lead to injuries.
Open the keyless chuck 2 by turning in rotation direction, 

until the tool can be inserted. Insert the tool.
Firmly tighten the collar of the keyless chuck 2 by hand 

in rotation direction . This automatically locks the drill 

chuck.
The locking is released again to remove the tool when 

the collar is turned in the opposite direction.

DUST/CHIP EXTRACTION

Dusts from materials such as leadcontaining coatings, 

some wood types, minerals and metal can be harmful 

to one’s health. Touching or breathingin the dusts can 

cause allergic reactions and/or lead to respiratory 

infections of the user or bystanders.
Certain dusts, such as oak or beech dust, are 

considered as carcinogenic, especially in connection 

with woodtreatment additives (chromate, wood 

preservative). Materials containing asbestos may only 

be worked by specialists.

 - Pro v ide for good ventilation of the working place.
 -

It i s recommended to wear a P2 filterclass respirator.

Observe the relevant regulations in your country for the 

materials to be worked.

3_OPERATION

Starting Operation
Inserting the Battery

Use only original Stayer lithium ion batteries with 

the voltage listed on the nameplate of your power 

tool. 

Using other batteries can lead to injuries and pose 

a fire hazard.

:

Set the rotational direction switch 7 to the centre position 

in order to avoid unintentional starting. Insert the 

charged battery 5 into the handle so that it can be felt to 

engage and faces flush against the handle.

Reversing the Rotational Direction

The rotational direction switch 7 is used to reverse the 

rotational direction of the machine. However, this is not 

possible with the On/Off switch 8 actuated.

Right Rotation: For drilling and driving in screws, push 

the rotati onal direction switch 7 left to the stop.

Setting the Torque / Setting the Operating Mode

The required torque can be preselected in 16 steps 

with the torque preselection ring 3. With the correct 

setting, the insert tool is stopped as soon as the screw is 

screwed flush into the material or when the set torque is 

reached.
Select a higher setting when driving out screws, or set to 

the symbol “Drilling”.

Drilling

Set the preselection ring 3 to the “Drilling without impact” 

symbol.
The safety clutch is deactivated in the “Drilling” position.

Impact drilling

"

P

" (PBL0000

P

K – BL000

P

K)

Set the preselection ring 3 to the “Impact drilling” 

symbol.
In the “Impact drilling” position, the safety clutch is 

deactivated and the maximum power is always effective.

Gear Selection, Mechanical
Actuate the gear selector 4 only when the machine 

is at a standstill.

Two speed ranges can be preselected with the gear 

selector 4.
Gear I:
Low speed range; for screwdriving or working with large 

drilling diameter.
Gear II:
High speed range; for working with small drilling diameter

If the gear selector 4 cannot be fully engaged, lightly 

rotate the drive spindle with the drill bit by twisting the 

drill chuck.

Switching On and Off

To start the machine, press the On/Off switch 8 and 

keep it pressed.

The light 6 is lit when the On/Off switch 8 is slightly or 

completely pressed in and permits to light the work area 

when the lighting conditions are bad.

To switch off the machine, release the On/Off switch 8

LED

Capacity

Lighting green

> 60%

Lighting yellow

3060%

Lighting red

< 30%

WORKING ADVICE

Apply the power tool to the screw only when it is 

switched off. Rotating tool inserts can slip off.

Tips
After longer periods of working at low speed, allow the 

machine to cool down by running it for approx. 3 mi 

nutes at maximum speed with no load.
For drilling in metal, use only perfectly sharpened HSS 

drill bits (HSS=highspeed steel). The appropriate quality 

is guaranteed by the Stayer accessories program.
Before screwing larger, longer screws into hard 

materials, it is advisable to predrill a pilot hole with the 

core diameter of the thread to approx. 2/ 3 of the screw 

length.

Summary of Contents for PBL2022P

Page 1: ...r I Calle Sierra de Cazorla nº7 C P 28320 Pinto Madrid SPAIN info grupostayer com www grupostayer com es Manual de instrucciones it Istruzioni d uso gb Operating instructions de Bedienungsanleitung p tr Manual de instruções Kullanma Kilavuzu cz Návod k použití překlad z originálu el Οδηγίες λειτουργίας fr Instructions d emploi ...

Page 2: ...os regulamentos ou documentos normalizados seguintes EN 62841 1 EN 62841 2 1 EN 55014 1 EN 55014 2 EN 61000 3 2 EN 61000 3 3 60335 2 29 de conformidade com os regulamentos 2006 42 CE 2011 65 EU 2014 30 EU 2014 35 EU TR Teknik veriler altında açıklanan ürün şu şekilde standartlara veya standart belgeleri ile tutarlı olmasını bizim sorumluluğumuzda EN 62841 1 EN 62841 2 1 EN 55014 1 EN 55014 2 EN 61...

Page 3: ...A LWA PBL122 CP PB L20 1822 PBL 2022 24 P PBL21 L20 P PBL 20 BRUSHLESS Li ion Li ion Li ion Li ion Li ion Vdc 12 18 18 18 18 Ah 2 0 2 0 6 0 2 0 6 0 2 0 6 0 2 0 6 0 min 60 60 35 60 60 n0 min 0 400 0 1400 0 400 0 1350 0 560 0 1900 0 440 0 1650 0 500 0 2000 dB A 69 67 2 75 75 dB A 75 78 2 68 68 Nm 28 32 45 50 60 ipm 0 6000 22000 0 6000 22000 0 6000 21000 0 7040 26400 0 7500 30000 max mm 25 30 40 40 4...

Page 4: ...2 3 7 8 6 5 10 11 9 1 ...

Page 5: ...lvo zapatos de seguridad con suela antidesli zante casco o protectores auditivos c Evite una puesta en marcha fortuita del aparato Asegúrese de que la herramienta eléctrica está apa gada antes de conectarla a la toma de corriente y o la batería de desconectarla o de transportarla Si trans porta la herramienta eléctrica sujetándola por el interrup tor de conexión desconexión o si introduce el enchu...

Page 6: ...tuoso puede perder líquido y humedecer la piezas adyacentes Examine las piezas afectadas Límpielas o sustitúyalas si fuese necesario Únicamente utilice el acumulador en combinación con su herramienta eléctrica Stayer Solamente así queda protegido el acumulador contra una sobrecarga peligrosa USO Y CUIDADO DE BATERÍAS No intente abrir la batería Podría provocar un cortocircuito Proteja la batería d...

Page 7: ...nta eléctrica No proceda con brusquedad Durante la carga del acumulador no es posible conectar la herramienta eléctrica El acumulador viene equipado con un sensor de temperatura NTC que solamente admite su recarga dentro del margen de temperatura entre 0ºC y 45ºC De esta manera se alcanza un larga vida útil del acumulador Observe las indicaciones referentes a la eliminación CAMBIO DE ÚTIL Antes de...

Page 8: ...roscar tornillos grandes y largos en materiales duros deberá taladrarse un agujero con el diámetro del núcleo de la rosca a una profundidad aprox correspondiente a 2 3 de la longitud del tornillo 4_MANTENIMIENTO Y SERVICIO MANTENIMIENTO Y LIMPIEZA Antes de cualquier manipulación en la herramienta eléctrica p ej en su mantenimiento cambio de útil etc así como al transportarla o guardarl a colocar e...

Page 9: ...Percusiones Corte en madera Corte en acero Corte en piedra Peso Nivel de potencia acústica Nivel de presión acústica Vibración Estos datos son válidos para tensiones nominales de U 230 240 V 50 60 Hz 110 120 V 60 Hz Los valores pueden variar si la tensión fuese inferior y en las ejecuciones específicas para ciertos países INFORMACIÓN SOBRE RUIDOS Y VIBRACIONES Llevar cascos de protección auditiva ...

Page 10: ...sione involontaria dell utensile Accertarsi che l utensile elettrico sia spento prima di collegarlo all alimentazione di corrente e o alla batteria di prenderlo o di trasportarlo Il fatto di tenere il dito sopra l interruttore o di collegare l utensile elettrico acceso all alimentazione di corrente potrà essere causa di incidenti d Togliere gli attrezzi di regolazione o la chiave inglese prima di ...

Page 11: ...vapori possono irritare le vie respiratorie In caso di batterie difettose vi può essere una fuoriuscita di liquidi che possono umettare oggetti vicini Controllare le relative parti Pulire queste parti e se il caso sostituirle Utilizzare la batteria ricaricabile esclusivamente insieme all elettroutensile Stayer Solo in questo modo la batteria ricaricabile viene protetta da sovraccarico pericoloso U...

Page 12: ...IO DEGLI UTENSILI Prima di effettuare lavori all elettroutensile ad es lavori di manutenzione cambio d utensile ecc nonché in caso di trasporto e di conservazione dello stesso avere sempre cura di portare in posizione media il commutatore per la reversibilità In difetto sussisterà il pericolo di lesioni in caso di azionamento accidentale dell interruttore di avvio di arresto Aprire il mandrino aut...

Page 13: ...ndo l interruttore avvio arresto 8 il mandrino autoserrante viene frenato impedendo in questo modo una fase di arresto dell utensile accessorio Avvitando viti rilasciare l interruttore avvio arresto 8 solo dopo che la vite sia stata avvitata a filo nel pezzo in lavorazione In questo caso la testa della vite non penetra nel pezzo in lavorazione LED Autonomia Luce verde 60 Luce giallo 3060 Luce ross...

Page 14: ...i di apparecchiature elettriche ed elettroniche RAEE ed all attuazione del recepimento nel diritto nazionale gli elettroutensili diventati inservibili devono essere raccolti separatamente ed essere inviati ad una riutilizzazione ecologica SMALTIMENTO E RICICLAGGIO Batterie ricaricabili Batterie Li ion Si prega di tener presente le indicazioni riportare nel paragrafo Trasporto Qualunque sia il tipo...

Page 15: ... Loose clothes jewellery or long hair can be caught in moving parts g If devices are provided for the connection of dust extraction and collection facilities ensure these are connected and properly used Use of dust collection can reduce dustrelated hazards 4 Power tool use and care a Do not force the power tool Use the correct power tool for your application The correct power tool will do the job ...

Page 16: ...the battery chargers listed on the accessories page Only these battery chargers are matched to the lithium ion battery of your power tool The battery is supplied partially charged To ensure full capacity of the battery completely charge the battery in the battery charger before using your power tool for the first time The lithiumion battery can be charged at any time without reducing its service l...

Page 17: ...ational direction switch 7 is used to reverse the rotational direction of the machine However this is not possible with the On Off switch 8 actuated Right Rotation For drilling and driving in screws push the rotati onal direction switch 7 left to the stop Setting the Torque Setting the Operating Mode The required torque can be preselected in 16 steps with the torque preselection ring 3 With the co...

Page 18: ...ations DISPOSAL The machine accessories and packaging should be sorted for environmental friendly recycling Only for EC countries Do not dispose of power tools into house hold waste According the European Guideline 2012 19 EU for Waste Electrical and Electronic Equipment and its implementation into national right power tools that a re no longer usa ble must be collected separately and disposed of ...

Page 19: ... Sie sich dass das Elektrowerkzeug ausgeschaltetist bevorSieesandieStromversorgung und oder den Akku anschließen es aufnehmen oder tragen Wenn Sie beimTragen des Elektrowerkzeuges den Finger am Schalter haben oder das Gerät eingeschaltet an die Stromversorgung anschließen kann dies zu Unfällen führen d Entfernen Sie Einstellwerkzeuge oder Schraubenschlüssel bevor Sie das Elektrowerkzeug einschalte...

Page 20: ...de benetzen Überprüfen Sie betroffene Teile Reinigen Sie diese oder tauschen Sie sie gegebenenfalls aus Verwenden Sie den Akku nur in Verbindung mit Ihrem Stayer Elektrowerkzeug Nur so wird der Akku vor gefährlicher Überlastung geschützt VERWENDUNG UND PFLEGE VON BATTERIEN Öffnen Sie den Akku nicht Es besteht die Gefahr eines Kurzschlusses Schützen Sie den Akku vor Hitze z B auch vor dauernder Son...

Page 21: ...rk zeug ein Drehen Sie die Hülse des Schnellspannbohrfutters 2 in Drehrichtung von Hand kräftig zu Das Bohrfutter wird dadurch automatisch verriegelt Die Verriegelung löst sich wieder wenn Sie zum Entfernen des Werkzeuges die Hülse in Gegenrichtung drehen STAUB SPÄNEABSAUGUNG Stäube von Materialien wie bleihaltigem Anstrich einigen Holzarten Mineralien und Metall können gesundheitsschädlich sein B...

Page 22: ...ND REINIGUNG Bringen Sie vor allen Arbeiten am Elektrowerkzeug z B Wartung Werkzeugwechsel etc sowie bei dessen Transport und Aufbewahrung den Drehrichtungsumschalter in Mittelstellung Bei un beabsichtigtem Betätigen des Ein Ausschalters bes teht Verletzungsgefahr Halten Sie das Elektrowerkzeug und die Lüftungsschlitze sauber um gut und sicher zu arbeiten Ist der Akku nicht mehr funktionsfähig wen...

Page 23: ... Die werte revalid bei einer nennspannungen für U 230 240 V 50 60 Hz 110 120 V 60 Hz Bei iedrigeren Spannungen und in länderspezifischen Ausführungen Land können diese Werte variieren INFORMATIONEN ZU GERÄUSCHEN UND VIBRATIONEN Gehörschutzhelme tragen Messwerte gemäß EN 62841 1 Die hier angegebenen technischen Spezifikationen werden innerhalb bestimmter Toleranzen gemäß den derzeit geltenden Norme...

Page 24: ...assurer que l interrupteur est en position arrêt avant de brancher l outil au secteur et ou au bloc de batteries de le ramasser ou de le porter Porter les outils en ayant le doigt sur l interrupteur ou brancher des outils dont l interrupteur est en position marche est source d accidents d Retirer toute clé de réglage avant de mettre l outil en marche Une clé laissée fixée sur une partie tournante ...

Page 25: ...ler les éléments concernés Les nettoyer ou le cas échéant les remplacer N utilisez l accu qu avec votre outil électroportatif Stayer Seulement ainsi l accu est protégé contre une surcharge dangereuse UTILISATION ET ENTRETIEN DES BATTERIES Ne pas ouvrir l accu Risque de court circuit Protéger l accu de toute source de chaleur comme p ex l exposition directe au soleil au feu à l eau et à l humidité ...

Page 26: ... puisse être monté Mettre en place l outil Tourner fortement à la main la douille du mandrin automatique 2 dans le sens de rotation Le mandrin de perçage se trouve alors verrouillé automatiquement Le verrouillage peut être desserré lorsqu on tourne la douille en sens inverse afin d enlever l outil ASPIRATION DE POUSSIÈRES DE COPEAUX Les poussières de matériaux tels que peintures contenant du plomb...

Page 27: ...ue des forets HSS aiguisés et en pa rfait état HSS aciers super rapides La gamme d accessoires Stayer vous assure la qualité nécessaire Avant de visser des vis d un certain diamètre et d une certaine longueur dans des matériaux durs il est recommandé d effectuer un préperçage à l aide du diamètre de l âme du filet d environ 2 3 de la longueur de vis Travaillez en appliquant une vitesse d avance mo...

Page 28: ...uropéenne Les accus piles usés ou défectueux doivent être recyclés conformément à la directive 2006 66 CE CARACTÉRISTIQUES TECHNIQUES Baterie Tension Alimentation par batterie Temps de charge Nombre de tour Couple maxi Percussions Diamètre de perçage pour bois Diamètre de perçage pour metal Poids Niveau de puissance acoustique Niveau de pression sonore Vibration Diamètre de perçage pour pierre Ces...

Page 29: ...ctrica esteja desligada antes de conectá la à corrente eléctrica e ou ao acumulador antes de apanhá la ou carregá la Manter o dedo sobre o interruptor ao transportar a ferramenta eléctrica ou conectar a ferramenta já ligada à rede pode levar a graves acidentes d Remover chaves de ajustes ou chaves de fenda antes de ligar a ferramenta eléctrica Uma chave de fenda ou chave de ajuste que se encontre ...

Page 30: ...a sua ferramenta eléctrica Stayer Só assim é que o seu acumulador é protegido contra perigosa sobrecarga USO E CUIDADOS COM AS BATERIAS Não abrir o acumulador Há risco de um curto circuito Proteger o acumulador contra calor p ex também contra uma permanente radiação solar fogo água e humidade Há risco de explosão Em caso de danos e de utilização incorrecta do acumulador podem escapar vapores Areja...

Page 31: ...es se o interruptor de ligardesligar for accionado involuntariamente Abrir o mandril de brocas de aperto rápido 2 girando no sentido de rotação até ser possível introduzir a ferramenta Introduzir a ferramenta Fechar a bucha do mandril de aperto rápido 2 manualmente no sentido de rotação Isto trava automaticamente o mandril de brocas O travamento solta se novamente logo que girar a bucha no sentido...

Page 32: ...or accionado involuntariamente Manter a ferramenta eléctrica e as aberturas de ventilação sempre limpas para trabalhar bem e de forma segura O acumulador não funciona mais dirija se a um serviço pós venda autorizado para ferramentas eléctricas Stayer Se a ferramenta eléctrica falhar apesar de cuidadosos processos de fabric ação e de teste a reparação deverá ser executada por uma oficina de serviço...

Page 33: ...te de pedra As indicações só valem para tensoes nominais U 230 240 V 50 60 Hz 110 120 V 60 Hz Estas indicacões podem variar no caso de tensões inferiores em modelos específicos dos países INFORMAÇÕES SOBRE RUÍDO E VIBRAÇÕES Use capacetes de proteção auditiva Valores medidos estabelecidos de acordo com EN 62841 1 As especificações técnicas aqui indicadas são entendidas dentro de certas tolerâncias ...

Page 34: ...etinin kapalı olduğundan emin olun Elektrikli el aletini parmagınız şalter üzerinde dururken taşırsanız ve alet açıkken fişi prize sokarsanız kazalara neden olabilirsiniz d Elektrikli el aletini çalıştırmadan önce ayar aletlerini veya anahtarları aletten çıkarın Aletin dönen parçaları içinde bulunabilecek bir yardımcı alet yaralanmalara neden olabilir e Çalışırken bedeniniz anormal durumda olmasın...

Page 35: ...a akü tehlikeli zorlanmalara karşı korunur BATARYALARIN KULLANIMI VE BAKIMI Aküyü açmayın Kısa devre tehlikesi vardır Aküyü aşırı ölçüde ısınmaya karşı örneğin sürekli güneş ışınına karşı ve ayrıca ateşe suya ve neme karşı koruyun Patlama tehlikesi vardır Hasar gördüklerinde veya usulüne uygun kullanılmadıklarında aküler buhar çıkarabilir Çalıştığınız yeri havalandırın ve şikayet olursa hekime baş...

Page 36: ...issedilir biçimde kavrama yapacak ve tutamakla aynı hizaya gelecek biçimde tutamağın içine yerleştirin Dönme yönünün ayarlanması Dönme yönü değiştirme şalteri 7 ile elektrikli el aletinin dönme yönünü de ğiştirebilirsiniz Ancak açma kapama şalteri 8 basılı iken bu mümkün değildir Sağa dönüş Delme ve vida takmak için dönme yönü değiştirme şalterini 7 sonuna kadar sola bastırın Tork ön seçimi İşleti...

Page 37: ...n olası ek ulusal yönetmelik hükümlerine de uyun TASFIYE Elektrikli el aleti aksesuar ve ambalaj malzemesi çevre dostu bir yöntemle tasfiye edilmek üzere tekrar kazanım merkezine gönderilmelidir Sadece AB üyesi ülkeler için Elektrikli el aletini evsel çöplerin içine atmayın Elektrikli el aletleri ve eski elektronik aletlere ilişkin 2012 19 UE sayılı Avrupa Birliği yö netmeliği ve bunların tek tek ...

Page 38: ...że wyłącznik jest w pozycji wyłączonej Przenoszenie elektronarzędzi z palcem na włączniku lub włączanie elektronarzędzi z włącznikiem w pozycji włączonej sprzyja wypadkom d Przed włączeniem narzędzia elektrycznego należy wyjąć klucz nastawczy lub inny klucz Klucz lub klawiatura pozostawiona na obracającej się części elektronarzędzia może spowodować obrażenia ciała e Nie należy sięgać zbyt wysoko P...

Page 39: ... vadného akumulátoru mohou unikat kapaliny a může dojít k potřísnění okolních věcí Z tohoto důvodu zkontrolujte všechny postižené věci Dle stavu je očistěte nebo vyměňte za nové Akumulátory Stayer používejte pouze pro nářadí Stayer dle doporučení výrobce Pouze takto ochráníte svůj akumulátor před nebezpečím poškození a přetížením POUŽÍVÁNÍ A PÉČE O BATERIE Nepokoušejte se akumulátor otevřít Mohlo ...

Page 40: ...sklíčidla proti směru chodu hodinových ručiček rozevřete sklíčidlo 2 tak aby bylo možné do něj zasunout pracovní nástroj Vložte poté nástroj do sklíčidla Manžetu rychloupínacího sklíčidla poté rukou pevně dotáhněte ve směru chodu hodinových ručiček Dojde tím k automatickému zajištění sklíčidla Při otáčení manžety opačným směrem dojde k opětovnému otevření sklíčidla a uvolnění nástroje ODSÁVÁNÍ PRA...

Page 41: ...dném stavu Nabídku vrtáků s odpovídající kvalitou najdete v ceníku příslušenství firmy Stayer V případě šroubování velkých či dlouhých vrutů šroubů do tvrdého materiálu doporučujeme předvrtat otvor o průměru závitu vrutu šroubu do hloubky zhruba 2 3 délky vrutu šroubu 4_ÚDRŽBA A SERVIS ÚDRŽBA A ČIŠTĚNÍ Před zahájením jakékoliv činnosti včetně čištění stroje např údržby výměny nástroje atd tak jako...

Page 42: ... 2006 66 EHS musí být vadné nebo vybité akumulátory baterie recyklovány TECHNICKÉ PARAMETRY Akumulátor Napětí Kapacita Nabíjecí čas Otáčky při chodu naprázdno Max krouticí moment Počet příklepů Vrtání Ø max do dřeva Vrtání Ø max do oceli Vrtání Ø max do zdiva Hmotnost Hladina akustického výkonu Hladina akustického tlaku Hladina vibrací Uvedené hodnoty platí pro jmenovitá napětí U 230 240 V 50 60 H...

Page 43: ...τηθέση απενεργοποίησης προτούσυνδέσετε το εργαλείο στην πηγή τροφοδοσίας ή και στην μπαταρία και προτού το κρατήσετε στα χέρια σας ή το μεταφέρετε Αν κατά τη μεταφορά ηλεκτρικών εργαλείων έχετε το δάκτυλό σας επάνω στο διακόπτη ή αν ενεργοποιηθούν ενώ ο διακόπτης είναι πατημένος μπορεί να προκληθεί ατύχημα δ Απομακρύνετε τυχόν κλειδί ρύθμισης ή οδοντωτό κλειδί πριν από την ενεργοποίηση του εργαλεί...

Page 44: ...δηγήσει στην απώλεια του ελέγχου του μηχανήματος Μην ανοίγετε την μπαταρία Υπάρχει κίνδυ νος βραχυκυκλώματος Προστατεύετε την μπαταρία από φωτιά και υπερβολικές θερμοκρασίες π χ ακόμη και από συνεχή ηλιακή ακτινοβολία Υπάρχει κίνδυνος έκρηξης Σε περίπτωση βλάβης ή και αντικανονικής χρήσης της μπαταρίας μπορεί να εξέλθουν αναθυμιάσεις από την μπαταρία Αφήστε να μπει φρέσκος αέρας και επισκεφτείτε έ...

Page 45: ...τη ON OFF Η μπαταρία μπορεί να υποστεί ζημιά ή βλάβη Για να αφαιρέσετε την μπαταρία 5 πατήστε το πλήκτρο απομανδάλωσης 9 και αφαιρέστε την μπαταρία από το πίσω μέρος του ηλεκτρικού εργαλείου Μην εφαρμόσετε βία Για να φορτώσετε την μπαταρία 5 μπορείτε να την αφήσετε μέσα στο ηλεκτρικό εργαλείο Κατά τη διάρκεια της φόρτισης το εργαλείο δεν μπορεί να τεθεί σε λειτουργία Πατήστε το διακόπτη ON OFF 10 ...

Page 46: ...αρισμός f Πριν διεξάγετε οποιαδήποτε εργασία στο ίδιο το ηλεκτρικό εργαλείο π χ συντήρηση αλλαγή εργαλείου κτλ καθώς και όταν πρόκειται να το μεταφέρετε θέστε το διακόπτη αλλαγής φοράς περιστροφής στη μεσαία θέση Σε περίπτωση αθέλητης ενεργοποίησης του διακόπτη ON OFF υπάρχει κίνδυνος τραυματισμού Διατηρείτε το ηλεκτρικό εργαλείο και τις σχισμές αερισμού καθα ρές για να μπορείτε να εργάζεσθε καλά ...

Page 47: ...ν οδηγία 2006 66 EE ΤΈΧΝΙΚΑ ΧΑΡΑΚΤΗΡΙΣΤΙΚΑ μπαταρία τάση Ισχύς μπαταρίας Χρόνος φόρτισης Αποδεικνύεται άδει Ροπή κρούση Κόψτε το ξύλο Κόψτε χάλυβα Κόψτε πέτρα βάρος Στάθμη ηχητικής ισχύος Στάθμη ηχητικής πίεσης δόνηση Αυτά τα δεδομένα είναι έγκυρα για ονομαστικές τάσεις U 230 240 V 50 60 Hz 110 120 V 60 Hz τιμές μπορούν να ποικίλουν την χαμηλότερη τάση και τα μοντέλα για συγκεκριμένες χώρες ΠΛΗΡΟΦ...

Page 48: ...r producto que haya sufrido algún desgaste en alguna de sus piezas por el uso normal de la herramienta siendo esta pieza un consumible accesorios o elemento sujeto al desgaste que debería de cambiarse por su propio uso por parte del usuario g Cualquier producto que presente una falla debida a un manejo inadecuado de la herramienta incompatible con los usos o aplicaciones indicadas en el manual de ...

Page 49: ...aid components consumables accessories or components subject to wear that must be replaced by the owner g Products that show any kind of misuse or application which deviates from its original intended uses listed in the Users guide h Products that show lack of correct maintenance from the owner The owner is responsible for the tool s maintenance in order to preserve its service life i Accessories ...

Page 50: ...NOTES ...

Page 51: ...NOTES ...

Page 52: ...Área Empresarial Andalucía Sector I Calle Sierra de Cazorla nº7 C P 28320 Pinto Madrid SPAIN info grupostayer com www grupostayer com ...

Reviews: