background image

17

To view manuals, videos, drivers, downloads, technical drawings, and more visit www.startech.com/support

3. 

(Optional -- for 

Monitors 

with recessed 

VESA Mounting 

Holes

, for 

Monitors

 with uneven rear geometry, or to adjust 

the engagement depth of the provided 

Screws

) Add the 

necessary number of 

Spacers (M-F)

 between the 

Monitor 

and the 

VESA Plate

.

4. 

Align the 

VESA Plate

 over the 

VESA Mounting Holes 

or 

(optional) 

Spacers (M-F)

 located on the back of the 

Monitor

The side of the

 VESA Plate

 that features the threaded hole 

should be pointing towards the top of the 

Monitor

.

5. 

Place four 

Washers (Large) (M-E)

 over each 

VESA 

Mounting Hole

6. 

Thread the appropriate size and length of 

M-Type Screws 

(e.g.

 M4 x 12 mm Screws (M-A)

) through the 

Washers 

(Large) (M-E)

VESA Plate

,


(Optional) 

Spacers (M-F)

,


and 

into the 

Monitor

7. 

Tighten the 

M-Type Screws

, using a 

Phillips Head 

Screwdriver

, until each

 Screw 

sits flush with the surface of 

the

 VESA Plate

.

Warning! 

Do not overtighten the 

M-Type Screws

. If any 

unexpected resistance is encountered while fastening these 

Screws

, immediately stop and attempt to use a  

different length of 

M-Type Screw

.

Summary of Contents for WKSTNCART

Page 1: ...vision 05 07 2021 User Manual For the latest information and specifications visit www startech com WKSTNCART Height Adjustable Mobile Workstation Single Monitor SKU WKSTNCART Actual product may vary from photos ...

Page 2: ... for illustrative purposes only and do not represent an endorsement of a product or service by StarTech com or an endorsement of the product s to which this manual applies by the third party company in question Regardless of any direct acknowledgement elsewhere in the body of this document StarTech com hereby acknowledges that all trademarks registered trademarks service marks and other protected ...

Page 3: ...t être réalisé par un professionnel certifié et dans le respect des normes locales et du code de construction local 安全対策 製品の設置やマウントは 使用地域の安全ガイドラインおよび建築基準に 従い 有資格の専門業者が行うようにしてください Misure di sicurezza L installazione e o il montaggio dei prodotti devono essere eseguiti da un tecnico professionale certificato che conosca le linee guida locali sulle norme edilizie e sulla sicurezza Säkerhetsåtgärder I...

Page 4: ...nt without assistance Before adding equipment to this product ensure the product has been properly assembled and that the product can support the weight of the added equipment Make sure all of the equipment has been properly secured before adjusting this product Do not move the cart over cords cables or uneven surfaces Before moving the cart unlock the Casters C Tipping Hazard This product is free...

Page 5: ...male capaciteit van dit product niet Overbelasting van dit product kan letsel of materiële schade veroorzaken Gewichtscapaciteit van de monitorsteun 8 kg 17 6 lb Gewichtscapaciteit van de toetsenbordhouder 2 kg 4 4 lb Gewichtscapaciteit van de CPU houder 5 kg 11 lb Geef kinderen geen toestemming om op dit apparaat te klimmen of dit product zonder goed toezicht te gebruiken Dit product is alleen be...

Page 6: ... 下さい 転倒注意 モニタが一番高い位置にある状態でカートを動かさないで下さ い また モニタを押してカートを動かすのはやめて下さい コードやケーブルの上 または凹凸のある床面でカートを移動させないで 下さい Dichiarazioni di avvertenza Assicurarsi di Assemblare il prodotto secondo le istruzioni Leggere l intero manuale e assicurarsi di aver compreso tutte le istruzioni prima di iniziare ad assemblare e a utilizzare questo prodotto Non superare la capacità di carico del prodotto Il sovraccarico del ...

Page 7: ...vant de commencer à assembler et utiliser ce produit Ne dépassez pas la capacité pondérale du produit Une surcharge du produit peut entraîner des blessures ou des dommages matériels Capacité de poids du support de moniteur 8 kg 17 6 lb Capacité de poids du plateau de clavier 2 kg 4 4 lb Capacité de poids du support CPU 5 kg 11 lb N autorisez pas les enfants à grimper sur ce produit ni à l utiliser...

Page 8: ...o e instalar o equipamento sem assistência Antes de adicionar o equipamento a este produto certifique se de que o montou e instalou devidamente e de que o produto pode suportar o peso do equipamento que está a adicionar ao mesmo Certifique se de que instala devidamente todo o seu equipamento antes de começar a ajustar este produto Não mova o carro pelos fios cabos ou superfícies irregulares Antes ...

Page 9: ...gesamte Handbuch und vergewissern Sie sich dass Sie die Anweisungen verstanden haben Überschreiten Sie nicht die Tragkraft dieses Produkts Ein Überladen dieses Produkts kann zu Verletzungen oder zur Beschädigung des Produkts führen Gewichtskapazität der Monitorhalterung 8 kg 17 6 lb Gewichtskapazität der Tastaturablage 2 kg 4 4 lb Gewichtskapazität der CPU Halterung 5 kg 11 lb Gestatten Sie Kinder...

Page 10: ...rs downloads technical drawings and more visit www startech com support Bewegen Sie den Wagen nicht über Leitungen Kabel oder unebenes Gelände Stellen Sie sicher dass die Rollen entriegelt sind bevor Sie den Wagen in Bewegung setzen ...

Page 11: ...al Specifications 7 Requirements 9 Installation 9 Attach the Caster C 9 Attach the Column B to the Base A 10 Adjust the Height of the Column B 11 Adjust the Height of the Keyboard Platform F and Handles 12 Attach and Adjust the Keyboard Platform F 13 Attach the VESA Mount H 14 Remove the VESA Plate from the VESA Mount H 15 Attach the VESA Plate to the Monitor 16 To view manuals videos drivers down...

Page 12: ...he CPU Holder Bracket 19 Adjust the Width of the CPU Holder D 20 Attach the CPU Holder D to the CPU Holder Bracket on the Column B 20 Attach the CPU Straps E to the CPU Holder D 21 Install Secure the CPU into the CPU Holder D 22 Cable Management 23 Store the 5 mm M 6 mm N Hex Keys 23 Operation 23 Move the Mobile Workstation Assembly 23 Warranty Information 25 ...

Page 13: ...eos drivers downloads technical drawings and more visit www startech com support Product Diagram Front View VESA Mount H Column B Base A Keyboard Platform F CPU Holder D Casters C Cable Management Slot Column Cap G Handles ...

Page 14: ...2 To view manuals videos drivers downloads technical drawings and more visit www startech com support Product Dimensions Front View ...

Page 15: ...3 To view manuals videos drivers downloads technical drawings and more visit www startech com support Keyboard Platform F View ...

Page 16: ...4 To view manuals videos drivers downloads technical drawings and more visit www startech com support CPU Holder D and CPU Straps E View Note The CPU Straps E are not pre installed ...

Page 17: ...t Information Package Contents Note The following images are not to scale Base A Qty 1 Column B Qty 1 Caster C Qty 4 CPU Holder D Qty 1 CPU Straps E Qty 2 Keyboard Platform F Qty 1 Column Cap G Qty 1 VESA Mount H Qty 1 M8 x 30 mm Screws I Qty 6 Washers Small J Qty 4 M6 x 6 mm Screws K Qty 6 Mouse Pad L Qty 1 ...

Page 18: ... Key N Qty 1 Wrench O Qty 1 M4 x 12 mm Screws M A Qty 4 M4 x 16 mm Screws M B Qty 4 M5 x 12 mm Screws M C Qty 4 M5 x 16 mm Screws M D Qty 4 Washers Large M E Qty 4 Spacers M F Qty 4 M6 Wrench P Qty 1 M6 Nuts Q Qty 2 User Manual Qty 1 ...

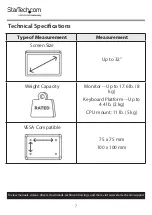
Page 19: ...gs and more visit www startech com support Technical Specifications Type of Measurement Measurement Screen Size Up to 32 Weight Capacity Monitor Up to 17 6 lb 8 kg Keyboard Platform Up to 4 4 lb 2 kg CPU mount 11 lb 5 kg VESA Compatible 75 x 75 mm 100 x 100 mm ...

Page 20: ...8 To view manuals videos drivers downloads technical drawings and more visit www startech com support Monitor Tilt Range 30 to 30 Monitor Rotation 180 to 180 Cable Management Yes ...

Page 21: ...ent scratching 2 Insert the four Caster C into the holes located in the bottom of the Base A and tighten using the Wrench O 3 Flip the Base A upright 4 Lock the Caster C by pressing down on the Brake located on top of each of the four Caster C Figure 2 5 For uneven surfaces adjust the height of the Caster C Flip the Base A upside down and use the Wrench O to adjust the Nuts located on each Caster ...

Page 22: ...ad four Washers Small J onto four M8 x 30 mm Screws I 3 Insert the four M8 x 30 mm Screws I through the bottom of the Base A and into the Column B and tighten using the 5 mm Hex Key M To view manuals videos drivers downloads technical drawings and more visit www startech com support Figure 3 ...

Page 23: ... remove the Monitor prior to making any adjustments to the height of the Column B Up 1 Loosen the Locking Knob located on the back of the Column B by twisting counterclockwise Figure 4 2 Pull the Column B up to the desired height using the attached Handles 3 Tighten the Locking Knob located on the back of the Column B by twisting clockwise Figure 4 ...

Page 24: ...ight of the Column B and press and hold the Locking Knob to lower the Column B Note Support the weight of the Column B during all height adjustments The Column B will free fall if not properly supported once the Locking Knob has been pressed 3 Release the Locking Knob once the Column B has reached the desired height 4 Tighten the Locking Knob located on the back of the Column B by twisting clockwi...

Page 25: ...Adjust the Keyboard Platform F Attach the Keyboard Platform F 1 Hang the Keyboard Platform F onto the Hooks located on the Keyboard Platform Attachment Plate on the Column B Figure 6 2 Insert four M6 x 6 mm Screws K through the Keyboard Platform F and into the Keyboard Platform Attachment Plate then tighten using a Phillips Head Screwdriver 3 Insert the Mouse Pad L into the desired side of the Key...

Page 26: ... 3 Tighten the Wing Nuts located under the Keyboard Platform by hand 4 Optional for secure Keyboard Platform F placement Remove the Wing Nuts by hand replace the Wing Nuts with the two M6 Nuts Q and tighten using the 5 Optional Replace the Wing Nuts with the two M6 Nuts Q and tighten using the M6 Wrench P Attach the VESA Mount H To view manuals videos drivers downloads technical drawings and more ...

Page 27: ...x Key M 3 Tilt the VESA Mount H upwards to access the top back Mounting Hole Insert an M8 x 30 mm Screw I through the Mounting Hole located at the bottom back of the VESA Mount and into the Column B then tighten using the 5 mm Hex Key M 4 Tighten the Hex Screw located on the side of the VESA Mount H using the 6 mm Hex Key N and press the Column Cap G onto the top of the Column B Remove the VESA Pl...

Page 28: ...off of the VESA Mount H Attach the VESA Plate to the Monitor 1 Place the Monitor on a padded surface screen side down so the back of the Monitor is accessible Figure 9 2 Optional Identify and remove the pre installed VESA Hardware from the back of the Monitor Note Not all Monitors will have placeholder VESA Hard ware Only remove the Screws for the VESA Mount Do not remove any of the screws from th...

Page 29: ...The side of the VESA Plate that features the threaded hole should be pointing towards the top of the Monitor 5 Place four Washers Large M E over each VESA Mounting Hole 6 Thread the appropriate size and length of M Type Screws e g M4 x 12 mm Screws M A through the Washers Large M E VESA Plate Optional Spacers M F and into the Monitor 7 Tighten the M Type Screws using a Phillips Head Screwdriver un...

Page 30: ...ole located on the top of the VESA Plate with the hole located on the top of the VESA Mount H Figure 10 2 Insert the Thumbscrew removed in step one of Remove the VESA Plate from the VESA Mount H through the screw hole located on the top of the VESA Plate and into the VESA Mount H 3 Insert the Hex Screw removed in step one of Attach the VESA Mount H into the screw hole located on the left side of t...

Page 31: ... four Hex Screws located on the sides of the CPU Holder Bracket using the 5 mm Hex Key M Figure 11 2 Slide the CPU Holder Bracket to the recommended mounting height of 80 120 mm from the floor 3 Tighten the four Hex Screws located on the sides of the CPU Holder Bracket using the 5 mm Hex Key M Ensure the Hex Screws are fastened enough to support the weight of the CPU Figure 11 ...

Page 32: ... Twist the Knobs located on the bottom of the CPU Holder D in a counterclockwise direction to loosen Figure 12 2 Adjust the CPU Holder D to the width of the CPU 3 Twist the Knobs located on the bottom of the CPU Holder D in a clockwise direction to tighten Attach the CPU Holder D to the CPU Holder Bracket on the Column B Figure 12 Figure 13 ...

Page 33: ...he CPU Holder Bracket on the Column B Figure 13 2 Insert two M6 x 6 mm Screws K through the CPU Holder D and into the CPU Holder Bracket on the Column B then tighten using a Phillips Head Screwdriver Attach the CPU Straps E to the CPU Holder D Push the t shaped end of the CPU Straps E through the slots on the back of the CPU Holder D Figure 14 Figure 14 ...

Page 34: ...aps E are being fed into themselves the Folding Plastic Clip will unfold After completing any necessary adjustments fold the Folding Plastic Clip to lock the CPU Straps E 3 Slide the CPU into the CPU Holder D 4 Unfold the Folding Plastic Clips and adjust the tension of the CPU Straps E After completing any necessary adjustments fold the Folding Plastic Clip to lock the CPU Straps E Figure 15 To vi...

Page 35: ...he Cable Management Slot located in the Column B Store the 5 mm M 6 mm N Hex Keys Slide the Hex Keys into the storage slots located on either side of the middle of the Column B Operation Move the Mobile Workstation Assembly 1 Unplug all the Cables connecting the Mobile Workstation to any Stationary Object e g the wall a media device etc 2 Disengage the Brakes on the Casters C Figure 16 ...

Page 36: ...isit www startech com support 3 Grip the Monitor and the Handles on the Column B and slowly move the Mobile Workstation Assembly using two people Ensure caution is exercised around corners or when navigating over bumps and or uneven ground 4 Lock the Brakes on the Casters C ...

Page 37: ...for any damages whether direct or indirect special punitive incidental consequential or otherwise loss of profits loss of business or any pecuniary loss arising out of or related to the use of the product exceed the actual price paid for the product Somestatesdonotallowtheexclusionorlimitationofincidentalorconsequential damages If such laws apply the limitations or exclusions contained in this sta...

Page 38: ...stered manufacturer of connectivity and technology parts StarTech com was founded in 1985 and has operations in the United States Canada the United Kingdom and Taiwan servicing a worldwide market Reviews Share your experiences using StarTech com products including product applications and setup what you love about the products and areas for improvement FR fr startech com DE de startech com ES es s...

Reviews: