


Channel Select:
Use to change channels while in Channel mode.
Memory Channel Select:
Use to scroll between pre-defined Memory channel.
(See “Advanced Configuration Settings” on page 7)
Last Channel Return
: Returns to the previous channel.
Mode Selection:
Toggles between memory mode and channel mode.
Capture Functions
The USB TV Tuner allows you to capture image from your television as either motion
videos or still images.
Still Image Capture
To capture a still image, click on the Still Image Capture button in the control window, on
the tuner, or on your remote. When you click the Still Image Capture button, a capture
window will appear containing all the pictures you have taken. To save any of the
images, click on the picture and choose a file name.
NOTE:
The images are not saved automatically. You have to both capture a Still Image
and manually save it. Unsaved images are deleted when the tuner is shut down.
Motion Capture
To start recording a motion file, press the Motion Video Capture button in the control
window, on the tuner, or on the remote. Press the button again to stop the recording.
While you are recording the file, you will see information on the files size and length.
As the default, Motion Capture files will be saved as .avi files with the following format:
MDDHHMMN.avi
, when
M
is the month (from 1 to 9. O-October, N-November, D-
December),
DD
is the day (from 01 to 31),
HH
is the hour (from 01 to 24),
MM
is the
minute (from 00 to 59) and
N
is the number of recordings you have made during the
same minute (from 1 to 9). You can adjust the capture settings from the Configuration
menu. See “Advanced Configuration Settings” on page 7.
Playback
If you have captured and saved a Motion Capture file, you can play it back by pushing
the
Playback
button in the control window. The previously viewed/saved video clip will
be automatically played back on your screen.
Contents
This package should contain:
• 1 x USBTVTUNER
• 1 x stereo cable (3 ft.)
• 1 x USB cable (3 ft.)
• 1 x remote control
• 1 x driver diskette
• 1 x Ulead VideoStudio editing CD
Installation
This section will guide you through the installation of your USBTBVTUNER and the
related software. Please read through this section carefully and complete each step in the
order listed.
1. Make sure that your adapter, computer, and external video devices are turned off.
2. Connect your TV antenna or cable TV coaxial cable to the
TV
port on the back of
your adapter.
3. Connect your external speaker or sound card’s “Line In” port to the
Audio-In
ports
on your tuner using the stereo cable.
4. Connect the USB cable from an open USB port on your computer to the
USB
port on
your tuner.
NOTE:
Completing the above steps will allow you to watch television on your PC. As an
option, you can also attach an external video device (such a VCR) to your system by
completing the following two steps.
6
3
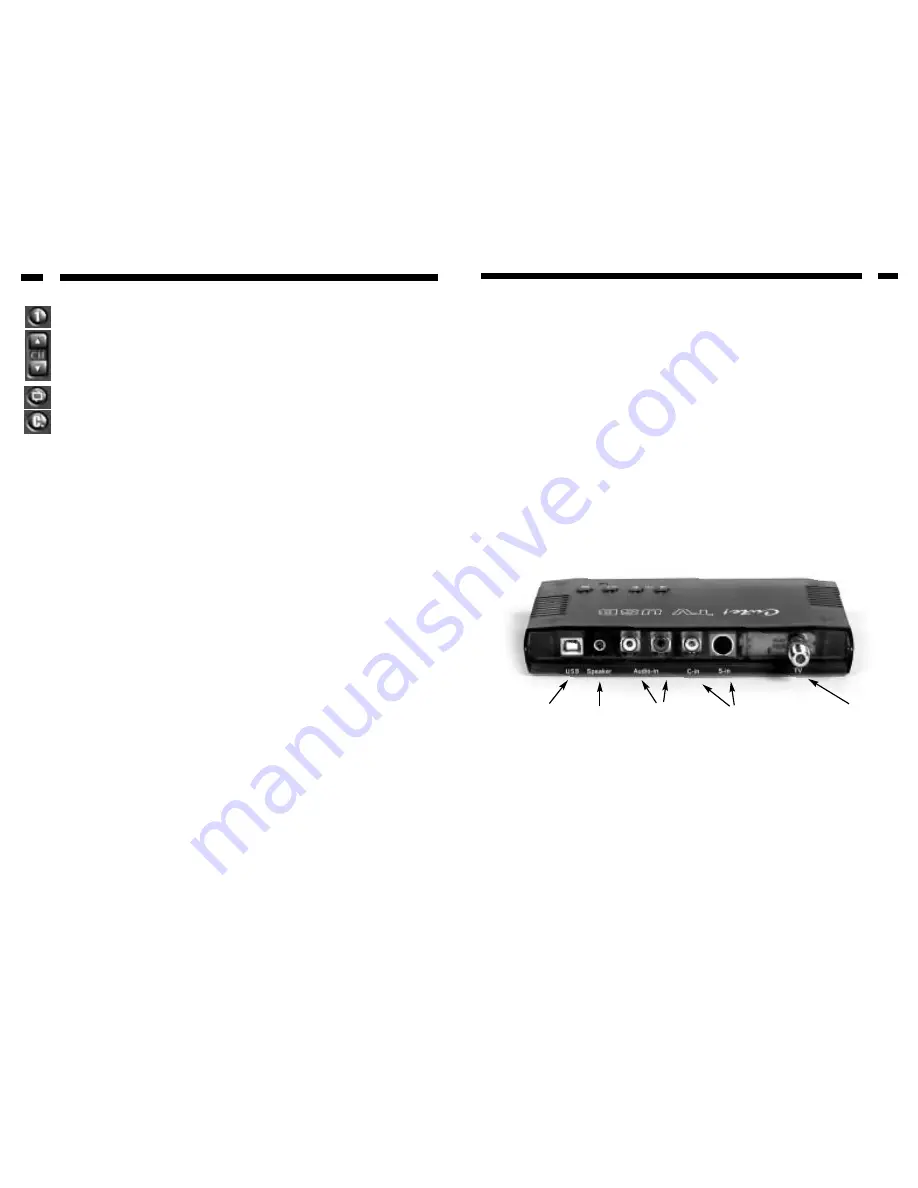
USB
Connects to PC’s
USB port using
provided USB
cable
Speaker
Connects to
external
speakers
Audio-In
Connects to audio
ports on external
video source
(Optional)
C-In/S-In
Connects to Composite
or S-Video ports on
external video source
(Optional)
TV
Connects to antenna
or cable TV coaxial
cable