background image

Instruction Manual

3

Installation

Hardware Installation

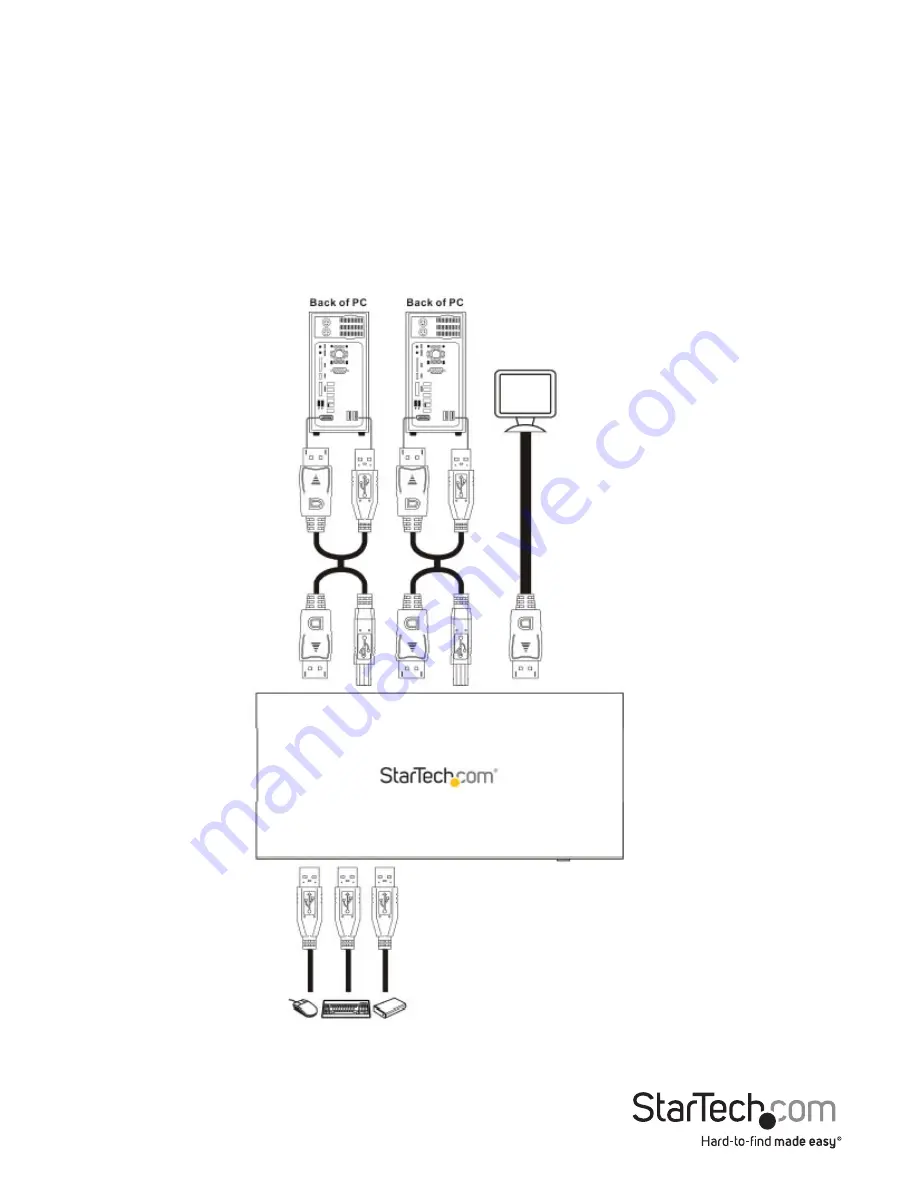
1.  Connect a DisplayPort monitor into the DP OUT connector on the back of the KVM switch. 
2.  Connect a USB keyboard and mouse into the USB ports on the front of the KVM 

switch.
3.  Connect the included DisplayPort USB KVM cables to each PC, and then to the PC1 

and PC2 ports on the back of the KVM switch.

Summary of Contents for SV231MDPU2

Page 1: ...g de startech com FR Guide de l utilisateur fr startech com ES Gu a del usuario es startech com IT Guida per l uso it startech com NL Gebruiksaanwijzing nl startech com PT Guia do usu rio pt startech...

Page 2: ...FCC Rules Operation is subject to the following two conditions 1 This device may not cause harmful interference and 2 this device must accept any interference received including interference that may...

Page 3: ...ew 1 Rear View 1 Introduction 2 Packaging Contents 2 System Requirements 2 Installation 3 Hardware Installation 3 Software Installation 4 Switch between computers 4 Operation 5 Switching between syste...

Page 4: ...Instruction Manual 1 Product Diagram Front View Rear View USB keyboard mouse and hub ports PC select button Console monitor connection PC and server KVM connections...

Page 5: ...2 m DisplayPort KVM cables 1 x instruction manual System Requirements DisplayPort display monitor projector TV etc DisplayPort output and an available USB port per computer USB keyboard and mouse A v...

Page 6: ...rt monitor into the DP OUT connector on the back of the KVM switch 2 Connect a USB keyboard and mouse into the USB ports on the front of the KVM switch 3 Connect the included DisplayPort USB KVM cable...

Page 7: ...esolution when switching between ports Switch between computers To switch between computers do any of the following 1 Press the PC select button on the KVM switch 2 Download the switching software and...

Page 8: ...ECT button on the front of the KVM switch Press Scroll Lock Scroll Lock If software is installed click the green circular icon in the toolbar Windows Mac OS 3 Browse to the location where you saved th...

Page 9: ...4 pin Female LEDs 2 x PC Selection Indicator Switching Modes Pushbutton Hotkey Software Note Hotkey switch commands are only supported on computers running a version of Windows OS Maximum Resolution...

Page 10: ...returned for repair or replacement with equivalent products at our discretion The warranty covers parts and labor costs only StarTech com does not warrant its products from defects or damages arising...

Page 11: ...ts and we quickly deliver them wherever they need to go Just talk to one of our tech advisors or visit our website You ll be connected to the products you need in no time Visit www startech com for co...

Reviews: