background image

Instruction Manual

9

Initializing the Hard Drive

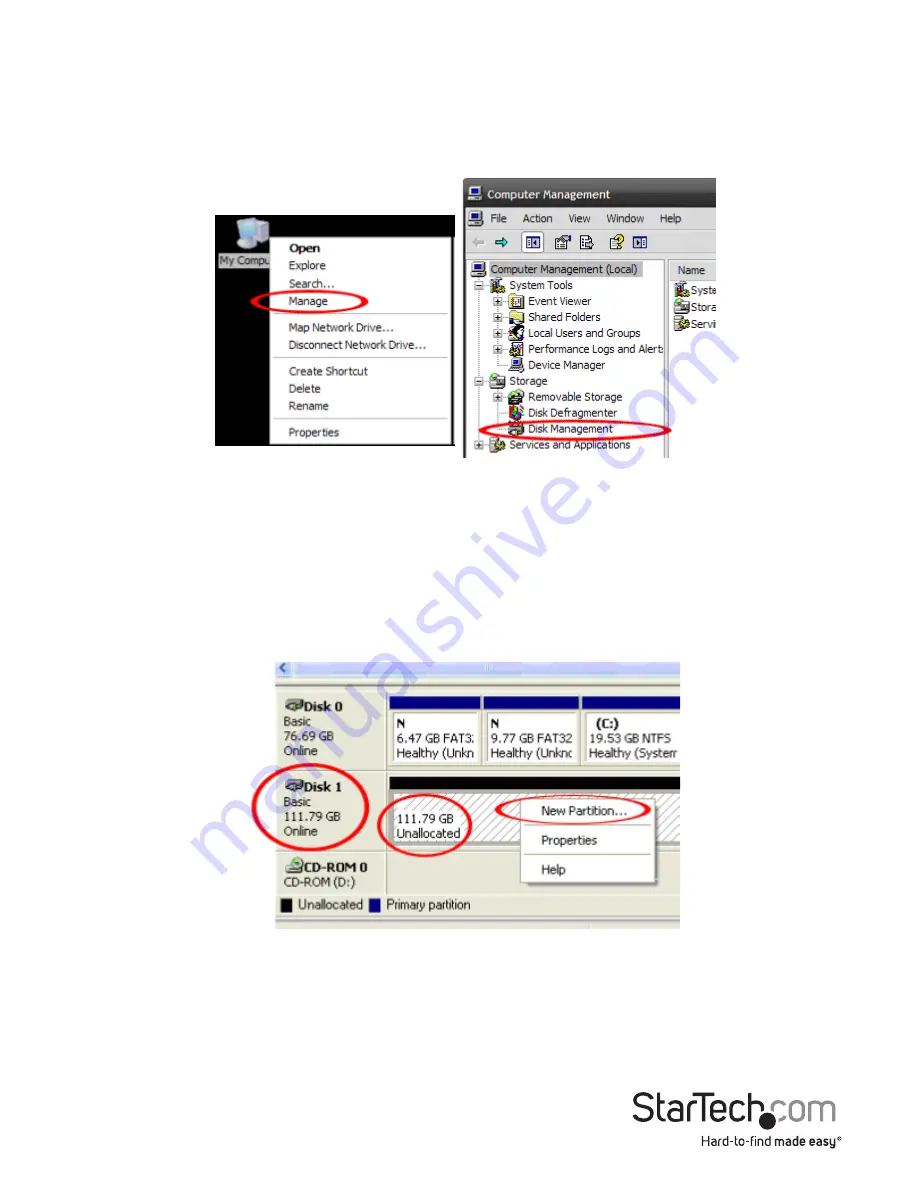
1.  If the SATA Hard Drive is blank it may need to be initialized and formatted before 

use. From the main Windows desktop, right-click on “My Computer” (“Computer” in 

Vista/ 7 / 8/ 8.1), then select Manage. In the new Computer Management window, 

select Disk Management from the left window panel.

2.  A dialog window should automatically appear, asking you to initialize the drive.

Depending on the version of Windows, it will give you the option of either creating 

an “MBR” or “GPT” disk. GPT (GUID partition) is not compatible with some older 

operating systems, while MBR is supported by newer and older operating systems.

3.  Once initialized, locate the Disk that says it is “Unallocated” (check the listed hard 

drive capacity to confirm it’s the correct hard drive) and then right-click in the 

section that says “Unallocated” and select “New Partition”.

4.  Follow the on screen prompts to initialize the drive in the format of your choice.

Summary of Contents for SM2NGFFMBU33

Page 1: ...sanleitung de startech com FR Guide de l utilisateur fr startech com ES Gu a del usuario es startech com IT Guida per l uso it startech com NL Gebruiksaanwijzing nl startech com PT Guia do usu rio pt...

Page 2: ...FCC Rules Operation is subject to the following two conditions 1 This device may not cause harmful interference and 2 this device must accept any interference received including interference that may...

Page 3: ...al Drive Tray 1 Introduction 2 Packaging Contents 2 System Requirements 2 Hardware Installation 3 How to Use 8 Connecting the Hard Drive 8 Powering the Drive Enclosure 8 Disconnecting the Hard Drive 8...

Page 4: ...Instruction Manual 1 Product Diagram Enclosure Internal Drive Tray 1 Drive tray screws 2 USB 3 0 Micro B port 1 M 2 NGFF SSD Connector 2 Drive installation bracket 3 Drive length adjustment holes...

Page 5: ...x SSD Mounting Screw and Standoff 1 x Mini Screw Driver 1 x Instruction Manual System Requirements System Requirements Computer system with available USB 3 0 5 Gbit s port or USB 2 0 port 480Mbps M 2...

Page 6: ...uter components or discharge yourself of any static electricity build up by touching a large grounded metal surface such as the computer case for several seconds 1 Using a Philips head screw driver no...

Page 7: ...gth but if your drive type is unknown place your SSD next to the M 2 NGFF SSD connector note which drive installation hole matches the height of your SSD If the bracket is already installed in the cor...

Page 8: ...in the drive installation hole that matches your SSD Replace the removed nut on the reverse side by using a small set of plyers or 5mm nut driver not included d Using the included screw driver remove...

Page 9: ...the removed screw through the mounting hole on your SSD drive and into the drive mounting standoff using the included Philips head screw driver Your M 2 SSD is now installed in the internal drive tra...

Page 10: ...driver not included replace the 2 drive tray screws on either side of the USB 3 0 Micro B port on the front of the enclosure 6 Using the included USB 3 0 cable connect the SSD enclosure to your compu...

Page 11: ...rive Windows 1 Select the Safely remove Hardware and Eject Media icon located in the task bar 2 Select the storage device from the list that appears 3 Wait for the message indicating that it is now sa...

Page 12: ...asking you to initialize the drive Depending on the version of Windows it will give you the option of either creating an MBR or GPT disk GPT GUID partition is not compatible with some older operating...

Page 13: ...returned for repair or replacement with equivalent products at our discretion The warranty covers parts and labor costs only StarTech com does not warrant its products from defects or damages arising...

Page 14: ...ts and we quickly deliver them wherever they need to go Just talk to one of our tech advisors or visit our website You ll be connected to the products you need in no time Visit www startech com for co...

Reviews: