StarTech.com PEXSAT34SFF User Manual Download Page 12

Instruction Manual

9

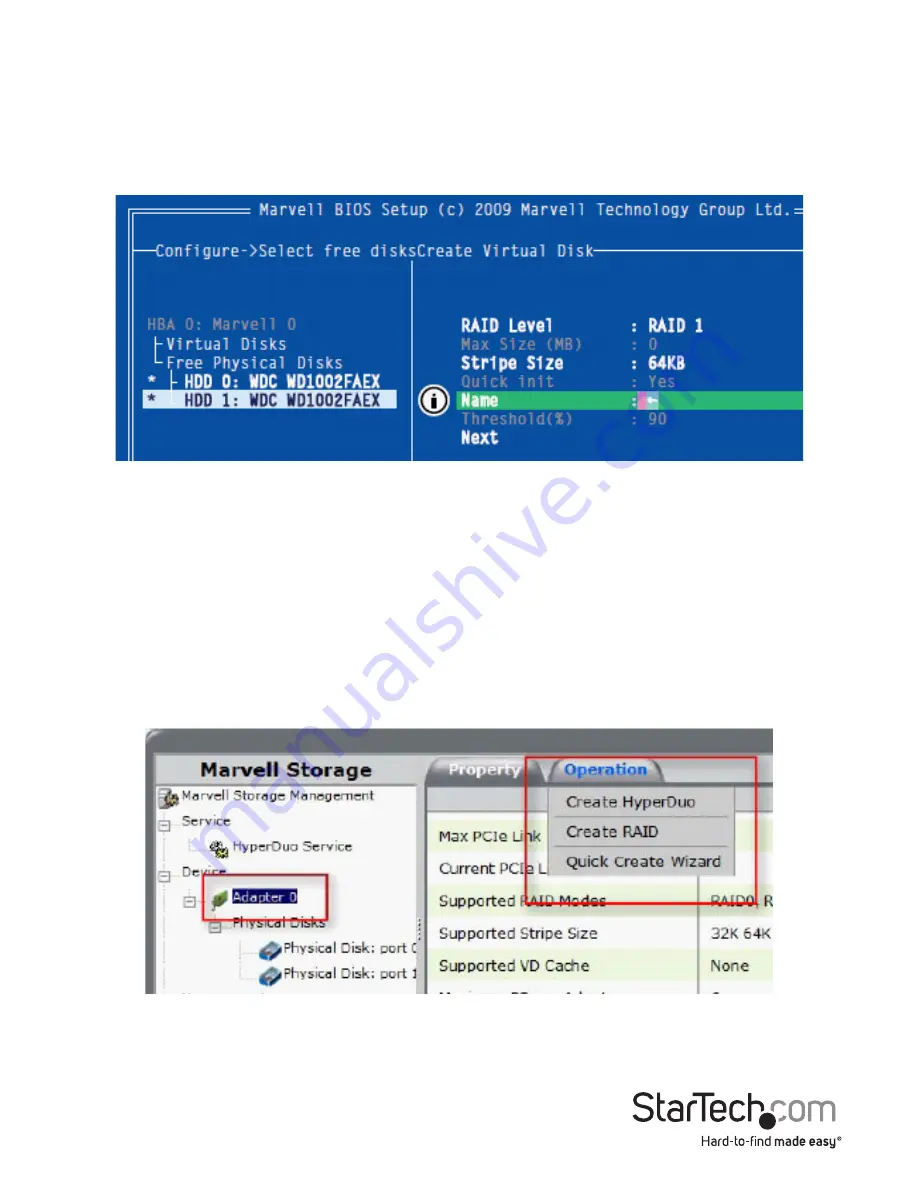
6.  The “Create Virtual Disk” configuration options appear in the “Information” pane 

(right-side), here you are able to select the RAID level and other  

configuration options:
a. Select 2 HDDs for RAID 0 or RAID 1 

b. Select 3 HDDs for RAID 0 

c. Select 4 HDDs for RAID 0 or RAID 10

7.  After configuring the virtual disk, highlight “Next” and press Enter. Press Y to confirm 

the creation of the virtual disk. It will now be listed in the Topology Pane (left).

Administration Console Method

WARNING!

 Creating a RAID virtual disk destroys all data on the physical disks included 

in the virtual disk set. Make sure to back up all data before continuing.
1.  From the left pane of main screen of the Marvell Storage Utility (MSU), select the 

adapter and hover the mouse over the “Operation” tab.

2.  Select “Create RAID”

Summary of Contents for PEXSAT34SFF

Page 1: ...anleitung de startech com FR Guide de l utilisateur fr startech com ES Gu a del usuario es startech com IT Guida per l uso it startech com NL Gebruiksaanwijzing nl startech com PT Guia do usu rio pt s...

Page 2: ...eceiving antenna Increase the separation between the equipment and receiver Connect the equipment into an outlet on a circuit different from that to which the receiver is connected Consult the dealer...

Page 3: ...r Installation 4 Management Utility Installation Optional Windows only 5 Verifying Installation 7 Operation 8 RAID Configuration 8 Administration Console Method 9 HyperDuo Configuration 11 Card BIOS M...

Page 4: ...y combining SSD and HDD drives into a single volume up to 3 SSD 1 HDD HyperDuo discreetly works in the background to identify and move frequently accessed files to the faster SSD drive s for improved...

Page 5: ...Instruction Manual 2 Mini SAS SFF 8087 port...

Page 6: ...e rear of the power supply on the back of the computer and disconnect all peripheral devices 2 Remove the cover from the computer case See documentation for your computer system for details 3 Locate a...

Page 7: ...d insert the provided Driver CD into the computer s CD DVD drive 2 AutoPlay should give you the option to browse the files on the CD or automatically open the CD If AutoPlay does not start go into My...

Page 8: ...he default installation options are recommended 2 After installing the Apache2 HTTP Server which is a built in component of the installation package the installation may trigger a Windows Security Ale...

Page 9: ...uction Manual 6 b Firefox i From the menu bar select Tools Options ii Select the Content tab and ensure that the Enable Javascript option is checked should be by default if it is not select it and cli...

Page 10: ...n select Manage In the new Computer Management window select Device Manager from the left window panel Under the SCSI and RAID Controllers category Storage Controllers in Vista or later should be a Ma...

Page 11: ...Press Ctrl M to enter BIOS Setup or Space to continue_ 2 Using the arrow keys to navigate move to HBA0 Marvell 0 and press Enter to select 3 Press Enter again to open the Configuration Wizard 4 Use th...

Page 12: ...figuring the virtual disk highlight Next and press Enter Press Y to confirm the creation of the virtual disk It will now be listed in the Topology Pane left Administration Console Method WARNING Creat...

Page 13: ...at you would like to use as part of the RAID set Once you have selected click Next to confirm your selection 5 You will now be presented with configuration options for your RAID set Choose the appropr...

Page 14: ...han those created in safe mode However they cannot be rebuilt WARNING Capacity mode is a data destructive process Please back up all data before using capacity mode Card BIOS Method 1 When prompted on...

Page 15: ...o confirm the creation of the virtual disk It will now be listed in the Topology Pane left Administration Console Method 1 From the left pane of main screen of the Marvell Storage Utility MSU select t...

Page 16: ...ows only 1 From the left pane of the MSU select HyperDuo Service 2 The right pane will then display available programs and folder that you can customize to one of the following optimization modes a Ch...

Page 17: ...ly your changes then select OK on the pop up that follows 4 If the folder you would like to optimize is not available select Advanced from the HyperDuo Service pane 5 The Customize Wizard will pop up...

Page 18: ...ID 0 1 1 0 Port Multiplier Yes Operating Temperature 5 C 50 C 41 F 122 F Storage Temperature 25 C 70 C 13 F 158 F Humidity 20 80 RH Dimensions LxWxH 80mm x 120mm x 20mm Weight 40g Compatible Operating...

Page 19: ...returned for repair or replacement with equivalent products at our discretion The warranty covers parts and labor costs only StarTech com does not warrant its products from defects or damages arising...

Page 20: ...ts and we quickly deliver them wherever they need to go Just talk to one of our tech advisors or visit our website You ll be connected to the products you need in no time Visit www startech com for co...

Reviews: