Quick-Start Guide
To view manuals, FAQs, videos, drivers, downloads, technical drawings, and more, visit www.startech.com/support.
Manual Revision: March 25, 2019 2:04 PM
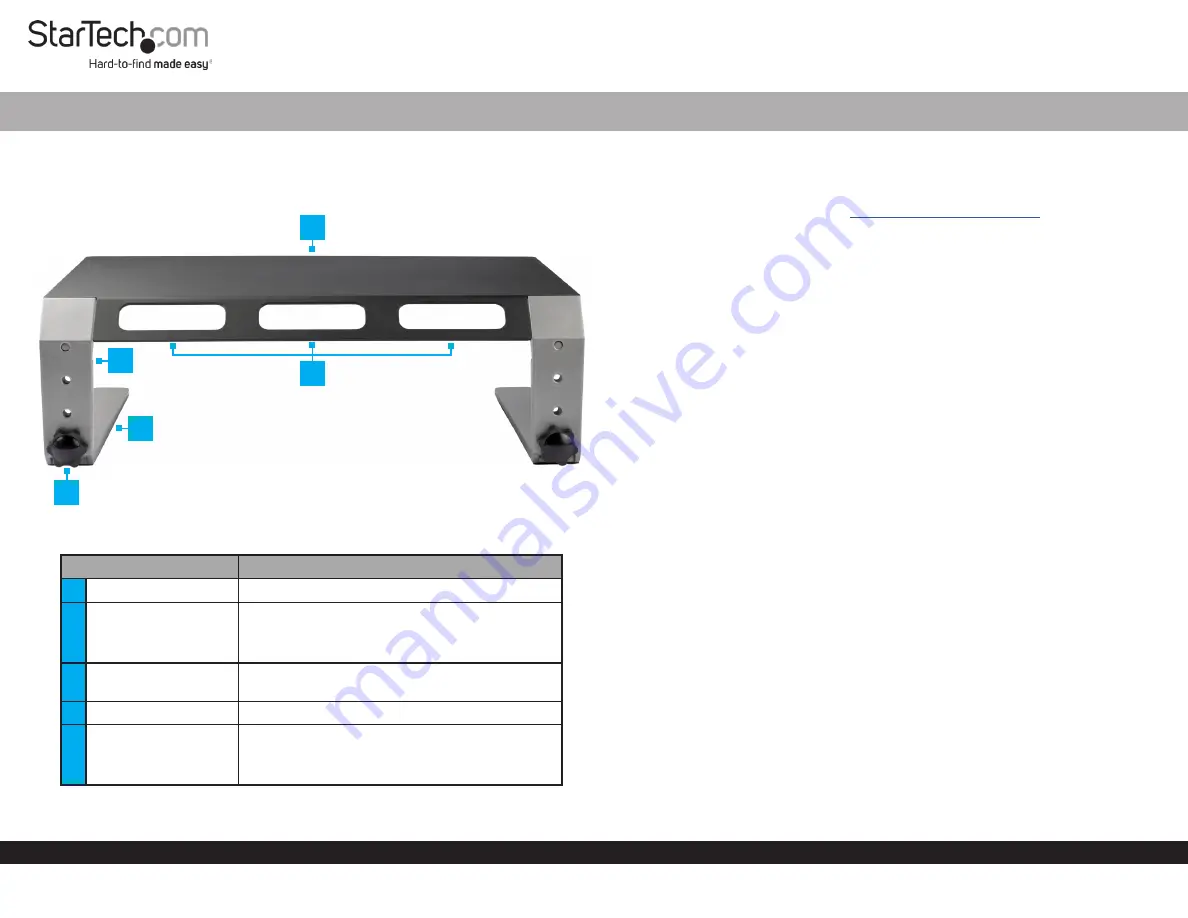
Product Diagram (MONSTND)
Rear View
Part
Function
1
Top Plate
• Used as a platform for a
Monitor
or
Laptop
2
Upper Leg
• Attaches to the
Top Plate
• Configurable with three height-adjustment
settings
3
Cable-Management
Slots
• Used for organizing and routing
Cables
4
Lower Leg
• Attaches to the
Upper Leg
5
Height-Adjustment
Screw
• Used to secure the
Upper Legs
and
Lower
Legs
together
• Can be removed to adjust height settings
Monitor Riser - Metal - Height Adjustable
1
Requirements
• Clean, Flat, and Stable Surface x 1
For the latest requirements please visit:
.
Installation
Assembly
1. Place the
Top Plate
, top side down, onto a
Clean, Flat, and Stable Surface
.
2. Place the
Upper Legs
onto the
Top Plate
. Ensure the
Holes
in the
Upper Legs
are
aligned with the
Holes
in the
Top Plate
. The slanted portion of the
Upper Legs
should be aligned with the slanted portion of the
Top Plate
.
3. Secure the
Upper Legs
to the
Top Plate,
using two
M6x10 mm Screws
for each
side. Fasten the
M6x10 mm Screws
using the
4 mm Hex Key
.
4. Align the
Lower Leg
against the
Upper Leg
at the desired
Monitor
height setting.
5. Insert the
Height-Adjustment Screw
through the
Upper Leg
and into the
Lower
Leg,
then hand-tighten.
Note:
Tighten the
Height-Adjustment Screws
by hand. Do not over-tighten.
6. Repeat steps 4 and 5 to attach the second
Lower Leg
.
7. Turn the
Monitor Riser Assembly
upright.
Operation
Height Adjustment
1. Place the assembled
Monitor Riser
, top side down, on a
Clean, Flat, and Stable
Surface
.
2. Remove the
Height-Adjustment Screws
.
3. Adjust the height of the
Lower Legs
to the desired height.
4. Insert the
Height-Adjustment Screws
through the
Upper Legs
and into the
Lower
Legs
, then hand-tighten.
5. Turn the
Monitor Riser Assembly
upright.
2
5
4
3


