


6. Insert the tray into the enclosure until the rear panel is flush to the sides of the case.
Re-tighten the screws you loosened in step 1. Ensure there is no movement of the
tray in the enclosure and continue to tighten the screws as needed. Once the screws
are tightened snugly and the tray does not move, the drive is ready to be used.
Installing Drivers (Windows 98/98SE)
Windows ME/2000/XP/2003 Server and Mac OS X all support removable hard drives
without additional software. Ensure you have the most current updates installed.
Computers running Windows 98/98SE need to install support for USB removable mass
storage devices before using the enclosure:
1. Go to
Start
,
Settings
,
Control Panel
. Double click
Add New Hardware
.
2. When the Add New Hardware Wizard opens, click
Next
. Click
Next
again to allow
Windows to search for Plug and Play devices.
3. When the Wizard is finished, choose
No, the device isn’t in the list
and click
Next
.
On the next menu, choose
No, I want to select the hardware from a list
and click
Next
.
4. From the list, choose
Other
as the type of device you are installing and click
Next
.
5. Click
Have Disk
. Insert the driver disk in your floppy drive. Type
A:
as the path
name, and click
OK.
Click
OK
again to confirm the name of the .ini file.
6. Windows will show you which driver it is installing. Click
OK
.
7. Click
Finish
to complete the installation.
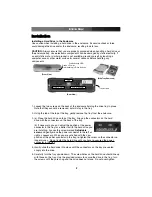
Connecting the Enclosure to a Computer
This product has been tested with Windows 98/98SE, ME, 2000, XP, 2003 Server, and
Mac OS X. Other operating systems may also support this device; consult your
documentation or a computer service professional for details on whether this product will
work with your operating system and configuration.
When used with the Windows operating systems noted above, the drive enclosure is
“hot-swappable” which means the drive can be connected and disconnected while the
computer is running and will be immediately accessible to the user like any other hard
drive.
1. Place the enclosure near the computer you wish to use.
2. Using the provided USB 2.0 data cable, connect one end to the USB connector
on the rear panel of the enclosure. Connect the opposite end of the cable to an
available USB connector on the back of the computer or a USB hub.
3. Plug the power adapter into a wall outlet or other suitable power source. Connect the
opposite end to the connector on the rear panel of the enclosure.
4. Switch the power button marked
I O
on the rear panel of the enclosure to the On (
I
)
position. The LED indicator on the front of the enclosure will light green. The drive
should be ready to use and will be visible under
My Computer
(Windows) or on the
desktop (Mac OS).
Instruction Manual
3
Summary of Contents for InfoSafe IDECASE35U2
Page 10: ...Revised 18 April 2005 Rev A...


