StarTech.com ATXSILENT Instruction Manual Download Page 4

2

Introduction

Thank you for purchasing a StarTech.com silent ATX computer case. The walls in the
case are covered with noise-absorbing pads and coated with silicon to reduce noise and
vibration. With ten drive bays, seven expansion slots, tool-less entry, a clamshell full of
helpful accessories and room for a full-sized dual-processor ATX motherboard, you’ll be
able to build the custom computer of your dreams quickly and easily. The case also
features front-mounted USB 2.0, audio, and IDE ports for your convenience.

Features

• Noise-absorbing pads and silicon coating help eliminate noise and vibration

• Clam-shell full of screws, anti-vibration pads, and accessories make installation and

customization easy

• USB 2.0, audio, and IDE ports are located in the front with a pop-out door for 

easy access 

• Comes with 10 drive bays and 7 expansion slots 

• Spacious interior provides plenty of room for a full-size dual-processor ATX 

motherboard and ATX power supply

• Backed by StarTech.com’s three-year warranty
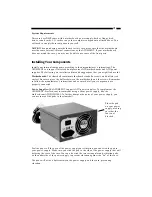
Before You Begin

To ensure a quick and easy case assembly, please read through the following instructions
before assembling your case.

WARNING: 

Do not attempt to install any computer components with the system

plugged in. Never open your computer case when your system is turned on. Always
make sure that the computer is off and unplugged before attempting to assemble or
alter your computer. 

Computer equipment can also be severely damaged by static

electricity. Be sure that you are properly grounded before opening your computer case or
touching any components. StarTech.com recommends that you wear an anti-static strap
when installing any computer equipment. If an anti-static strap is unavailable, discharge
yourself of any static electricity build-up by touching a large grounded metal surface
(such as the computer case) for several seconds. Also be careful to handle cards and
motherboards by their edges and not the gold connectors.

Contents

• 1 x ATXSILENT case

• 1 x clamshell with assorted screws, anti-vibration pads, and accessories

Summary of Contents for ATXSILENT

Page 1: ...Silent ATX PC Case ATXSILENT Instruction Guide The Professionals Source For Hard to Find Computer Parts S SI IL LE EN NT T A AT TX X C CA AS SE E Actual product may vary from photo ...

Page 2: ...erence to radio communications However there is no guarantee that interference will not occur in a particular installation If this equipment does cause harmful interference to radio or television reception which can be determined by turning the equipment off and on the user is encouraged to try to correct the interference by one or more of the following measures Reorient or relocate the receiving ...

Page 3: ...1 Table of Contents Introduction 2 Installing Your Components 3 Using Your Front Ports 5 Technical Specifications 6 Technical Support 7 Warranty Information 7 ...

Page 4: ... ATX motherboard and ATX power supply Backed by StarTech com s three year warranty Before You Begin To ensure a quick and easy case assembly please read through the following instructions before assembling your case WARNING Do not attempt to install any computer components with the system plugged in Never open your computer case when your system is turned on Always make sure that the computer is o...

Page 5: ...offs screws and buffers red circles Be sure to place the buffers between the motherboard and the screws Remember to follow the manufacturer s instructions and ensure that all your components are properly connected Power Supplies The ATXSILENT supports ATX power supplies To complement the ATXSILENT StarTech com recommends using a silent power supply like the StarTech com ATXPOW350SL To further damp...

Page 6: ...ack rubber rings to prevent vibration Place a rubber ring on the outside of your case so that the ring is between the head of the screw and the case Disk Drives The hard drive cage is removable with a thumbscrew You may find it easier to remove the drive cage before installing your hard drives The screws in the clamshell are color coded to help make drive installation easier Make sure you follow m...

Page 7: ...front ports will not work Check with your motherboard manufacturer for specifics on connecting your front ports To open the front port panel push on the door gently then release You can plug your USB 2 0 or audio devices into the front ports and use them as normal Using the Front IDE Port You can use the front IDE port to connect your IDE hard drives for making backups or for testing Use the provi...

Page 8: ...5 Expansion slots 7 slots Cooling 1 x 8cm fan Enclosure 1mm steel Motherboards Dual processor ATX including P4 Front I O Ports 2 x USB 2 0 Type A 1 x Speaker 1 x Microphone 1 x IDE 40 pin 1 x Power connector 4 pin Dimensions 8 x 20 x 18 25 W x D x H 203 x 508 x 464 mm Weight 24 3lbs 11 kgs ...

Page 9: ... Warranty Information This product is backed by a three year warranty In addition StarTech com warrants its products against defects in materials and workmanship for the periods noted below following the initial date of purchase During this period the products may be returned for repair or replacement with equivalent products at our discretion The warranty covers parts and labor costs only StarTec...

Page 10: ...Revised July 17 2003 ...

Reviews: