StarTech.com 8STIES51000POE Manual Download Page 6

Instruction Manual

3

Installation

Wall-Mounting

The Network Switch is designed to sit on a flat surface (such as a desktop) or mount to 

a wall or similar surface. Skip to the Hardware Installation section below if you are not 

wall-mounting the device.
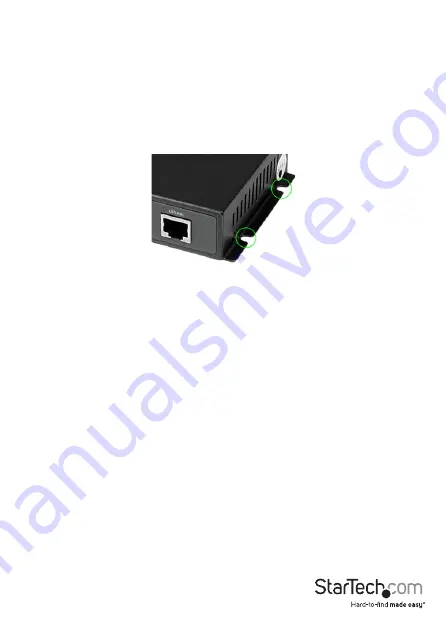
1.  Determine the desired location and orientation of the switch on the wall, and mark 

both mounting notch location on one side of the integrated mounting bracket, 

ensuring they are level. 

2.  Depending on the mounting surface, use the appropriate tools to install the 

included screws into the wall, leaving a gap of approximately 2 mm between the 

head of the screw and the wall surface. 

3.  Place switch back onto the wall with the mounting notches against the previously 

installed screws and mark the location for the mounting notches on the opposite 

side of the device.

4.  With the switch in place on the wall, install the remaining two screws on the other 

side so the device is held in place.

Hardware Installation

1.  Plug one end of the universal power adapter into the DC connector on the side 

panel of the Network Switch and the other end of the plug into an electrical outlet. 

The Power LED on the front of the Switch should now be lit.

2.  Connect a network cable to the Uplink port on the front panel of the switch, and 

connect the other end of the cable into the RJ-45 port on your upstream switch or 

router. The Uplink connection speed should auto-detect and the appropriate LEDs 

will illuminate to show activity.

3.  Connect your PoE or non-PoE devices to the remaining 4 ports on the rear panel 

of the switch (e.g. computer, IP Phone, IP Camera, etc.). The switch will auto-detect 

connection speed and whether PoE is required, and the appropriate LEDs will 

illuminate and show activity.

Summary of Contents for 8STIES51000POE

Page 1: ...e startech com FR Guide de l utilisateur fr startech com ES Guía del usuario es startech com IT Guida per l uso it startech com NL Gebruiksaanwijzing nl startech com PT Guia do usuário pt startech com IES51000POE 5 Port Gigabit Industrial Power over Ethernet Switch with 4 PoE ports actual product may vary from photos ...

Page 2: ...receiving antenna Increase the separation between the equipment and receiver Connect the equipment into an outlet on a circuit different from that to which the receiver is connected Consult the dealer or an experienced radio TV technician for help Use ofTrademarks RegisteredTrademarks and other Protected Names and Symbols This manual may make reference to trademarks registered trademarks and other...

Page 3: ...le of Contents Product Overview 1 Front View 1 Rear View 1 LED Indicators 1 Introduction 2 Packaging Contents 2 Installation 3 Wall Mounting 3 Hardware Installation 3 Specifications 4 Technical Support 5 Warranty Information 5 ...

Page 4: ...000Mbps Flashing Yellow Ethernet Uplink activity at 100Mbps Flashing Yellow Ethernet Uplink activity at 10M LAN 4 Solid Green Connected at 1000Mbps Solid Yellow Connected at 100Mbps Flashing Green Ethernet activity at 1000Mbps Flashing Yellow Ethernet activity at 100Mbps Flashing Yellow Ethernet activity at 10Mbps PoE 4 Solid Green Power over Ethernet function is enabled OFF PoE function is disabl...

Page 5: ...orts lets you connect Gigabit Ethernet and power to four PoE enabled devices or a mixture of PoE and non PoE components Packaging Contents 1 x Gigabit Ethernet PoE Switch 4 x Mounting Screws 1 x Set Rubber Feet 1 x Universal Power Adapter 4 x Power Cords NA UK EU AU 1 x Instruction Manual ...

Page 6: ... mounting notches on the opposite side of the device 4 With the switch in place on the wall install the remaining two screws on the other side so the device is held in place Hardware Installation 1 Plug one end of the universal power adapter into the DC connector on the side panel of the Network Switch and the other end of the plug into an electrical outlet The Power LED on the front of the Switch...

Page 7: ...ectors 5 x RJ 45 Female Maximum Data Transfer Rate 2 Gbps Full Duplex Switching Architecture Store and Forward Buffer Size 512 KB Full Duples Yes Auto MDIX Yes Flow Control Half duplex back pressure and IEEE802 3x full duplex Power Consumption 65W Max Power Adapter 48V DC 1 36A Enclosure Material Steel Operating Temperature 0 C to 50 C 32 F to 122 F Storage Temperature 0 C to 50 C 32 F to 122 F Hu...

Page 8: ... returned for repair or replacement with equivalent products at our discretion The warranty covers parts and labor costs only StarTech com does not warrant its products from defects or damages arising from misuse abuse alteration or normal wear and tear Limitation of Liability In no event shall the liability of StarTech com Ltd and StarTech com USA LLP or their officers directors employees or agen...

Page 9: ...rts and we quickly deliver them wherever they need to go Just talk to one of our tech advisors or visit our website You ll be connected to the products you need in no time Visit www startech com for complete information on all StarTech com products and to access exclusive resources and time saving tools StarTech com is an ISO 9001 Registered manufacturer of connectivity and technology parts StarTe...

Reviews: