background image

Menu Operations 


24 


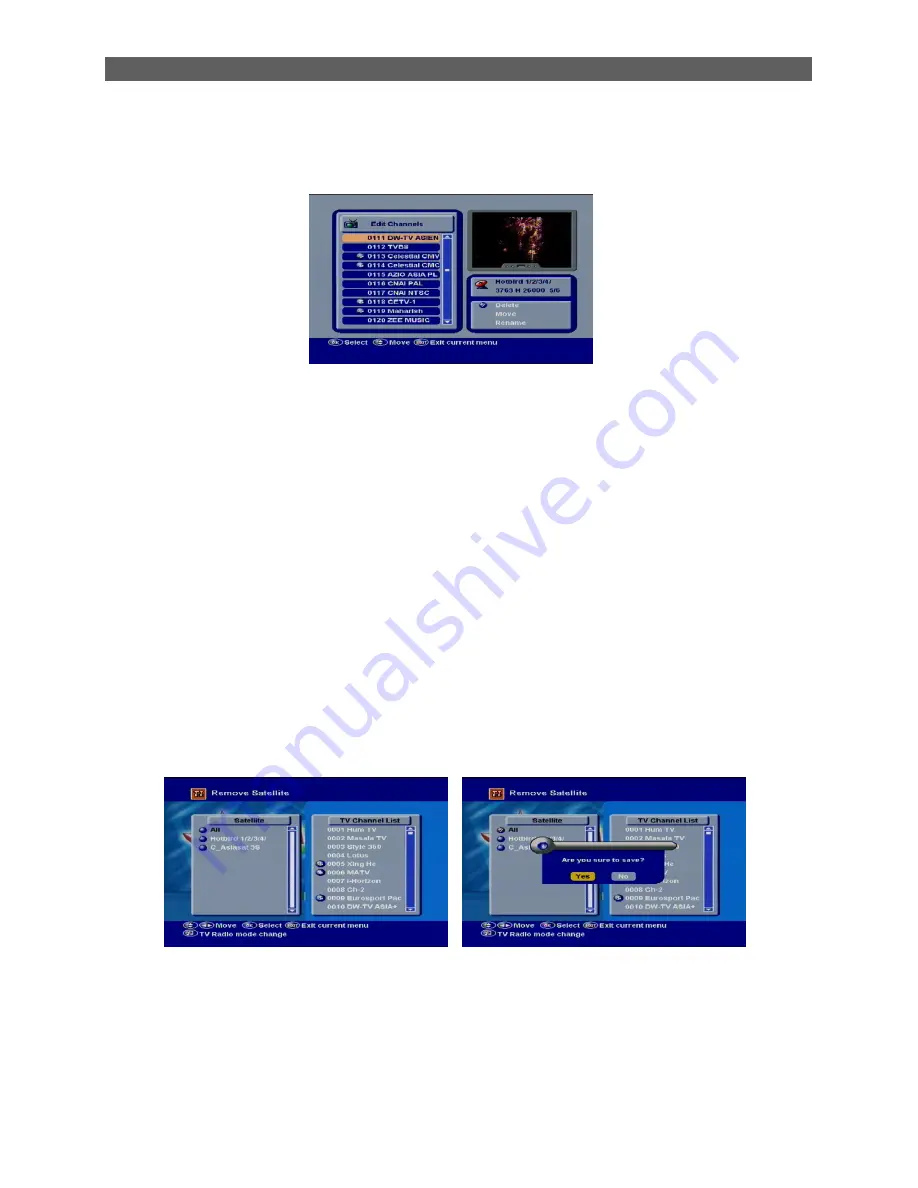
5.2    Edit  Channels 

After selecting the Edit Channels menu you can see the window like. 
In 

Edit Channels

 menu; 


This menu can support you to delete, move and rename the channel of normal channel. 
1. 

You can move the highlighted channel with [CH

/

] to preview the highlighted program in 

the preview window. 

2. 

The further functions to manage the channel list. 

[Delete] 


Press  [OK]  button  to  mark  a  channel  for  deleting.  Marked  channel  will  be 

deleted after you confirm to save the changes when you leave this menu.


[Move]   

Press  [OK]  button  to  mark  a  channel  for  deleting.  Move  the  channel  to  the 
desired position with [CH

/

]. Press [OK] to confirm the position.


[Rename] 

Press  [OK]  button  to  open  the 

Find

  window  like  showed  beside.  Press 

[CH

/

] / [Vol

/

] to select the leading character  of the channel  name  and 

press [OK] to confirm it. 

3. 

Press  [EXIT]  button  you  will  be  asked 

Are  you  sure  to  save?

.  Select 

Yes

  to  delete  all 

channel. Select 

No

 to cancel the operation.   


5.3    Remove  Satellite 

After selecting the Remove Satellite menu you can see the window like. 
In 

Remove Satellite

 menu; 


In this menu, you can delete the channel and Satellite. 
1. 

In TV list Press [TV/Radio] to switch to Radio  list. In Radio list  press [TV/Radio]  again  to 
switch back to TV list. 

2. 

Press OK button in the left screen to delete all channels in the selected satellite. 

3. 

Press  EXIT  after  select  the  satellite,  the  confirmatory  window  will  appear.  If  you  select 
<Yes>, all channels of the selected satellite will be removed. 


Summary of Contents for SR-98USB

Page 1: ... as marked on the unit If you are not sure of the type of power supply for example 120 or 230V to your home consult your local dealer or local power company WARNING Do not open the cabinet or touch any parts in the inner mechanism Consult your local dealer for technical service if the opening is required WARNING The mains plug is used as the disconnect device the disconnect device shall remain rea...

Page 2: ... Note Moisture may be formed inside the unit in the following conditions When the unit is suddenly moved from a cold environment or an air condition room to a warm place Immediately after a heater has been turned on In a steamy or very humid room If the moisture forms inside the unit it may not operate properly To correct this problem turn on the power and wait about two hours for the moisture to ...

Page 3: ...V OUT 8 2 7 Audio 8 2 8 SUB 8 2 9 TXT 8 2 10 Pause 8 2 11 Zoom 9 2 12 Sleep 10 2 13 SAT 10 2 14 FAV 10 2 15 Lock 10 2 16 EPG 11 2 17 Recall 11 2 18 INFO 12 2 19 CH 12 2 20 V 12 2 21 OK 12 2 22 MENU 13 2 23 EXIT 13 2 24 PGUP PGDN 13 2 25 13 2 26 Channel Number 13 2 27 DEL 13 2 28 CAP 13 2 29 USB 13 2 30 MP3 13 2 31 JPEG 13 2 32 Movie 13 2 33 Cal 14 2 34 Weather 14 2 35 PVR LIST 14 2 36 A B 14 2 37 ...

Page 4: ... 4 5 6 OTA Upgrade 21 4 6 Reset Factory Default 22 5 Service Organizing 23 5 1 Channel Properties 23 5 2 Edit Channels 24 5 3 Remove Satellite 24 5 4 Channel Sort 25 5 5 Edit Transponder List 25 6 STB Setting 26 6 1 Output Setting 26 6 2 Parental Lock 27 6 3 Language Setting 27 6 4 OSD Setting 27 6 5 Clock Set 28 6 6 Automatic Standby 29 7 STB Status 30 8 Reservation 30 9 CAS 31 10 PVR 32 10 1 PVR...

Page 5: ...change numbers in the menu or to change the choice 4 CH To change channels or for navigating and changing values in menus 5 OK To select an item in the menu and confirm it or pop up channel list when no menu 6 EXIT Use this key return to the viewing mode from any menu function 7 Display 4 Digit 7 Segment Displays the received channel number while operating and time while in standby mode 8 Remote S...

Page 6: ...imited channel selection 3 RS 232 Serial Port allowing software upgrades 4 TV SCART Output SCART for the connection to a TV set 5 DC 0 12V DC 0 12V output 6 VIDEO CVBS video output for TV AV in 7 AUDIO HiFi outputs for stereo set 8 ANT IN Antenna input for the terrestrial antenna 9 TO TV Modulator output for the connection to a TV set 10 AC IN Mains input cable 11 POWER ON OFF Allows to completely...

Page 7: ...Remote Control Panel Description 5 1 3 Remote Control Description ...

Page 8: ... parameter value It is also used to show the TV RADIO channel list while watching TV or listening to the RADIO Menu Used to display the main menu Exit Use this key return to the viewing mode from any menu function Pgup Pgdn Used to move the highlight bar one page at a time on menu It is also used to change the channel up down 100 channels Used to display the main menu Numeric 0 9 Numeric keys enab...

Page 9: ... selected is not from the satellite to which your dish is pointing Select another channel 2 The signal of current TV channel is too weak You can try to change to other channels with a stronger signal If the problems still exist please consult your local dealer or installer for technical service 3 You selected the wrong LNB type in the installation menu or your DiSEqC switch configuration is not co...

Page 10: ...itle information it will be displayed if this function is On If this function is Off subtitles won t be displayed 2 9 TXT 1 Press TXT button in TV mode to open the teletext page This service is depending on the support of the channel provider 2 If the channel does not support teletext information it will show No Teletext Data on the screen 2 10 Pause 1 In playing mode press PAUSE the picture will ...

Page 11: ... key again the image will enlarge rotate as x1 x2 x4 x6 x8 x12 x16 3 In x2 x16 image using CH VOL keys to move the image center area you want to see 4 In zoom mode press Exit to close Zoom window MULTI 1 In MULTI menu you can choose channels preview window static starting from the current channel Only the marked preview program is continuously playing 2 Press CH Vol to change the marked channel am...

Page 12: ...V In TV mode press the FAV button to display the Favorite Group window 1 Press CH to switch Favor Group 1 Favor Group 6 Press OK to confirm it 2 In the Favorite Group window you can select the desired favorite channel with CH and confirm it with OK to switch to it In bigger groups you can navigate with PGUP PGDN 3 Press Exit to close the Favorite Group window Frequently Asked Question Q Why the sc...

Page 13: ...ighted channel with CH and preview the highlighted program in the preview window with Vol and display the event s detailed description 2 Press the INFO button in the EPG menu to display the detailed information of the actual event in the selected channel 3 Press the Red button in the EPG menu to program a timer with the actual events data 4 Press the Green Yellow to select date 5 To close the EPG ...

Page 14: ...e press Vol to adjust volume 2 21 OK 1 In TV mode press OK button to open the Channel List window 2 press CH to switch channel 3 Press OK to change and display the marked channel 4 The OK key is used to select a program highlight line or parameter value 5 The color buttons offer further functions to manage the channel list Ø Press the Red exchange screen Ø Press Green button to access directly to ...

Page 15: ...firm the number with the OK button to change to the desired channel 2 27 DEL Have no function 2 28 CAP Have no function 2 29 USB In TV mode press USB button to access directly to the Media Management menu 2 30 MP3 In TV mode press MP3 button to access directly to the Partition menu Press CH to select the wanted item partition press OK to confirm it 2 31 JPEG In TV mode press JPEG button to access ...

Page 16: ...nterruption 2 37 T S In TV mode press T S button you want to time shift 2 38 GOTO When you play the recorded channels press Goto button the Jump to message box will pop up input the Time and press OK then the receiver will back to the input time point and play the program from that point continually If the input time is more than the recorded time the picture will back to last picture please noted...

Page 17: ...inually And Time shift is started by this key 2 43 I Press I button when you play a marked program the screen will record to the an mark point 2 44 I I Press I I button when you play a marked program the screen will jump to the next mark point 1 Jump Step Value 1 Mins 3 Mins 5 Mins 10 Mins 15 Mins jump 2 Jump Step Value Record the an mark point 2 45 LNB Short When LNB is short it will notify user ...

Page 18: ...the MENU button to display the main menu And menu is a field of text shown on the TV screen the selected line generally become blue Most of menus show a short information at the bottom of screen Use the CH button you can move upwards and downwards in the menu When you have reached the required subject menu press the OK button to confirm your selection When you want to return to the previous mode p...

Page 19: ...press Vol to select the Transponder list to select directly with CH press OK to confirm it 3 In the LNB Type item press Vol to select the LNB Type list to select directly with CH press OK to confirm it 4 In the 22K item press Vol to switch ON Off The 22KHz signal is used in KU universal LNBs to change between low band and high band 5 In the DiSEqC1 0 item press Vol to select the DiSEqC1 0 list to ...

Page 20: ...nter the selected item 4 2 Automatic Satellite Search After selecting the Automatic Satellite Search menu you can see the window like In Automatic Satellite Search menu Press CH to select and OK to confirm your choice If you select the satellite for scanning press Vol go to the right bottom of the OSD and press the OK button TV radio channel search will start Scan All Channel Searchs all channels ...

Page 21: ...item press Vol to switch Horizontal Vertical 4 In the Symbol Rate item press Number 0 9 to switch symbol rate 5 In the Scan Mode item press Vol to switch All Channel Free Channel 6 In the Network Search item press Vol to switch Disable Enable Network Search Search other transponder besides the existing transponder 7 Press OK to start scanning 4 4 Blind scan Basically the operation of Blind scan is...

Page 22: ...ster receiver to a slave receiver 1 Connect master receiver to the slave receiver via serial interface 0 Modem cable 2 Switch on the slave receiver 3 Mark Start on the master receiver and press OK to start upgrade Wait until the display on the front panel shows END Then switch off the receiver and on again Now the new software is used 4 Press EXIT to save the setting without upgrade 4 5 2 Transfer...

Page 23: ...elect directly with CH press OK to confirm it 2 Select Start and press OK to start upgrade 4 5 5 Upload to USB After selecting the Upload to USB menu you can see the window like In Upload to USB menu This function allows you Transfer Main S W and Transfer Channel Data fo the receiver to external hard drives 1 Press CH to change the backup mode Backup mode include Transfer Main S W and Transfer Cha...

Page 24: ...Select Timer item and press OK to enter the detail setting for your reservation 2 Start Select the Software User Interface and Default DB Then select Start and press Enter to begin the download of the upgrade This may need about 30 minutes Therefore we suggest using of this function only if you don t intend to watch TV during this time 4 6 Reset Factory Default After selecting the Reset Factory De...

Page 25: ...ke In Channel Properties menu you can made the favorite channel grouping and adult channel function in this menu 1 You can select between 6 favorite groups and lock with Vol Press OK to assign the channel to a favorite group and lock press EXIT to exit favorite group 2 Press OK again to remove the channel from the marked favorite group 3 Press MENU button you will be asked Are you sure to save Sel...

Page 26: ...o confirm the position Rename Press OK button to open the Find window like showed beside Press CH Vol to select the leading character of the channel name and press OK to confirm it 3 Press EXIT button you will be asked Are you sure to save Select Yes to delete all channel Select No to cancel the operation 5 3 Remove Satellite After selecting the Remove Satellite menu you can see the window like In...

Page 27: ...Transponder List menu you can see the window like In Edit Transponder List menu In this menu you can see all satellite informations and can make Delete Edit and Add the satellite and transponder To Delete Edit and ADD the satellite select the satellite name in the left screen screen and to Delete Edit and ADD the transponder select the transponder in the right screen Press OK Button and Select one...

Page 28: ...ng menu you can see the window like In Output Setting menu In this menu you can select Display Mode Video Output Aspect Mode AC3 Mode Display Mode Press Vol to select menu items among Auto PAL PAL M PAL N NTSC3 58 Video Output Press Vol to select menu items among CVBS RGB Aspect Mode Press Vol to select menu items among Auto 4 3PS 4 3LB 16 9 AC3 Mode Press Vol to select menu items among Disable En...

Page 29: ...age Setting menu In this menu You can select Menu Language First Audio Second Audio Subtitle Language 1 Menu Language Press Vol to enter Menu Language menu The selection of language include English French Spanish Turkish Russian Greek Dutch Arabic and Farsi 2 Basically the operation of First Audio Second Audio is same as Menu Language 3 Subtitle Language Press Vol to select languages The selection...

Page 30: ...le Display Press Vol to select Off Standard If the current channel has subtitle information it will be displayed if this function is Standard If this function is Off subtitles won t be displayed 6 5 Clock Set After selecting the Clock Set menu you can see the window like In Clock Set menu In this menu You could set local time 1 GMT Usage This item is used to set the time by using the time signal f...

Page 31: ...ng menu If the channel doesn t provide time information you have to input the date and time information manually The most channels support the time signal 6 Press Exit to leave the Local Time Setting menu 6 6 Automatic Standby After selecting the Automatic Standby menu you can see the window like In Automatic Standby menu 1 Automatic Standby Press Vol to select Off and On 2 Time Press Vol to selec...

Page 32: ... display 8 Reservation You can reserve a channel recording at your desired time In this mode you can reserve channels up to 16 Press the YELLOW button to edit the reserved channel And the use the button to the detail setting for your reservation To add more press the RED button Press the GREEN button to delete the reservation After all settings are done press the ok button to save and exit ...

Page 33: ...eservation for other time zone 9 CAS When you enter to CAS menu you will see a screen like beside CA In this option you can find information about the conditional access system If there is no card or it is placed incorrectly information about No card Unknown will be showed on the screen With a FELEC CAS card information about the card will be showed Note Card must be inserted with chip in upper si...

Page 34: ... you can see the window like In PVR Setting menu Record Type Press Vol to switch between Original TS MPEG Time Shift Size Press Vol to switch between 0 MB 200 MB 500 MB Default record Press Vol to switch between 15 mins 30 mins 45 Mins 60 Mins 75 Mins 90 Mins 105 Mins 120 Mins 135 Mins 150 Mins 165 Mins 180 Mins No Limitation Jump Time Press Vol to switch between 1 mins 3 Mins 5 Mins 10 Mins 15 Mi...

Page 35: ...tton to leave the information display 10 3 Format Disk Format Disk If you want to delete the hard disk totally you can do it with the OK Button Format and the hard disk will be completely erased Caution This process will delete also saves you have made with Backup tools 10 4 Picture Setup After selecting the Picture Setup menu you can see the window like In Picture Setup menu ...

Page 36: ...list menu Press CH to select the wanted item partition press OK to confirm it Press VOL to select the All Music Picture Video Music List Picture List Video list Record list Press CH to select the file item Add All Press Green button to show a add icon behind all image name Delete All Press Red button to show a deleting icon behind all channel name The OK buttons offer further functions to manage t...

Page 37: ...NU EXIT button you will be asked Are you sure to save Select OK to confirm it Select No to cancel the operation Add Select the file you want to add using the CH button If you decide to add the file Press OK on the pop up window Press MENU EXIT button you will be asked Are you sure save the data Select OK to confirm it Select No to cancel the operation ...

Page 38: ...window and press OK on the RCU Press Exit button to close the find window and brings you back to the file list Record List Basically the operation of Record List is same as All except that in the lock offer further functions to manage Select the file you want to Lock using the CH button If you decide to Lock the file Press OK on the pop up window Marked Records will be locked and displayed only af...

Page 39: ...ected between antenna and the receiver or adjust the antenna position Audio muting Press the MUTE button No picture or sound TV power Turn TV on The receiver can t receiver the signal Check the antenna cable replace the cable or connect the cable to the receiver tightly No picture Incorrect values of some tuner parameters Set the values of tuner parameters correctly Refer to the installation menu ...

Page 40: ...DVB S recommendation INPUT SIGNAL Frequency 950MHz 2150MHz Input level 65dBm 25dBm Channel bandwidth 36MHz Input socked F type connector LNB CONTROL Power supply 13 18V 500mA max with short circuit protection Polarized control 13 18V polarization vertical horizontal DiSEqC control DiSEqC1 0 DiSEqC1 1 and DiSEqC1 2 RF MODULATOR Input IEC 169 24 Male x 1 Output IEC 169 24 Female x 1 Band UHF TV Stan...

Reviews: