background image

PLATE COMPACTOR

12

1.

2.

3.

4.

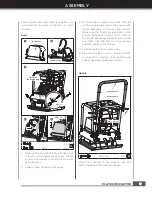
On new machines or after installing 
a new belt, check belt tension after 
first 20 hours of operation. Check 
and adjust belt every 50 hours 
thereafter.

Checking V-Belt(s)

To ensure optimum power transmission from 
the engine to the eccentric shaft, the V-belt(s) 
must be in good condition and operate under 
proper tension.

Maintaining your compactor will insure long 
life to the machine and its components.

Preventive Maintenance

Turn off engine. Engine must be cool.

Keep the engine’s throttle lever in its 
SLOW position, and remove spark plug 
wire from spark plug and secure.

Inspect the general condition of the 
plate compactor. Check for loose screws, 
m i s a l i g n m e n t   o r   b i n d i n g   o f   m o v i n g 
parts, cracked or broken parts, and any 
other condition that may affect its safe 
operation.

R e m o v e   a l l   d e b r i s   f r o m   t h e   p l a t e 
compactor with a soft brush, vacuum, 
or compressed air. Then use a premium 
quality lightweight machine oil to lubricate 
all moving parts.

Clean the bottom of the compactor base 
as soon as it begins to pick up soil being 
compacted. The unit can not do a good 
job if the bottom surface is not smooth 
and clean.

Replace spark plug wire.

1.

2.

3.

4.

5.

6.

Never use a “pressure washer” to 
clean your plate compactor. Water 
can penetrate tight areas of the 
unit and cause damage to spindles, 
pulleys, bearings, or the engine. 
The use of pressure washers will 
result in shortened life and reduce 
serviceability.

Tensioning V-Belt(s)

P r o p e r   b e l t   t e n s i o n   i s   c r i t i c a l   t o   g o o d 
performance.

Proper adjustment will assure long belt life. 
Too much or too little belt tension will cause 
premature belt failure. 

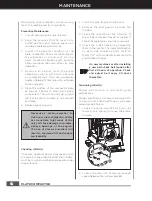
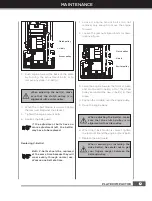
Turn off engine. Engine must be cool.

Remove the belt guard to access the 
V-belt(s).

Check the condition of the V-belt(s). If 
any V-belt is cracked, frayed, or glazed, it 
should be replaced as soon as convenient. 

Check the V-belt tension by squeezing 
them in the center. The normal deflection 
on each side should be 9mm (3/8” to 
13mm (1/2” with moderate pressure from 
your thumb or finger.

A

B

A

B

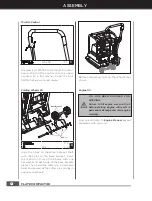
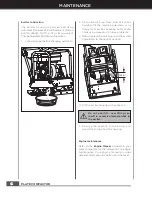
Loosen the jam nuts B, leaving enough 
space between the nut and bracket.

Loose 4 engine mount bolts (do not 
remove) only enough to move the engine 
forward.

2.

1.

MAINTENANCE

MAINTENANCE

Summary of Contents for 61021

Page 1: ...LL CUSTOMER SERVICE 909 628 4900 SAVE THIS MANUAL KEEP THIS MANUAL FOR SAFETY WARNINGS PRECAUTIONS ASSEMBLY OPERATION INSPECTION MAINTENANCE AND CLEANING PROCEDURES WRITE THE PRODUCT S SERIAL NUMBER ON THE BACK OF THE MANUAL OR THE MONTH AND YEAR OF PURCHASE IF PRODUCT HAS NO SERIAL NUMBER ...

Page 2: ...materials to increase its density and load bearing capacity mainly used for small repair and maintenance work The loose soil or particles are moved or rearranged in a particular manner close to each other to The Engine Manufacturer is responsible for all engine related issues with regards to performance power rating specifications warranty and service Please refer to the Engine Manufacturer s owne...

Page 3: ...al safety Do not operate the machine while under the influence of drugs alcohol or any medication that could affect your ability to use it properly Dress properly Wear heavy long pants boots and gloves Do not wear loose clothing short pants jewelry of any kind Secure long hair so it is above shoulder level Keep your hair clothing and gloves away from moving parts Loose clothes jewelry or long hair...

Page 4: ...dd fuel while the engine is running or when the engine is hot Do not operate the machine with known leaks in the fuel system Loose the fuel tank cap slowly to relieve any pressure in the tank Never overfill fuel tank there should be no fuel above the upper limit mark Replace all fuel tank and container caps securely and wipe up spilled fuel Never operate the unit without the fuel cap securely in p...

Page 5: ...y keep hands fingers and feet away from the base plate Grip the handle of the plate compactor firmly with both hands If both hands are holding the handle and your feet are clear of the compactor base your hands fingers and feet can not be injured by the compactor base Always operate the machine from behind never pass or stand in front of the machine when the engine is running Never place tools or ...

Page 6: ...een removed from the carton you should have 1 Exciter and Chassis assembly 2 Belt 3 Engine with Frame Assembly 4 Belt Cover 5 Handle 6 Wheel Bracket Assembly 7 Operator s Manual Engine Manual 8 Hardware Bag Including CONTENTS SUPPLIED X 2 A Ø12 X 4 M8 x 45 X 2 B M5 x 35 X 1 C X 2 D Ø12 X 4 BOX 1 BOX 2 1 2 3 4 8 6 7 5 PARTS INFORMATION ...

Page 7: ...t on the exciter pulley 1 2 4 3 5 M8 25 2 Belt Belt Cover Exciter Pulley 1 3 2 4 5 M12 4 The slot on the Engine base X 2 A Ø12 X 4 With the belt inserted out from the slot on the engine base place the engine with frame assembly on the exciter chassis Make sure the front and rear slots on the engine base seat firmly on the shaft of the shock absorbing supports Secure the assembly with the M12 nut l...

Page 8: ... the holes on the base bracket Insert the 12x80 pin through the holes with one flat washer on each side of the base bracket plates Then install the cotter pin Using pliers bend and spread all the cotter pins prongs in opposite directions Ø12 4 Base Bracket X 2 D Ø12 X 4 Before compacting fold up the Wheel Kit as shown M5 x 35 X 1 C Unscrew bolt M5X35 from throttle control Secure the throttle contr...

Page 9: ...gine switch must be in the ON position for the engine to run Turning KNOW YOUR MACHINE Features and Controls Throttle Control Lift Handle Air Cleaner Fuel Tank Exciter Oil Drain Hose Belt Guard Muffler Handle Base Plate the engine switch to the OFF position stops the engine Choke Lever The choke lever opens and closes the choke valve in the carburetor The closed position enriches the fuel mixture ...

Page 10: ...e found in the Engine Manual packed separately with the unit Starting Engine Move the fuel valve lever to the ON position To start a cold engine move the choke to the CLOSE position To restart a warm engine leave the choke lever in the OPEN position Move the throttle lever away from the SLOW position about 1 3 of the way toward the FAST position Turn the engine switch to the ON position Operate th...

Page 11: ...e a certain amount of moisture in the soil is necessary excessive moisture may cause soil particles to stick together and prevent good compaction If soil is extremely wet allow it to dry somewhat before compacting If soil is so dry as to create dust clouds while operating plate some moisture should be added to the ground material to improve compacting This will also reduce service to the air filte...

Page 12: ...om of the compactor base as soon as it begins to pick up soil being compacted The unit can not do a good job if the bottom surface is not smooth and clean Replace spark plug wire 1 2 3 4 5 6 Never use a pressure washer to clean your plate compactor Water can penetrate tight areas of the unit and cause damage to spindles pulleys bearings or the engine The use of pressure washers will result in shor...

Page 13: ... bolts A shown in above figure 1 2 Both V belts should be replaced at the same time because they will wear evenly through normal use Work on one belt at a time When adjusting the belt s make sure that the clutch pulley is in alignment with exciter pulley When removing or installing the drive belt s be careful not to get your fingers caught between the belt and pulley When the V belt tension is cor...

Page 14: ...m side of exciter housing Tilt the machine side down so oil drains from exciter Examine oil for metal chips as a precaution to future problems Return Screw the bolt plug into the exciter completely to the upright position Fill the exciter housing with exciter oil Apply pipe sealant to pipe plug and reinstall into top of exciter housing Engine maintenance Refer to the Engine Manual included in your...

Page 15: ...efill with fresh oil of the grade recommended in the Engine Manual Allow the engine to cool Remove the spark plug and put 60 ml of SAE 30 of high quality motor oil into the cylinder Pull the starter rope slowly to distribute the oil Replace the spark plug 1 2 3 4 Use clean cloths to clean off the outside of the compactor and to keep the air vents free of obstructions 5 Remove the spark plug and dr...

Page 16: ...ing machine or storing indoors The unit must be transported in the upright position to prevent fuel from spilling Do not lay machine on its side or top Secure or tie down unit using the lifting handle to prevent machine from sliding or tipping over Machine may fall and cause damage or injury if lifted incorrectly Lift using handles at base of plate MAINTENANCE ...

Page 17: ...l line or stale fuel 4 Vent plugged 5 Water or dirt in fuel system 6 Dirty air cleaner 1 Connect and tighten spark plug wire 2 Move choke lever to OFF 3 Clean fuel line Fill tank with clean fresh gasoline 4 Clear vent 5 Drain fuel tank Refill with fresh fuel 6 Clean or replace air cleaner Engine overheats 1 Engine oil level low 2 Dirty air cleaner 3 Air flow restricted 1 Fill crankcase with proper...

Page 18: ...PLATE COMPACTOR 18 PARTS PARTS INFORMATION ...

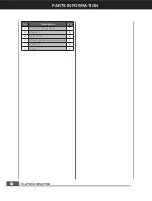
Page 19: ...c Shaft 1 31 Key C8x20 1 32 Exciter Pulley 1 33 Exciter Pulley Pressing Plate 1 34 Washer 8 1 No Description Q ty 35 Bolt M8x25 1 36 Exciter Housing 1 37 Oil Seal FB30x42x6F 1 38 Bearing Cover Left 1 39 Exciter Housing Gasket 2 40 Bearing Cover Right 1 41 Air Plug Screw 1 42 Sealing Washer 14 2 43 Bolt Plug M14x1 5 1 44 Screw M16x45 6 45 Spring Washer 16 6 46 Flat Washer 16 6 47 Bolt M6x20 12 48 B...

Page 20: ...PLATE COMPACTOR 20 No Description Q ty 67 Wheel Kit Rotary Shaft 1 68 Washer 12 2 69 Pin 2x11x35 4 70 Wheel Support Bracket Weldment 1 71 Washer 16 4 72 Wheel 2 PARTS INFORMATION ...

Page 21: ...DISCLAIMER ...

Reviews: