background image

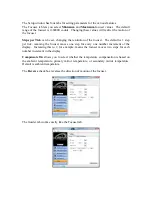
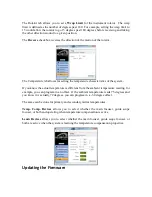
The Temperature Compensation tab allows you to control the temperature compensation
parameters.  There are two ways to set the temperature compensation.

You can click on the 

Snapshot 

button to capture the current temperature data.  Then, at a

later point in the night, click on the 

Comp. Immediate

 button.  This will calculate the

temperature differential between the current conditions and those when you clicked the
Snapshot button earlier.  The temperature compensation will be based on this differential.

Alternatively,   you   can   let   the   Hyperion   learn   the   correct   temperature   compensation
characteristics.  Check the 

Learn

 box.  The current temperature information is recorded.

At a later time, uncheck the 

Learn

 box and the differential will be calculated.

Check the 

Enabled

 box to activate temperature compensation.

Summary of Contents for Hyperion

Page 1: ...eld the Hyperion comes standard with a wealth of features This instruction manual will describe in detail the proper use of the Hyperion and its many features Please note the Warnings given in the next section in order to avoid damaging your Hyperion Table of Contents Warnings 2 Overview 5 Collimation 10 Telescope Control Panel 13 Telescope Control Software 17 Cleaning the Optics 24 Appendix 27 Sp...

Page 2: ... and tested that should not be adjusted by the user First is the secondary mirror spacing This is adjusted by a nut located under the cover plate on the spider hub Don t go there Second is the corrector lens tip tilt adjustment This is located about halfway down the outside of the primary baffle tube Don t go there ...

Page 3: ...kely one screw will pop loose and you will have to take off the back plate to reattach it When collimating the telescope make only small adjustments as the telescope was collimated before shipping and should require only a little tweaking Same goes for the secondary assembly It is held in place by its collimation screws Again don t loosen these too much or the assembly can become detached another ...

Page 4: ...focus knob by hand Note that there is a tension knob on the bottom of the focuser When the focuser motor is attached and in use the tension knob should be loose The instrument rotator should never be moved by hand Manual rotation of the focuser can be achieved by loosening the lock collar on the Feathertouch focuser Note that the indexing of the rotator is independent of the position of the focuse...

Page 5: ...pe Control Panel instrument rotator focuser and cooling fans There are six collimation screws three adjustment and three lock screws Recall that the large screws are the only thing holding the primary mirror assembly Use caution when adjusting these screws The screws are described in more detail in the section on collimation ...

Page 6: ...ers These features can also be controlled remotely from a computer using the Telescope Control Software More details are in the section on the Telescope Control Panel and Telescope Control Software The high precision instrument rotator allows accurate positioning of the camera for framing a target or finding a guidestar It can be controlled through either the Telescope Control Panel or the Telesco...

Page 7: ...user for precise focusing The focuser is automated using Starizona s MicroTouch autofocuser The Feathertouch has 4 5 115mm of focus travel and tick marks on the side of the focuser drawtube indicate the current travel of the focuser in mm The Hyperion has 7 33 186mm of backfocus from the racked in focuser drawtube to the focal plane This distance does not include the thickness of the focuser adapt...

Page 8: ...the mount This may make some instruments impractical for some mounts The distance between dovetails is 16 406mm and each dovetail is 19 75 502mm long The secondary mirror is collimated with three screws attached to the triangular plate on the spider assembly A reminder that these three screws are the only thing holding the secondary mirror assembly in place Use caution when adjusting these screws ...

Page 9: ...n is the ability to control all electronic features wirelessly This is done through the wireless control box The control box plugs into your computer via a USB cable and talks wirelessly to the Hyperion up to 300 feet away ...

Page 10: ...r in the primary mirror You should see the laser being emitted from the bottom of the laser collimator You should also see that the beam bounces off the secondary and returns right on itself If you see two red spots on the collimator the beam is not returning exactly onto itself and you need to adjust the secondary mirror This adjustment is done using the secondary collimation bolts In order to ad...

Page 11: ...escope to a moderately bright star It is important that the star is well centered in the field Begin the star test by defocusing the telescope You will see a donut shaped star image If the telescope is out of collimation you will see the central obstruction is not concentric with the outer edge of the star image the donut hole will appear offset If adjustment is necessary begin by loosening one of...

Page 12: ...e a single frame exposure about 5 10 seconds long at 1x1 binning full resolution Examine the corners of the image at 100 magnification The stars should appear equally round in each corner If using a program such as MaxIm DL you can make use of inspection tools to measure the average size of the stars in each corner of the image If the star sizes are not equal fine tuning is possible by making very...

Page 13: ...n Select button and Control dial There are two focus motor plugs and one 12v power plug Start by connecting the included focus motor cable The main focuser plug is the one on the right Connect this to the MicroTouch motor on the Feathertouch focuser To operate the control panel begin by plugging in the 12v power supply You can lock down the cable with the clamp below the panel ...

Page 14: ...ning the dial counter clockwise decreases the position count and moves the focuser in See the section below on Setup for instructions on resetting the focuser position and reversing the direction of travel Pressing the Mode button will scroll the menu on the LCD screen through the various electronic features Guider First is the Guider focuser for an optional MicroTouch focuser on an optional piggy...

Page 15: ...cuser in the Setup menu and press the Select button The menu will display Reset to 30000 Press and hold the Select button for 3 seconds to reset the focuser to 30000 counts the middle of the default range Pressing the Mode button moves the menu to the next setting Min Val 0 Zero is the default minimum value for the focuser This can be increased using the Control dial Mode again will choose Max Val...

Page 16: ...the rotator will turn past 180 degrees You can dial in any number up to 360 The default is zero meaning the rotator will never turn more than 180 degrees before taking the other direction to a given angle This prevents cord wrap issues with the focus motor and camera cables Temperature Compensation Setup The first setting in the Temp Comp menu allows you to turn on temperature compensation and to ...

Page 17: ...ition by clicking and holding on either the up or down arrows to the right of the position display To send the focuser to a given position type the desired position into the Target Position box and press Goto Note that the focuser has a range of 0 60000 counts To index the focuser to a given position enter that number in the Target Position box and press Reset to Target Position This will set the ...

Page 18: ... send the rotator to a given position type the desired angle 0 359 into the Target Position box and press Goto To index the rotator to a given position enter that number in the Target Position box and press Reset to Target Position This will set the current position to the targeted angle Checking the Wrap Limit box will enable the wrap limit set in the Setup window see below As with the focuser yo...

Page 19: ...irst Temperatures shows the current ambient temperature as well as the current temperatures of the primary and secondary mirrors The mode can be changed from degrees F to degrees C The Heaters tab allows you to manually set the power for each heater Heater 1 controls the primary mirror heater Heater 2 controls the secondary mirror heater The up and down arrows will increase or decrease the heater ...

Page 20: ...his will calculate the temperature differential between the current conditions and those when you clicked the Snapshot button earlier The temperature compensation will be based on this differential Alternatively you can let the Hyperion learn the correct temperature compensation characteristics Check the Learn box The current temperature information is recorded At a later time uncheck the Learn bo...

Page 21: ...efault is 1 step per tick meaning the focuser moves one step for every one number increment of the display Increasing this to 2 for example means the focuser moves two steps for each number increment in the display Compensate On allows you to select whether the temperature compensation is based on the ambient temperature primary mirror temperature or secondary mirror temperature Default is ambient...

Page 22: ...e system If you know the actual temperature is different from the ambient temperature reading for example you can program in an offset If the ambient temperature reads 75 degrees and you know it is actually 72 degrees you can program in a 3 0 degree offset The same can be done for primary and secondary mirror temperatures Temp Comp Devices allows you to select whether the main focuser guide scope ...

Page 23: ... button then release all three buttons The Hyperion will power up in Program Mode indicated by PROG MODE on the control panel display The fans also run continuously while inProgram Mode You then have 30 seconds to click Program in the Hyperion Flash Loader program If you fail to select Program within the allotted time the telescope will leave the program mode When successful you will see the teles...

Page 24: ... lifted out of the scope and set mirror side up on the instrument rotator assembly Begin by detaching the secondary dew heater wire at the front of the telescope The is a black clip connector just inside the front ring of the telescope against the tube wall This cable runs along the tube wall to the wireless control board which is mounted to the telescope back plate Next carefully place the telesc...

Page 25: ...tional Back Plate Removal Tool shown below The tool threads on where the focuser normally goes and provides a convenient handle for lifting the back plate Lift the plate high enough for the baffle tube and the wireless communications board to clear the optical tube ...

Page 26: ...zona recommends using First ContactTM cleaning product for cleaning the Hyperion s primary mirror First ContactTM is a spray on solution that dries into a polymer film which is peeled off the mirror removing dust and other contaminants First ContactTM can be purchased from PhotonicCleaning com Follow the instructions that come with the cleaning solution to properly clean the mirror ...

Page 27: ... around 4th magnitude and near the zenith Use the Telescope Control Panel or Hyperion software to roughly focus the telescope manually Select Wizard from the top menu in FocusMax and choose First Light FocusMax will rearrange the software windows so you can see everything that is about to happen Follow the directions to begin FocusMax will drive the telescope out of focus to determine the focus ra...

Page 28: ...er you want to autofocus go to the main FocusMax window and click the Focus button Using CCDInspector to Collimate CCDInspector from CCDWare is a powerful program for analyzing images It has handy routines to help easily collimate your telescope Begin collimating as described in the Collimation section above You can fine tune the collimation of the secondary mirror by using the Defocused Star Coll...

Page 29: ...e the Multi Star Collimation Viewer to collimate the primary mirror Make small adjustments on the primary mirror s collimation screws again using about 1 8 turn each time to make the stars evenly sized across the full field of view The Hyperion is now accurately collimated ...

Page 30: ...imized Field of View 70mm Image Circle 1 58 Optical Tube Length 49 13 994mm Overall Length with focuser 46 27 1175mm Weight 60 lbs 27 3 kg With optional focal reducer Focal Length 1950mm Focal Ratio F 6 1 Optimized Field of View 52mm Image Circle 1 52 Starizona 5757 N Oracle Rd Tucson AZ 85704 520 292 5010 www starizona com ...

Reviews: