background image

SOHOTANK ST4-TB User Manual

!


Thank you for purchasing STARDOM products. This manual will introduce the ST4 Series. Before using your ST4, please read this 
manual thoroughly. Although all information contained in this user manual has been carefully verified before publishing, however, the 
actual  product  specification  will  be  based  on  the  time  of  delivery  from  STARDOM.  Any  updates  to  the  product  specifications  or 
relevant information may be found on www.stardom.com.tw. Products are subject to change without prior notifications. 
If you have any questions regarding the products of STARDOM, or you would like to know the latest product information, user manual 
update, or firmware update, please contact your local supplier or visit www.stardom.com.tw for further information. 

!

Copyright © RAIDON TECHNOLOGY, INC. All rights reserved. 

!


1.

Operating Information 

2.

Package Contents and Product Views 

3.

Hardware Requirements and Precautions 

4.

Hardware Installation 

5.

GUI Management Software 

6.

Visual Status Indicator Definitions 

7.

Frequently Asked Questions 

!


Operating Temperature : 10 

 35 

 (50 ~ 95 

)  

Storage Temperature : -20 

 47

 (-4 ~ 116 

Line Voltage : 100 

 240V AC 

!


Open the package and you should find the following: 

Please make sure that the contents listed above are not damaged or missing. If you should find damages or missing contents, please 
contact your supplier immediately. 
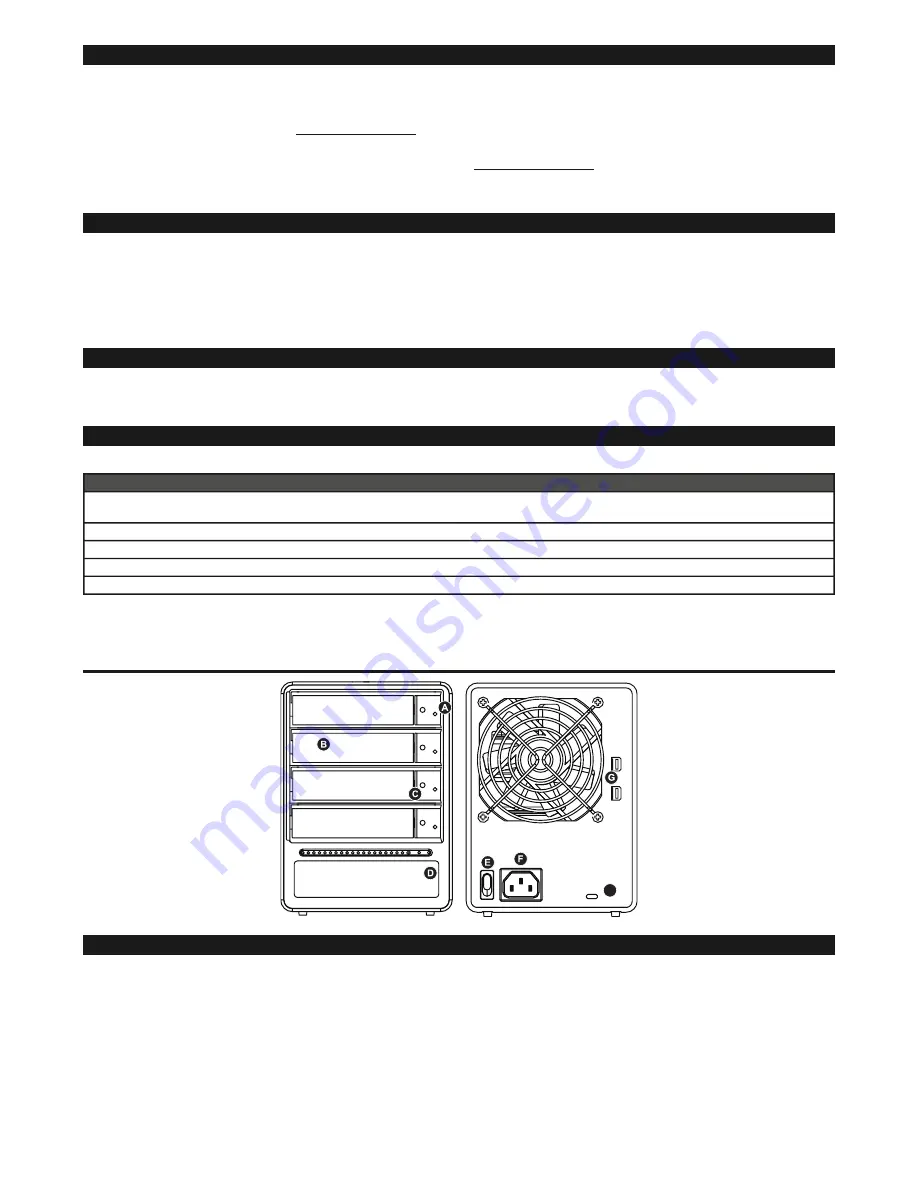
 

Front and Rear View 

!!

A. Hard drive status indicator 
B. Removable drive tray 
C. Key access opening 
D. Power indicator 
E. Power Switch 
F. Power socket 
G. Thunderbolt 
H. Anti-theft cord slot  

!!

!


1.

Please make sure that the hard drives are free from bad blocks or defects prior to installation in order to avoid system crashes or 

data loss. 

2.

Whenever turning off or unplugging the ST4 Series from your computer system becomes necessary, always remember to safely 

remove it from your operating system first. 

3.

When the ST4 is connected to the computer system, it’s prohibited to remove, insert or swap the hard drive while data transfer is 

being performed. 

4.

If  you  will  be  incorporating  either  software  or  hardware  RAID  functionality  to  operate  with  the  ST4  Series,  it  is  important  to 

understand  the  RAID  level  and  its  component  that  will  be  incorporated  and  the  precautions  to  take  as  each  RAID  level  and 

component may function differently and contains various limitations. 

5.

!

Introduction


Table of Contents

1.

  Operating Information

2.

  Package Contents and Product Views

ST4-TB

ST4-TB x 1

(with removable drive tray enclosed x 4)


Thunderbolt cable

 x1

AC Power Cable 

1

Accessories Kit

CD ( User Manual / Software ) x 1


3. Hardware Requirements and Precautions

!

2

H

Summary of Contents for SOHOTANK ST4-TB

Page 1: ...M Safe Capsule Series User Manual STARDOM Safe Capsule Serie Bedienungsanleitung Série STARDOM Safe Capsule Manuel de l utilisateur Manual de usuario de STARDOM Safe Capsule Serie STARDOM Safe Capsule STARDOM Safe Capsule シリーズユーザーマニュアル STARDOM Safe Capsule ...

Page 2: ...make sure that the contents listed above are not damaged or missing If you should find damages or missing contents please contact your supplier immediately Front and Rear View A Hard drive status indicator B Removable drive tray C Key access opening D Power indicator E Power Switch F Power socket G Thunderbolt H Anti theft cord slot 1 Please make sure that the hard drives are free from bad blocks ...

Page 3: ...and inserted into the key access opening to eject the removable drive tray latch and extract the removable drive tray Step 4 Mount your hard drives onto the removable drive tray and secure it with the screws included in the accessory kit to avoid any damage to the hard drive due to accidental movements Step 5 Choose one of the provided cables of your preference to connect the preferred interface c...

Page 4: ...ck icon from the bottom left corner to unlock settings under General Step 3 Insert your Username Password for the computer Step 4 Select Allow From Anywhere for App downloads Step 5 Click on the lock icon from the bottom left corner to lock settings 4 ...

Page 5: ... installation for Introduction License Destination Select Installation Type Installation Summary and please click on Continue for Introduction Step 7 Please click on Continue for License Step 8 Please click on Agree in the popped up dialogue of License to continue 5 ...

Page 6: ...n Install Step 10 Insert your Username Password for the computer then please click on Install Software to continue Step 11 Software installation completed please click on Close button to exit installation Step 12 Please launch the monitoring software after restarting the computer from software installation 6 ...

Page 7: ...torage Management Host Name IP address and MSU version Device RAID configurations and information of installed HDD Management Configurations of E Mail notification for incidents 3 RAID Settings A If installed HDD was used for RAID on other devices please assure that previous RAID info in HDD has been successfully removed erased and HDD has been reformatted B Please backup all data before configuri...

Page 8: ...Step 2 Choose for desired RAID level Step 3 Please select desired HDD s for proceeding with RAID configuration Step 4 Please verify RAID level and number of HDD selected are indicated correctly and then click on Next to continue 8 ...

Page 9: ...mation in the popped up dialogue to proceed with selected RAID level Step 7 RAID level completed The naming sequences of adapter set assigns from Adapter 0 Adapter 1 to Adapter 5 and ST4 TB may adopt maximum of 6 sets RAID Default name is VD_R0_1 The options in the top right corner may apply for Modify or Restore HDD ID Each set of HDDs within will be indicated as 0 1 2 and 3 9 ...

Page 10: ...e erased Step 1 On the left of managing window please select the Virtual Disk from a RAID set which wish to be deleted The option for Delete will appear once click the Operation tab on the right of managing window Step 2 Confirmation dialogue will appear for deletion Step 3 Second confirmation dialogue will appear to proceed with delete 10 ...

Page 11: ...nd LED indication of ST4 TB will not be functioning until ST4 TB has been reactivated 3 If HDD was used for RAID in other devices please revert the HDD to JBOD mode using original device software before install in ST4 TB 4 If monitoring software is being active for a period of time without accessing please proceed with refreshing or restarting the software for acquiring an updated status 5 If an o...

Page 12: ...SOHOTANK ST4 TB User Manual 12 www stardom com tw ...

Reviews: