

MS2-TB3 Quick Installation Guide
the Indication of M.� Status
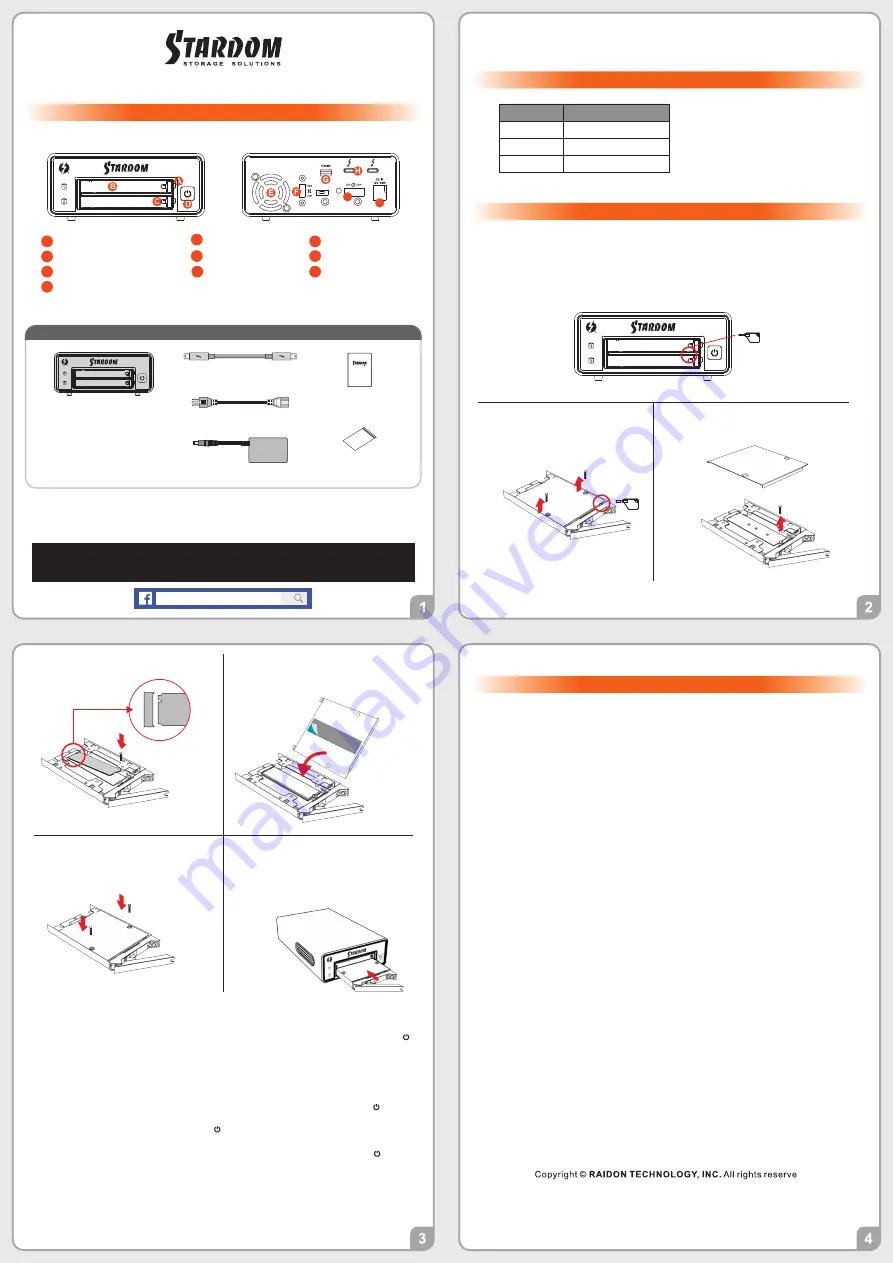
Product Diagram & the Contents of Product package
Hardware Installation
Important Notice
Thank you for choosing product from
RAIDON Technology lnc.
This information in the manual
has been thoroughly checked before publication, but may not conform to the product catually
delivered which mean actual product specifications depend on the product shipped to you. Any
update in the specifications or product-related information shall not be subject to further notice but
for the latest information on the product, please visit the website as
www.STARDOM.com.tw
or
contact us at
, and we will get back to you as soon as possible.
Please check the included parts and the product itself for any damage or missing
parts. If you have any questions, please contact the retailer or sales representative.
Please download the user manual from the official website (www.stardom.com.tw)
˙
˙
Please follow the following procedure to have your MS�-TB� installed:
Hardware Installation
Front View
Rear View
M.� access light
A
M.� enclosure handle
B
M.� enclosure pin release
C
Fan
E
Fan speed switch
F
Mini DisplayPort
G
Thunderbolt
TM
port
H
Main power switch
I
Power socket
J
MS�-TB� Main Unit
x�
Quick Installation
Guide
x�
The following items should be inside the package upon opening:
Contents of Product Package
Thunderbolt Cable
x�
AC/DC Adapter
x�
Power Cord
x�
Ejector pin
Stardom Storage Solutions
Place the system on a stable surface. Ensure that the vent is not blocked and that it is
installed in a well-ventilated area. (Please keep the product away from moisture and
other environment that might be harmful to the product)
1.
Remove the screws of the upper
cover of the tray, and then use the
ejector pin
to pry open the upper
cover and remove it.
3.
Insert M.2 and lock the screws.
5.
Remove the release paper from the heat
sink in the upper cover and replace the
upper cover.
6.
When the
M.2
installation has been
completed, insert the tray into the
system horizontally and secure the latch
into place.
8.
Remove the screws holding the M.2
position.
4.
�.
Use the ejector pin included in the accessory kit
to eject the M.2 enclosure handle, and
then pull tray handle to remove it.
Lock the screws.
7.
This system can only transfer data to one computer through one interface at a time.
The usable storage capacity of the M.2 after formatting will be less than the capacity
indicated on the M.2.
All existing data will be deleted when this product is set up for the first time. Please ensure
that all data on the M.2 has been backed up before installation to avoid data loss.
If the MR2-TB3 needs to be shut down or disconnected, please ensure the MR2-TB3 is
safely removed through your operating system before turning off the power.
MS2-TB3 uses a 12V/5V AC/DC Adapter. Please do not use other non-certified Power
Adapter to avoid damaging to your MS2-TB3.
This product does not support the M.2 hot-swap function. If you need to remove
the tray, please do it with the main power switch off to avoid damage to software
and hardware.
We strongly recommend backing up important data stored on the MS2-TB3 to another
storage device or a remote site. STARDOM will not be held liable for the damage or loss of
data you stored on the MS2-TB3.
�.
�.
�.
�.
�.
�.
�.
NOTE:
Please make sure that the product is connected to the host (power on status) before turning
on the power, otherwise the product will be on the sleep mode.
Power touch switch
D
※
The product is in a state of near-complete power-off in shutdown mode, and the hard disk, LCD, and fan
are all out of operation, providing only a small portion of power for preparation for subsequent startup.
Please connect the signal cable first, and then power cord later.
First turn
the main power switch on the back of the product
to “I” to turn the power on,
then gently press
the touch power on the front of the product
until the power symbol “ ”
lights up.
After turning on the power, please perform subsequent formatting settings through the
operating system. Please follow the instructions of the computer operating system for M.2
formatting; after formatting, you can read and write data.
If you are not using the product for a while, you can put the product into shutdown mode:
first press
the touch power on the front of the product
until the power symbol “ ” is off;
if you want to use the product, gently press
the touch power on the front of the product
until the power is turned on. The symbol “ ” is illuminated.
If the product is not used for a long time, please turn off the product main power switch: first
gently press
the touch power on the front of the product
until the power symbol “ ” is off,
then turn
the main power switch on the back of the product
to “ O ” to turn off the power.
If the computer is unable to detect the system, please install the drivers from official website
(www.stardom.com.tw)
9.
10.
11.
12.
13.
14.
Status
M.2 access light
No M.2
OFF
Data access
Blue light always on
M.2 idle
Blue light always on
V�.� (Feb. ����)
I
J
Remind:
Signal display will vary depending on
the definition of M.� manufacturers.


