background image

SR2 Series User Manual

1

2. Package Contents and Product Views

Introduction

Open the package and you shall find the following parts


SR2-BA31 product  x 1
(with removable drive tray enclosed x 2)

SR2-B31 product  x 1
(with removable drive tray enclosed x 2)

SR2-B31A product  x 1
(with removable drive tray enclosed x 2)

USB 3.2 C to C cable x1

USB 3.2 C to C cable x1


USB 3.2 C to A cable x1


USB 3.2 C to A cable x1

Power Cable x1

Power Cable x1

Power Cable x1

Quick Installation Guide x1

Quick Installation Guide x1

Quick Installation Guide x1

Screws & Ejector pins

Screws & Ejector pins

Screws & Ejector pins

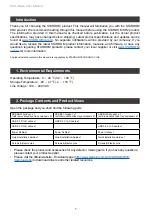
Thank you for choosing the STARDOM product. This manual will familiarize you with the STARDOM 

SR2 product. We recommend reading through this manual before using the STARDOM SR2 product. 

The information provided in this manual was checked before publication, but the actual product 

specifications may have changed before shipping; Latest product specifications and updates can be 

found at 

www.STARDOM.com.tw

. No separate notifications will be provided by our company. If you 

would like to receive the latest STARDOM product information, manuals, and firmware, or have any 

questions regarding STARDOM products, please contact your local supplier or visit 

www.STARDOM.

com.tw

 for more information.

All product-related content in this manual are copyrighted by STARDOM TECHNOLOGY, INC.

•  Please check the product and accessories for any defect or missing parts. If you have any questions, 

please contact your product supplier.

• 

Please visit the official website - Download page (

http://www.stardom.com.tw/STARDOM2016/

download.php

) to download drivers and other related resources.

1. Environmental Requirements

Operating Temperature: 0

40 

 (32

104 

Storage Temperature : -20

47

 (-4

116 

)

Line Voltage : 100

240V AC 

Summary of Contents for SOHORAID SR2

Page 1: ...SOHORAID User Manual SR2 Series...

Page 2: ...on Procedure 4 5 How to Switch the RAID Mode 5 6 Hard Drive Replacement Instructions 6 7 Data Rebuild 6 9 Additional Display Messages of System and Operation Procedures 7 11 Install The Operation Syst...

Page 3: ...e information provided in this manual was checked before publication but the actual product specifications may have changed before shipping Latest product specifications and updates can be found at ww...

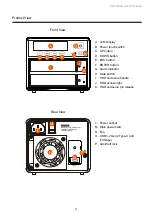
Page 4: ...rly and securely attached L P M O N A LCM display B Power touch switch C UP button D DOWN button E ESC button F ENTER button G Alarm indicator H Mute button I HDD enclosure handle J HDD access light K...

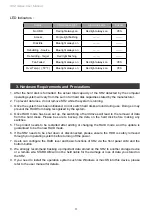
Page 5: ...is guaranteed to be the new RAID mode 6 If the SR2 needs to be shut down or disconnected please ensure the HDD is safely removed through your operating system before turning off the power 7 Users can...

Page 6: ...product to I to turn the power on the power touch switch on the front of the product will light red then gently press the power touch switch on the front of the product until the power symbol turns in...

Page 7: ...ct to I to turn the power on the power touch switch on the front of the product will light red then gently press the power touch switch on the front of the product until the power symbol turns into a...

Page 8: ...t switch the positions of the drives Once the replacement is complete turn on the power of the SR2 When the system completes initialization the LCM will ask you if you wish to initiate the rebuilding...

Page 9: ...Note The next time you turn on the power of the unit the system will automatically continue to process the remains Please do not switch position of the drive at any time System Temp 50 System FAN xxx...

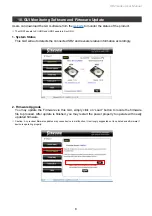
Page 10: ...information accordingly 2 Firmware Upgrade You may update the Firmware via this GUI simply click on Load button to locate the firmware file to proceed After update is finished you may restart the powe...

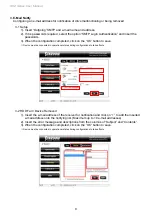
Page 11: ...e OK button to save Device must be connected in operational states during configurations to take effects 3 2 HDD Fail Device Removed 1 Insert the e mail address of the receiver for notification and cl...

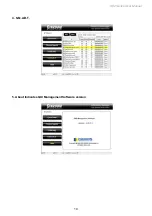
Page 12: ...SR2 Series User Manual 10 4 S M A R T 5 About Indicates GUI Management Software version...

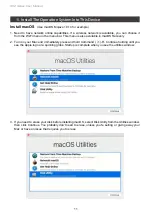
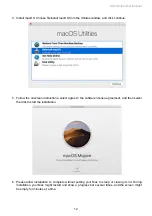
Page 13: ...our Mac and immediately press and hold Command R Continue holding until you see the Apple logo or a spinning globe Startup is complete when you see the utilities window 3 If you need to erase your dis...

Page 14: ...structions select agree to the software license agreement and then select the disk to start the installation 6 Please allow installation to complete without putting your Mac to sleep or closing its li...

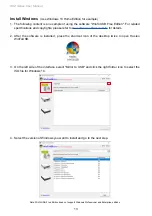
Page 15: ...r the software is installed press the shortcut icon of the desktop twice to open Hasleo WinToUSB 3 On the left side of the interface select Mirror to USB and click the right folder icon to select the...

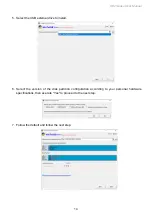
Page 16: ...the USB external drive to install 6 Select the version of the disk partition configuration according to your personal hardware specifications then execute Yes to proceed to the next step 7 Follow the...

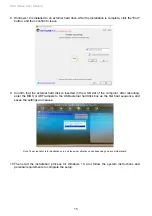
Page 17: ...he USB slot of the computer After rebooting enter the BIOS or UEFI adjusts to the USB external hard disk box as the first boot sequence and saves the settings and leaves 10 Then start the installation...

Page 18: ...ystem you most often use See the below suggestions 1 Use NTFS format for Windows 2000 XP Vista 7 8 10 system 2 Use HFS Mac OS Extended format for a Mac OS X system 3 Choose FAT32 format if you ll use...

Page 19: ...USB 3 2 C to C x1 USB 3 2 C to C x1 USB 3 2 C to A x1 USB 3 2 C to A x1 x1 x1 x1 x 1 x 1 x 1 STARDOM STARDOM SR2 STARDOM SR2 www STARDOM com tw STARDOM STARDOM www STARDOM com tw 1 0 40 32 104 20 47...

Page 20: ...R2 Series User Manual 18 G H I J K Before switch on please ensure all plugs are properly and securely attached L P M O N A LCM B C UP D DOWN E ESC F ENTER G H I J K L M N O USB 3 2 Gen2 Type C 10Gbps...

Page 21: ...SR2 Series User Manual 19 3 1 SR2 2 3 RAID 4 RAID 5 RAID RAID 6 SR2 7 RAID SR2 8 SR2 SR2 STARDOM 9 Windows Mac YES YES 50 C YES...

Page 22: ...SR2 Series User Manual 20 4 3 5 6 2 5 4 1 2 3 SR2 USB USB SR2 USB I LCM 4 5 6 7 8 O RAIDON RAIDbox2 RAID 1 vxxxxxx x Pri HDD OK Sec HDD OK SR2 RAID 1 9 10 USB 3 2 C to A Type A USB 3 2 Gen2...

Page 23: ...21 RAIDON RAIDbox2 RAID 1 vxxxxxx x Enter Esc Up Down MUTE 5 RAID Change to RAID 0 Ent Yes Esc No RaidMode Changed Please Reboot RAIDON RAIDbox2 RAID 0 vxxxxxx x SR2 RAID 1 RAID 1 I LCM UP 2 RAID ENT...

Page 24: ...anual 22 6 RAID 1 degraded Pri X Sec O RAID 0 failed Pri O Sec M Pri X Sec M MUTE SR2 1 2 SR2 LCM X M Pri HDD Insert Sec HDD OK Pri HDD Insert Sec HDD OK Rebuilding Sec Pri 32 Rebuilding Sec Pri 32 7...

Page 25: ...s User Manual 23 Pri HDD Fail Sec HDD OK Pri HDD OK Sec HDD Fail SR2 6 Pri HDD OK Sec HDD OK T System Temp 50 Pri HDD OK F Sec HDD OK System FAN xxxx RPM 8 9 LCM T 50 LCM F MUTE SR2 SR2 RAIDON SR2 LCM...

Page 26: ...SR2 Series User Manual 24 GUI HDD1 Pri HDD2 Sec 1 GUI SR2 2 GUI Load 10 GUI...

Page 27: ...SR2 Series User Manual 25 2 E Mail e mail 3 1 1 e mail SMTP 2 SMTP Login Authentication 3 OK 3 2 1 E Mail Address e mail 10 e mail 2 Subject Contents e mail 3 OK...

Page 28: ...SR2 Series User Manual 26 4 S M A R T 5 GUI...

Page 29: ...SR2 Series User Manual 27 11 macOS 1 Wi Fi macOS 10 14 Mojave 2 Mac Command R Apple 3 macOS Mac...

Page 30: ...SR2 Series User Manual 28 4 macOS macOS 5 6 Mac Mac...

Page 31: ...SR2 Series User Manual 29 Windows 1 WinToUSB 2 Hasleo WinToUSB 3 USB Windows 10 ISO 4 Windows WinToUSB Windows Windows 10...

Page 32: ...SR2 Series User Manual 30 5 USB 6 7...

Page 33: ...SR2 Series User Manual 31 8 Windows 10 9 USB BIOS UEFI USB 10 Windows 10...

Page 34: ...SR2 Series User Manual 32 Q1 SR2 A 1 Windows 2000 XP Vista 7 8 10 NTFS 2 Mac OS X HFS Mac OS Extended 3 PC Mac FAT32 4GB 12...

Page 35: ...SR2 Series User Manual 33 http www stardom com tw...

Reviews: