background image

SOHORAID DR8-TB2 User Manual

8

4. 

硬體安裝

請參照以下步驟完成硬體安裝


拆開外包裝

,

並取出產品主體。

如果你是要將

DR8

系統安裝於機架上,請將配件中的把手鎖定於

DR8

系統面板兩側,並使用

配件包的螺絲來將

DR8

系統鎖定於機架內的軌道位置,並確定

DR8

系統呈現平穩狀態。

如果你選擇擺放系統於桌面,請將配件中的腳墊鎖定於系統下方,並將系統擺放於穩固平台,

並確認散熱風扇口沒有被其他物體擋住,系統四周有適當的散熱空間。

(

擺放環境請避免接近

潮濕或其他易對產品造成損傷的環境

)

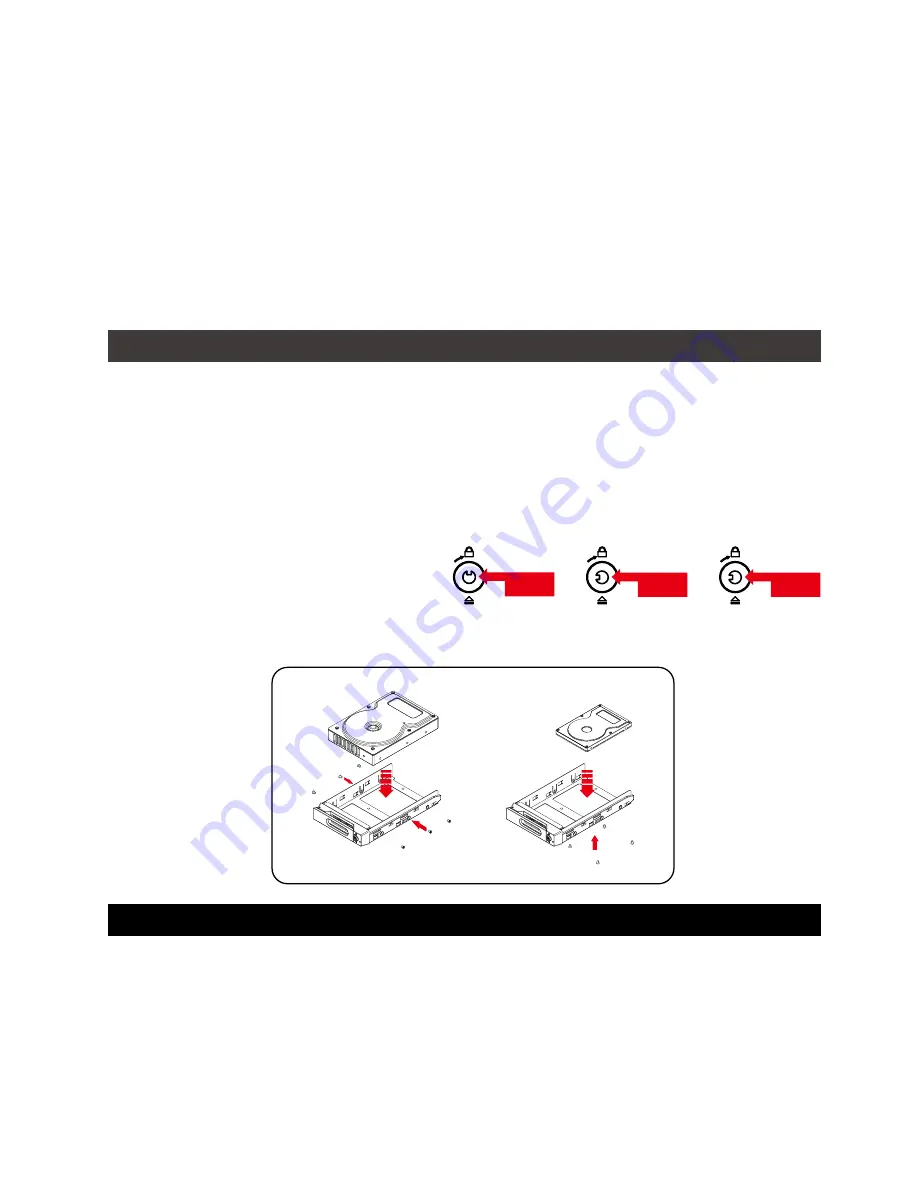
步驟

1

步驟

2

步驟

3

步驟

4

Lock

Unlock

Press

步驟

5

請使用零件包內附的鑰匙解鎖硬碟托

盤鎖,按下硬碟卡榫按鍵,即可抽出

硬碟抽取盒。

將硬碟安裝到抽取盒上,並以零件包內附的螺絲加以固定,以避免不必要的移動對硬碟造成

傷害。

硬碟安裝完成後

,

請將抽取盒平移放入主機內

,

並關上把手。

將電源線連接到電源插座及

 DR8-TB2 

上。

Thunderbolt 

連接線與電腦相連接。

開機後,系統指示燈;待辨識成功後,請依據您所需的儲存格式,將系統內的硬碟依照作業

系統的指示完成格式化。待硬碟格式化完成後,便可直接使用

DR8

系統。

如電腦無法辨識此一系統

請安裝光碟中之驅動程式。

步驟

6

步驟

7

步驟

8

步驟

9

步驟

10

注意:不建議使用不同廠牌,或是同廠牌不同型號的硬碟,避免影響效能。

10. 

RAID5

模式下儲存系統僅容許單顆硬碟故障。因此,當您發現二顆以上的硬碟顯示故障時,您先

前巳存儲的資料可能已毀損或遺失;在

RAID0

模式下,當您發現一顆以上的硬碟顯示故障時,您先

前巳存儲的資料可能已毀損或遺失。

11. 

當您需要關閉或移除

DR8-TB2

時,務必透過您所操作的作業系統中執行硬碟安全移除後,方進行電

源關閉的動作。

12. 

當系統溫度達到

45

度時

機器風扇會全速運轉

加速機器內部散熱

當系統溫度降回

40

度以下時

才會恢復手動風扇轉速設定之狀態。

13. 

強烈建議除了使用

DR8-TB2

的資料儲存功能外,請針對重要資料備份到另一個儲存裝置上或遠端備

份,雙重備份您重要的資料。若您儲存在

DR8-TB2

的資料損毀或遺失,

STARDOM

將不負任何的

責任。

Summary of Contents for SOHORAID DR8-TB2

Page 1: ...SOHORAID User Manual DR8 TB2...

Page 2: ...DR8 TB2 User Manual 1 DR8 TB2 6 SOHORAID DR8 TB2 User Manual V1 0...

Page 3: ...nformation User Manual s update please contact to your local supplier or visit to www stardom com tw for further information Copyright Raidon Technology Inc All right is reserved Operating Temperature...

Page 4: ...formatted 4 Since DR8 TB2 will delete all data files in your HDDs SSDs at its first time use please be informed that you shall first save all your personal data files into a safe memory space before s...

Page 5: ...ompleted as the changes made to the drive positions may destroy the RAID formation 9 A WARNING to you if you plan to delete or switch your original RAID setting If you plan to delete or switch your or...

Page 6: ...g the HDD into tray please insert them into DR8 TB2 and then latch the handle Connect AC power cord to your power outlet and DR8 TB2 Connect the cable to the Mac PC and the DR8 TB2 port After booting...

Page 7: ...strongly suggest you to first reset them with JBOD mode at your DR8 TB2 before setting them to the RAID mode you will use DR8 TB2 Status Power Status Light HDD Status Light Buzzer Blue LED Red LED Blu...

Page 8: ...er Manual 6 2 1 STARDOM STARDOM DR8 TB2 STARDOM DR8 TB2 www stardom com tw STARDOM STARDOM www stardom com tw 10 35 50 95 20 47 4 116 100 240V AC 1 2 3 4 5 6 7 DR8 TB2 DR8 TB2 x1 x8 Thunderbolt x1 x1...

Page 9: ...SOHORAID DR8 TB2 User Manual 7 A B C D 3 1 2 RAID5 RAID0 20GB 3 DR8 TB2 4 5 DR8 TB2 6 DR8 TB2 7 8 RAID 9 RAID E F G H I Thunderbolt J 0 5 6 3 4 7 0 1 2...

Page 10: ...SOHORAID DR8 TB2 User Manual 8 4 DR8 DR8 DR8 DR8 1 2 3 4 Lock Unlock Press 5 DR8 TB2 Thunderbolt DR8 6 7 8 9 10 10 RAID5 RAID0 11 DR8 TB2 12 45 40 13 DR8 TB2 DR8 TB2 STARDOM...

Page 11: ...TB2 User Manual 9 5 System Fan Failure Management DR8 TB2 DR8 TB2 DR8 TB2 DR8 TB2 STARDOM 6 7 1 DR8 TB2 Thunderbolt cable Thunderbolt cable 2 DR8 TB2 3 RAID MODE JBOD DR8 TB2 RAID YES YES N A N A YES...

Page 12: ...http www stardom com tw...

Reviews: