42
511158
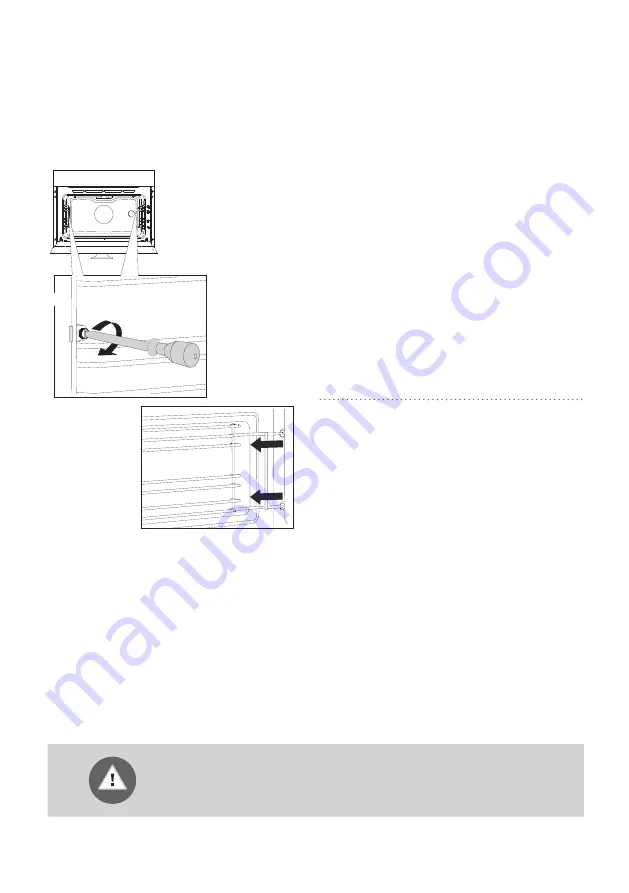
REMOVING AND CLEANING THE WIRE
GUIDES
Only use conventional cleaners to clean the guides.
1
Undo the screw.
2
Remove the guides from the holes in
the back wall.
After cleaning, re-tighten the screws on the guides with a screwdriver.
Page 1: ...www gorenje com DETAILED INSTRUCTIONS FOR USE OF THE ELECTRIC OVEN GB IE MT...
Page 2: ...received an undamaged appliance If you do find transport damage please contact the seller from which you purchased the appliance or the regional warehouse from which it was supplied The telephone numb...
Page 3: ...ADDITIONAL FUNCTIONS 21 Step 5 START THE COOKING PROCESS 21 Step 6 END THE COOKING PROCESS AND SWITCHING OFF THE OVEN 22 DESCRIPTIONS OF SYSTEMS COOKING MODES AND COOKING TABLES 39 MAINTENANCE CLEANI...
Page 4: ...ching heating elements Children less than 8 years of age shall be kept away unless continuously supervised WARNING Accessible parts may become hot during use Young children should be kept away During...
Page 5: ...n result in a short circuit Therefore keep the power cords of other appliances at a safe distance Do not line the oven walls with aluminium foil and do not place baking trays or other cookware on the...
Page 6: ...Oven handle Guides Cooking levels 4 3 2 1 511158 The figure represents one of the built in appliance models Since the appliances for which these instructions were drawn up may have different equipmen...
Page 7: ...e heaters back on COOLING FAN The appliance is fitted with a cooling fan that cools the housing and the appliance control panel EXTENDED OPERATION OF THE COOLING FAN After the oven is switched off the...
Page 8: ...at up their form may change This does not affect their functionality and their original form will be restored when they cool down The grid or the tray should always be inserted into the groove between...
Page 9: ...HE MODEL The rating plate indicating the basic information about the appliance is located at the edge of the oven and it is visible when the oven door is opened A Serial number B Code ID C Type D Bran...
Page 10: ...10 CONTROL UNIT DEPENDING ON THE MODEL 1COOKING SYSTEM SELECTOR KNOB 2CHILD LOCK KEY 3OVEN LIGHTING ON OFF KEY 4TEMPERATURE KEY 0 511158...
Page 11: ...MER KEY Cooking duration End of cooking Alarm Clock 6START STOP KEY Use this key to start or stop the program 7SETTINGS KNOB Use this knob to set the time and temperature 8COOKING INFORMATION AND CLOC...
Page 12: ...rom the oven Clean all accessories and utensils with warm water and regular detergent Do not use any abrasive cleaners Before using the oven for the first time heat it with the upper and lower heater...
Page 13: ...also work if the clock is not set However timer functions are not available in this case SETTING THE TIMER FUNCTIONS After a few minutes of idling the appliance will switch to standby mode CHANGING TH...
Page 14: ...heater a part of the large grill set will operate This system is used for grilling a smaller amount of open sandwiches or beer sausages and for toasting bread 240 LARGE GRILL The upper heater and the...
Page 15: ...optimized This mode is used for roasting meat and baking pastry 180 DEFROSTING The air circulates with no heaters activated Only the fan will be activated This is used to slowly thaw frozen food AQUA...
Page 16: ...MPERATURE KEY Rotate the SETTINGS KNOB and choose the desired temperature Maximum temperature is limited with some systems When the appliance is switched on with the START key the symbol C flashes on...
Page 17: ...nd cooking time is automatically displayed 2 pm Touch the TIMER key again to select the COOKING TIME symbol and set the time when you wish the cooking to end 6 pm Press START to start the cooking proc...
Page 18: ...ed in seconds 511158 After the set time expires the oven will automatically stop operating end of cooking An acoustic signal will be heard which you may turn off by touching any key After one minute t...
Page 19: ...ms cooking modes or additional functions cannot be changed The only possible change is to end the cooking process by rotating the selector knob to 0 Child lock will remain active after the oven is swi...
Page 20: ...old it for 5 seconds Two fully lit bars will appear on the display Rotate the SETTINGS KNOB to adjust the display dimmer one two or three bars After three seconds the setting will be automatically sav...
Page 21: ...ute of idling the appliance will switch to standby mode After the use of the oven some water may be left in the condensate channel underneath the door Wipe the channel with a sponge or a cloth STEP 5...
Page 22: ...zzas successively will save a lot of energy as the oven will already have been preheated Use dark black silicon layered or enamel coated baking sheets and trays as they conduct the heat very well When...
Page 23: ...to heat the oven to the desired temperature as quickly as possible This mode is not appropriate for cooking When it is switched on the oven will begin to heat up The symbol C will flash on the display...
Page 24: ...in MEAT Pork roast 1500 2 180 190 130 150 Pork shoulder 1500 2 190 200 120 140 Pork roulade 1500 2 190 200 120 140 Meat loaf 1500 2 200 210 60 70 Beef roast 1500 2 180 210 90 120 Roast beef well done...
Page 25: ...g time min PASTRY White bread 2 180 190 40 50 Buckwheat bread 2 180 190 40 50 Whole grain bread 2 180 190 40 50 Rye bread 2 180 190 40 50 Spelt bread 2 180 190 45 55 Sweet souffl 2 170 180 35 45 Souff...
Page 26: ...out the cake is done Did the cake collapse Check the recipe Next time use less liquid Note the mixing time when using small mixers blenders etc The cake is too light at the bottom Use a dark coloured...
Page 27: ...ray make sure there is enough liquid in the tray to prevent burning Turn the meat during cooking After grilling clean the oven the accessories and the utensils Grilling table small grill Type of food...
Page 28: ...almon steaks fillets 600 3 220 240 19 22 TOASTED BREAD 6 slices of white bread 4 240 1 5 3 4 slices of mixed grain bread 4 240 2 3 Open sandwiches 4 240 3 5 7 When grilling in a baking tray make sure...
Page 29: ...L 2 4 Type of food Weight g Guide level from the bottom Temperature C Cooking time min MEAT Duck 2000 1 150 170 80 100 Pork roast 1500 2 160 170 60 85 Pork shoulder 1500 2 150 160 120 160 Pork shank 1...
Page 30: ...tions and tips for UPPER and BOTTOM HEATER 2 Type of food Guide level from the bottom Temperature C Cooking time min Cheesecake short crust 2 150 160 65 75 Pizza 2 200 210 15 20 Quiche Lorraine shortc...
Page 31: ...socket is in the front upper corner of the oven right wall 2Connect the meat probe plug to the socket and stick the probe into the food If any timer settings were activated they will be cancelled 3Tu...
Page 32: ...rrent meat probe temperature will be displayed during operation The temperature may be adjusted during operation When the set core temperature is reached the cooking process will stop An acoustic sign...
Page 33: ...e as they strongly reflect the heat Provide enough liquid during the cooking process to prevent the meat from burning Turn the meat during roasting The roast will remain juicier if you cover it Type o...
Page 34: ...ime min PASTRY Cake 2 150 160 45 60 Sponge cake 2 150 160 25 35 Crumble cake 2 160 170 25 35 Fruit cake sponge 2 150 160 45 65 Plum cake 2 150 160 35 60 Sponge roll 2 160 170 15 25 Fruit cake short cr...
Page 35: ...re the jars are of equal size filled with the same contents and tightly sealed Pour 1 litre of hot water into the deep tray approx 70 C and place 6 1 litre jars into the tray Place the tray into the o...
Page 36: ...mer Temperature at the start of simmering when bubbles appeared Resting time in the oven min FRUIT Strawberries 6 1 l 40 55 switch off 25 Stone fruits 6 1 l 40 55 switch off 30 Fruit mush 6 1 l 40 55...
Page 37: ...70 Pork roast 2 kg 2 190 160 190 Beef roast 1 kg 2 210 120 140 FISH Whole fish 200 g piece 2 200 40 50 Fish fillet 100 g piece 2 210 25 35 PASTRY Pressed cookies 2 180 25 30 Small cupcakes 2 190 30 35...
Page 38: ...any heaters operating Food suitable for defrosting includes cakes with heavy cream or butter based cream cakes and pastry bread and rolls and deep frozen fruit In most cases it is recommended to remov...
Page 39: ...ont side of the housing depending on the model Clean this surface only with a mild detergent soapsuds and a soft sponge that will not scratch the finish Do not use abrasive cleaners or cleaners contai...
Page 40: ...sing warm soapsuds while the oven is still warm With stubborn dirt and grime use conventional oven cleaners Rinse the oven thoroughly with clean water to remove all cleaner residue Never use aggressiv...
Page 41: ...n cannot be changed 2Pour 0 6 l of water into a glass or shallow baking dish and insert it into the lower guide 3After 30 minutes food residues on the oven enamel walls will have softened and they wil...
Page 42: ...AND CLEANING THE WIRE GUIDES Only use conventional cleaners to clean the guides 1Undo the screw 2Remove the guides from the holes in the back wall After cleaning re tighten the screws on the guides w...
Page 43: ...cavity ceiling Before cleaning the oven remove the trays the grid and the guides 1To remove the heater undo the screw located at the front of the oven cavity ceiling Never use the heater when folded l...
Page 44: ...sed door then lift the door and pull it out To replace the door observe the reverse order If the door does not open or close properly make sure the notches on the hinges are aligned with the hinge bed...
Page 45: ...al position DEACTIVATING AND ACTIVATING THE DOOR LOCK The oven should be cooled down completely First open the oven door Push the door lock to the right by 90 with your thumb until you feel a click Th...
Page 46: ...s fitted with a system that dampens the door closing force starting at the 75 degree angle It allows simple quiet and smooth closing of the door A gentle push to a 15 degree angle relative to the clos...
Page 47: ...of the door marking 1 on the support and pull them away from the glass pane marking 2 on the support 2Hold the door glass pane by the lower edge slightly lift it so that it is no longer attached to th...
Page 48: ...nty Before changing the bulb remove the trays the grid and the guides Use a Phillips cross screwdriver Halogen lamp G9 230 V 25 W 1Use a flat screwdriver to release the bulb cover and remove it NOTE M...
Page 49: ...the main switch then reconnect the appliance and switch it on The main fuse in your home trips often Call a service technician The oven lighting does not work The process of changing the light bulb i...
Page 50: ...ld be taken to an authorized collection center for waste electric and electronic equipment processing Correct disposal of the product will help prevent any negative effects on the environment and heal...
Page 51: ......
Page 52: ...MULTI_IL_45 en 11 19...