AA 1.5V
AA 1.5V
CHARGING THE STARBLADE DRONE BATTERY & ATTACHING THE BATTERY TO THE DRONE
SETUP OVERVIEW
RADIO CONTOL TRANSMITTER • BATTERY INSTALLATION
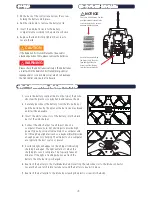
If the Radio Control Transmitter will not be used for
extended periods of time, please remove the batteries.
Please use 4 AA batteries. Use the
polarity markings to install in the
correct orientation. Do not mix
batteries of different types.
Unscrew the screw holding
the battery lid to the body.
Then lightly pull the clip
down to pull the lid away
from the transmitter body.
NOTICE
Please check the AA batteries routinely. If the AA batteries
are left within the Radio Control Transmitter, potential
leakage and/or corrosion may occur, which can damage
the transmitter and create a fire hazard.
On the back of the controller, unscrew the screw
holding the battery lid in place.
1.
Pull the clip down to remove the battery’s lid.
2.
Insert the 4 AA batteries into the battery
compartment according to the polarities shown.
3.
Replace the lid and firmly tighten the screw to
secure the lid.
4.
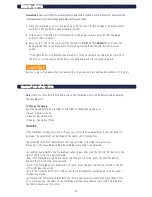
Locate the battery compartment on the top of the drone.
Unscrew the plastic screw, by hand, and remove the lid.
1.
Carefully disconnect the battery from the drone. Do not
pull the batteries by the wires as the batteries may break
and it will be unusable.
2.
Insert the white connector of the battery, into the black
part of the USB charger.
3.
Connect the USB charger to a USB port, like on a
computer. Please note: Not all USB ports provide high
power. Typically, only ports mounted on a computer and
not through a peripheral (such as a keyboard) will provide
enough power for charging. The USB ports on a computer
are typically the best source of power.
4.
A solid red light will appear on the USB port indicating
charging has begun. The light will turn off when the
charging process is complete. This typically takes 60
minutes. If the light is flashing when you attach the
battery, then the battery is charged.
5.
Reattach the battery to the StarBlade drone by inserting the red connector to the drone connector.
Secure the hook-latch fabric fastener around the battery to keep it in place.
6.
Reattach the battery lid to the drone by screwing the plastic screw into the body.
7.
CAUTION
WARNING


