


- 16 -
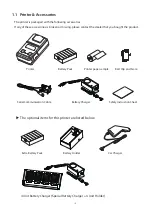
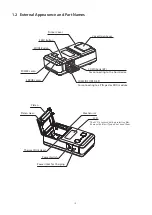
3. Printer Features
3.1 Control Panel
3.1.1 Buttons
1) FEED button: When the printer is on, you can press FEED to feed the paper.
2) MODE button:
You can change the communication mode and print settings by configuring the printer’s mode
settings.You can configure the mode settings after you press and hold MODE for 5 seconds or
more and the ERROR LED flashes five times.
(For more information about mode settings, see section 2.3, “Memory Switch Settings.”)
3.1.2 Panel LEDs
1) POWER LED (green): Lights when the printer is on. The printer can receive data when the POWER
LED is on.
2) ERROR LED (red):
Lights when there is a printer error and when the printer is receiving data.
3.1.3 LCD
1) The 128 × 32 dot (16 × 2 line) display shows alphanumeric characters.
2) Content
Mode/Status
: Indicates the currently specified printer mode or error status.
Data communication status :
... The image shown on the left indicates that the data com-
munication status is good.
Remaining battery power :
... There is sufficient remaining battery power.
... The remaining battery power is low. Please charge the bat-
tery pack.
Flashing
... The remaining battery power is extremely low.
Stop using the printer immediately, and charge the battery
pack.
Note: If you continue printing at the low remaining battery power sta-
tus, the printer cannot feed paper properly and may print with
condensed (narrow) line spacing.
Bluetooth connection status :
... The mark on the left indicates that there is a Bluetooth con-
nection.
When there is no Bluetooth connection, the mark is not
displayed.
Bluetooth Mode
Data communication status
Remaining battery power
Mode / Status
Bluetooth Connection Status
ERROR Lamp
POWER Lamp
FEED Buttom
MODE Button
LCD