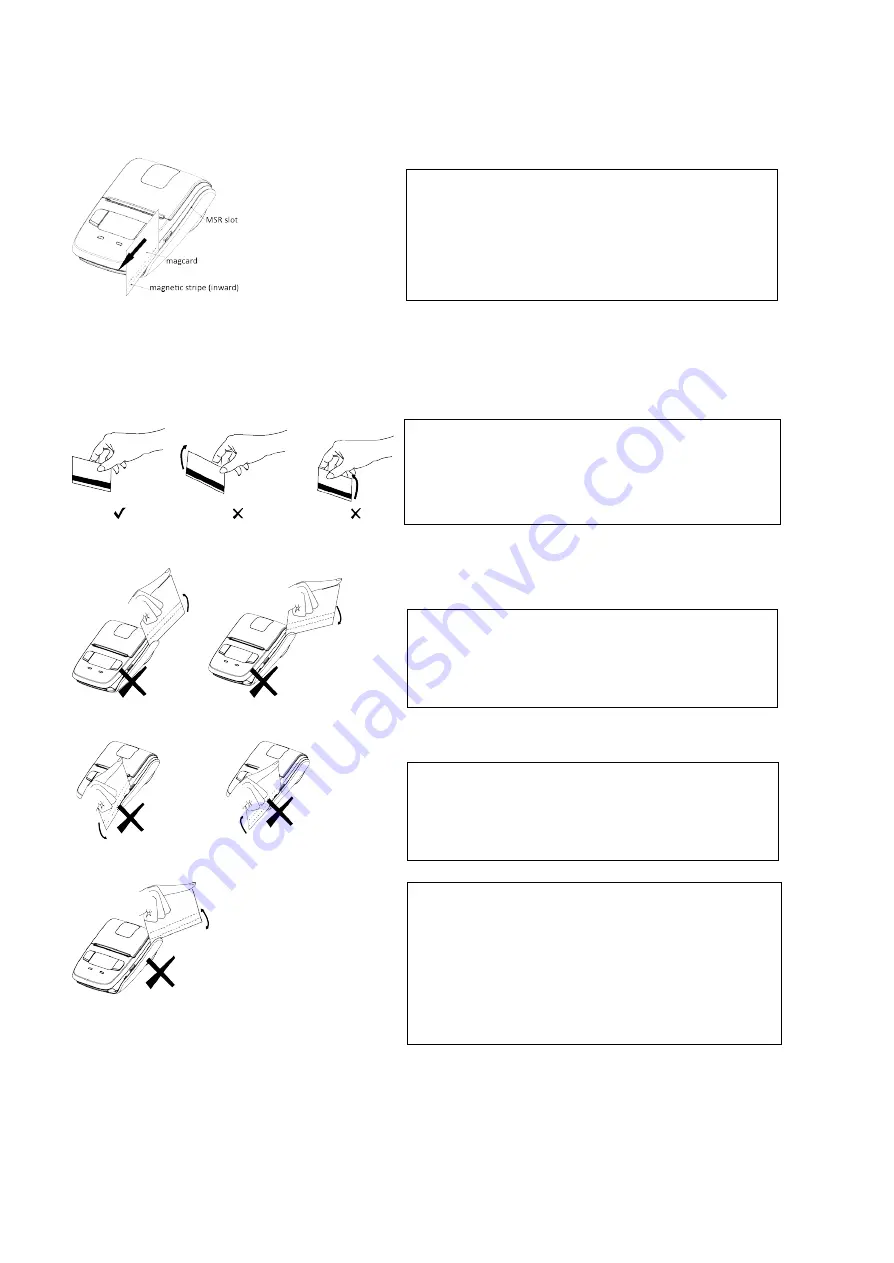
Star SM-L200 SERIES Hardware Manual Download Page 37


28


 Correct example: 


Incorrect example: 

To grasp a magnetic card 

To move a magnetic card


.


If you grasp the front/rear part of a card and move it 
through the MSR slot,the front /rear part is loose 
and a read error occurs. 

If you insert a card tilted upward/downward into 
the MSR slot,the card does not move horizontally 
and a read error occurs. 

If you extract a card at the end of the MSR slot by 
lifting up or lowering down,the card is not 
maintained and a read error occurs. 

If you insert a card into the middle part of the MSR 
card ,the card is not read correctly and read error 
occurs,or if you move the card back or forth by force 
after inserting into the MSR slot,the card is not read 
correctly and a read error occurs. 

Make sure the magnetic stripe is towards to the 
magnetic head. Hold the card in the center as 
illustrated below and swipe it straight at a steady 
speed in the direction of arrows. 

Summary of Contents for SM-L200 SERIES

Page 1: ...Mobile Printer SM L200 SERIES Hardware Manual...

Page 2: ...Rules These limits are designed to provide reasonable protection against harmful interference in a residential installation This equipment generates uses and can radiate radio frequency energy and if...

Page 3: ...le Suppl ment C OET65 et d exposition aux fr quences radio lectriques RF CNR 102 de l IC Cet quipement met une nergie RF tr s faible qui est consid r e conforme sans valuation de l exposition maximale...

Page 4: ...79 2010 ENVIRONMENT EN 50581 2012 Manufacturer s Name Star Micronics Co Ltd Manufacturer s Address 20 10 Nakayoshida Suruga ku Shizuoka shi Shizuoka 422 8654 Japan Importer s Name Star Micronics Europ...

Page 5: ...appreciate being informed of them The above notwithstanding STAR can assume no responsibility for any errors in this manual iPad iPhone iPod touch and Retina are trademarks of Apple Inc registered in...

Page 6: ...ontact your dealer for advice Continued use of the printer could result in a fire Never attempt to repair the printer yourself Also do not disassemble or modify the product Doing so could lead to inju...

Page 7: ...rinting quality may suffer if the thermal head heating element becomes soiled by being touched with your hands Do not touch the thermal head heating element There is a risk of damage to the driver IC...

Page 8: ...ease perform the following maintenance every 6 months Thermal head Dip a cotton swab in an alcohol solvent ethanol methanol or isopropyl alcohol and clean the heating area of the head Platen While tur...

Page 9: ...nter Features 15 3 1 Control Panel 15 3 1 1 Button 15 3 1 2 Panel Lamp 16 3 1 3 OLED Indication 16 3 1 4 Buzzer Description 17 3 2 Self Test 17 3 2 1 Self Test Procedure 17 3 2 2 Printing the Bluetoot...

Page 10: ...Resistance Very silent printing thru direct thermal printing method Print speed 35mm s Paper feed 70mm s Support Bluetooth Ver3 0 4 0 BLE Dual Mode Support Secure Magnetic Stripe Reader Model with Ca...

Page 11: ...these accessories is broken or missing please contact the dealer that you bought the product Printer Battery Pack Printer paper sample Belt Clip USB Cable Safety Instruction Sheet The optional items...

Page 12: ...3 1 2 Appearance and Components OLED...

Page 13: ...ned off before you insert or remove the battery pack 2 Insert the battery pack into the back of the printer as in the figure shown below following the direction of the arrow 3 To remove the battery ba...

Page 14: ...status descriptions are as follows While Charging Charging is completed When power ON Power lamp is Flashing in green Power lamp is constant on But if printer goes into Stand by mode power lamp will k...

Page 15: ...rge itself Prepare a battery pack that has been charged relatively recently 1 to 2 days earlier To ensure that the battery lasts for a long time we recommend that you turn off the printer whenever pos...

Page 16: ...n be charged approximately 300 times in the normal temperature range without losing performance If an extreme decline in the running time of the battery is noticed the battery is reaching the end of i...

Page 17: ...d Recycling A battery pack is used to power this device Since the disposal process of batteries varies from country to country refer to the appropriate measures mandating the disposal method of the co...

Page 18: ...with PIN for Android or Windows system PIN and Device name can be changed through Star Utility To obtain this utility please contact with your dealer b Another is Bluetooth 4 0 BLE without PIN for iO...

Page 19: ...e last five digit number written in the Serial No column on the bottom of the printer 2 2 2 Android 1 Press and hold MODE button for approx 2 seconds and printer is turned on 2 Open the tablet setting...

Page 20: ...INGS select Devices Bluetooth 3 Turn ON Bluetooth Select the displayed device name STAR L200 XXXXX and enter the PIN code 4 When Connected is displayed pairing is completed You can test the connectivi...

Page 21: ...button to open the paper cover 2 Load the roll paper in the orientation shown in the figure below 3 Pull the end of the roll straight toward you Then press down on both sides of the printer cover to c...

Page 22: ...printing is not in progress The paper cover can be opened when replacing the paper However since the tear bar is on the inside of the paper cover be careful not to place your face or hands too close...

Page 23: ...ew hole to attach the belt clip to the printer 2 Use a coin to firmly screw in the screw 2 4 2 Using the Belt Clip When the printer is attached to your belt you can use it like the picture below Note...

Page 24: ...y Switch Setting mode The MODE button can now be used to change Printer MODE status visible on the OLED screen for fast configuration Refer to 3 3 Memory Switch Settings for details about mode convers...

Page 25: ...ED will display most of the printer status 1 The 128 x 64 dots display shows alphanumeric characters 2 Content Mode Status Indicates the currently specified printer mode or error status Remaining batt...

Page 26: ...er open Thrice USB disconnected 3 2 Self Test You can use self test to check the printer s settings Before you start the self test make sure that roll paper has been properly loaded into the printer 3...

Page 27: ...st finishes press and hold FEED and MODE at the same time 3 The printer will print the Bluetooth device name and MAC address and the self test will finish automatically The printer will be ready to re...

Page 28: ...ure the settings Release the buttons after you surely confirm the screen display Enter Menu Mode to get a printer into the setting mode 3 To switch the Menu and option parameter or return to the previ...

Page 29: ...n the OLED Press the MODE button once to switch the menu item Display 1 Self Test 2 System Setting Press the FEED button once to get into the System Setting menu You will see present Input Password 00...

Page 30: ...d FEED button to confirm the new setting and return to the previous menu The density has set to Low 0 Medium 1 Low Please use at a room temperature if you want to set the density to 3 Special Some typ...

Page 31: ...it Auto Off Time Press the MODE button twice to switch the menu item Auto Off Time Press the FEED button once to get into the menu Display Auto Off Time 0001 9999 Min 0000 Press the MODE button once t...

Page 32: ...set 0 When the setting does not need to be reset press and hold FEED button to return to the previous menu Password Press the MODE button 6 times to switch the menu item Password Press the FEED button...

Page 33: ...n once to enter the menu item Self Test Display 1 Print 2 MSR 3 MSR Key Inject 4 Hex Dump Mode 5 Previous Menu Press the FEED button once you will see present Press Feed To Print in the OLED press FEE...

Page 34: ...ystem Setting Input Password 0000 1 Density 0 Medium 1 Low 2 High 3 Special Medium 2 Standby Time Standby Time 0010 9999 Sec 60 Seconds 3 Auto Off Time Auto Off Time 0001 9999 Min 0000 Min 4 Smart Pow...

Page 35: ...ease press and hold the MODE button to turn off the printer when it is supplied the power If AUTO OFF is enabled If the smart power option is enabled and printer is turned on and powered AUTO OFF func...

Page 36: ...not the card cannot be read properly See correct example on Figure 3 4 2 If you hold the corner of the card it is difficult to swipe it straight so that you may fail to read the card data So hold the...

Page 37: ...tract a card at the end of the MSR slot by lifting up or lowering down the card is not maintained and a read error occurs If you insert a card into the middle part of the MSR card the card is not read...

Page 38: ...CAUTION 1 Do not use roll paper whose end is glued to its core because the printer will be unable to properly detect the end of the paper Also we recommend that you use roll paper that has a roll end...

Page 39: ...4 Specification of Black Mark SM L200 supports black mark on both sides of the paper and the specification of black mark is illustrated by the following image Note PCS value of BM should be more than...

Page 40: ...it 8 data bit fixed Parity bit No parity fixed Stop bit 1 stop bit fixed USB Micro USB 1 Power saving Sleep mode YES Character Set Font Alphanumeric 9x17 9x24 12x24 dots Kanji 24x24 dots Barcode Symbo...

Page 41: ...0 2 1 Physical characteristics Operation condition 0 C to 50 C 20 to 85 RH Charging condition 0 C to 40 C 0 10 1 Storage condition 20 C to 60 C 5 to 95 RH Dimension 86 W x 122 5 D x 46 H mm Weight 220...

Page 42: ...33 Dimensions External Dimension 86mm W x 122 5mm D x 46mm H Weight 220g including battery pack Body color Black 46 86 86 46 122 5...

Page 43: ...http www starmicronics com support Rev 2 2...

Reviews: