Star LC-4522 User Manual Download Page 7

Printer Setup


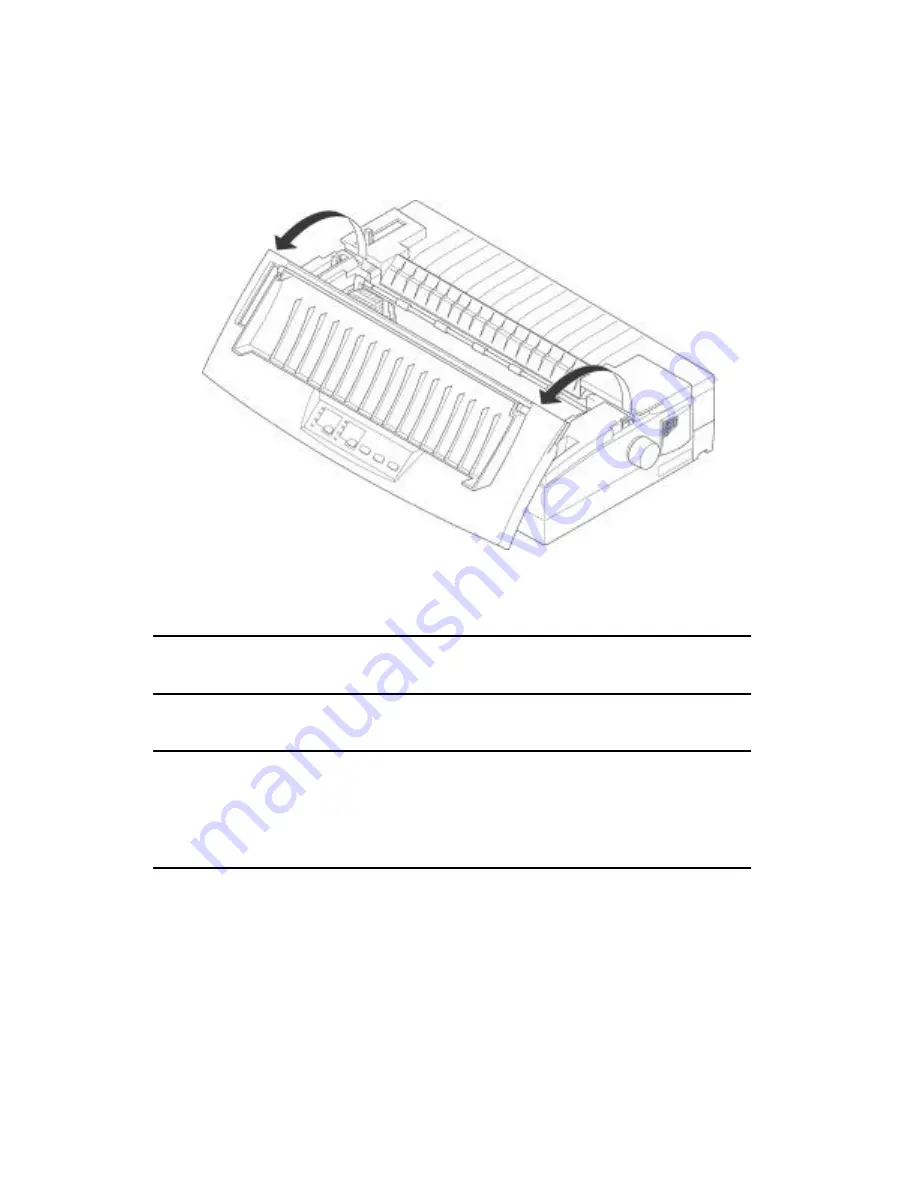
Opening the front cover 

o Lift up on the front cover and swing it open until it stops. 


o To close the front cover, simply lower it back into place. 


Caution! 

The tear assist edge is rather sharp. Take care to avoid injuring your hands. 


Note: 

You can completely remove the front cover from the printer or you can stand it 

up. You should normally leave the front cover closed, because it protects  

against objects getting into the printer, and it cuts down on printer noise. 


Removing the protective materials 

Two small p ieces of packing material are inserted into the printer to protect 

components during shipping. Be sure to remove them before using the printer. 

o Open the rear cover by pushing it back so that the cover swings back and 

down. 


Summary of Contents for LC-4522

Page 1: ...USER S MANUAL LC 4522 DOT MATRIX PRINTERS...

Page 2: ...11 Loading fanfold paper 12 Printing on fanfold paper 16 Parking fanfold paper 17 Unpaking fanfold paper 17 Using the tear off function 18 Connecting to your computer 18 Chapter 2 Control Panel Opera...

Page 3: ...ing the current switch settings 30 Exiting the EDS Mode 30 EDS Mode Settings 31 Chapter 4 Using the Printer with MS DOS Setting up for printing with MS DOS 40 Chapter 5 Paper Handling Selecting paper...

Page 4: ...ect to for power should be nearby and unobstructed 3 Make sure that the printer is close enough to your computer for you to connect the two with your printer cable 3 Allow six inches 15 centimeters of...

Page 5: ...ote that it is a good idea to keep the original box and all the packing materials just in case you need to pack the printer up again and send it somewhere at a later date Important There are several v...

Page 6: ...General guide 3 General guide The following illustrations show the major components of your printer...

Page 7: ...move the front cover from the printer or you can stand it up You should normally leave the front cover closed because it protects against objects getting into the printer and it cuts down on printer n...

Page 8: ...from inside the printer as shown in the illustration A piece of cardboard is inserted into the printer to protect components during shipping Be sure to remove it before using the printer o Open the r...

Page 9: ...nto the slots inside the knob s spindle Press the knob carefully but firmly into place as far as it will go Installing the ribbon cassette o Make sure the printer is unplugged from its power outlet Ca...

Page 10: ...cassette clockwise to take up any slack in the ribbon o Carefully place the cassette onto the mechanism making sure that the spindle fits into the socket on the bottom of the cassette Also make sure t...

Page 11: ...n out or used up If you experience problems with print quality check the condition of the ribbon If the black part looks gray and well worn replace the ribbon with a new one Removing the ribbon casset...

Page 12: ...humb and forefinger to squeeze the two tabs on the ribbon cassette towards the center carefully remove the cassette from the holder o Use the procedure under Installing the ribbon cassette on page 6 t...

Page 13: ...10 Printer Setup Standing up the paper guide o You can move the paper guide so that it is at angle as shown inthe illustrations below...

Page 14: ...from the outlet you are using do not plug in the power cord Contact your dealer for assistance o Set the switch on the left of the printer to 1 ON to turn power on and to 0 OFF to turn power off Cauti...

Page 15: ...Paper Handling on page 41 of this manual o Remove the paper guide from the printer o Make sure printer power is turned off o Set the release lever to the fanfold position o Grasping the two back corne...

Page 16: ...roximately with the holes on the sides of the paper Also move the center paper support so that it is approximately halfway between the two tractors o Open the covers of both tractors and insert the pa...

Page 17: ...o Close the rear cover and press down gently on it until it locks into place with a click Caution Since printing with an open rear cover may cause paper feeding problems be sure to close the rear cove...

Page 18: ...ed paper Then slide the right and left paper guides apart so they do not interfere with the fanfold paper feeding o Turn on the printer The printer will beep a number of times to indicate that paper i...

Page 19: ...g on fanfold paper When printing on fanfold paper take care not to print too close to the perforations that separate each sheet The following shows the recommended print area for fanfold paper cut she...

Page 20: ...feeds the fanfold paper until it is no longer in contact with the platen which is indicated by the printer beeping a number of times Also the control panel sPOWER indicator starts to flash because pa...

Page 21: ...omputer The computer sends data to the printer through a cable This printer does not come with a cable so you must purchase one separately You will probably want to use a standard parallel cable for c...

Page 22: ...led Printer Parallel PRN LPT1 or something similar o Plug the other end of the parallel cable into the socket on the side of the printer and secure it in place with the clips Note Consult your dealer...

Page 23: ...scribed in the relevant sections covering them Switching between on line and off line o Press ON LINE to switch the printer between being on line and off line o When the printer is on line the ON LINE...

Page 24: ...the printer into the Quality Lock Mode when you turn it on The Print Quality mode will function for the image printing too Entering the Print Quality Lock Mode When the printer is in the Print Qualit...

Page 25: ...Multi part Mode o Make sure the printer is off line ON LINE indicator is not lit o Press MULTI PART to change the printing force selection The following shows the meanings of the indicators that light...

Page 26: ...s off line ON LINE indicator is not lit o Holding down LINE FEED and press ON LINE then the printer will automatically feed the paper to the top of the next page Parking fanfold paper o Make sure the...

Page 27: ...to a position where it can be torn off easily o Check to make sure that the printer is on line o Press the SET EJECT PARK button to perform the long tear off operation or press the LINE FEED button to...

Page 28: ...s The printer will automatically eject the cut sheet that is in the printer or reverse feed fanfold paper until it is no longer in contact with the platen Also all the font and pitch indicators on the...

Page 29: ...p both buttons held down until the printer beeps twice This procedure saves the following settings Current the print quality and the copy capabilitysettings Quiet Print Mode status o To clear saved co...

Page 30: ...il the printer beeps once which indicates that the buffer is cleared Initializing the printer The following procedure initializes the printer to its power on settings If you have control panel setting...

Page 31: ...seven banks representing banks ofswitches that are identified by the letters A through G Each bank contains a number of switches numbered 1 through 7 that you can turn on and off to configure the prin...

Page 32: ...Mode use the control panel sSWITCH button to select a bank switch When the SW indicator flashes it indicates the current switch selected Lit Indicator Selected Switch 1 1 1 3 2 3 3 3 5 4 5 5 5 7 6 7 7...

Page 33: ...ttings o In the EDS Mode press the control panel sPRINT button to print out the current switch settings Asterisks on the printout show whether a switch is turned on or off Exiting the EDS Mode o Press...

Page 34: ...directional OFF or bi directional ON printing for graphics Bi directional printing ON is faster while uni directional OFF printing generally provides better print quality in the graphics mode Switch 4...

Page 35: ...inter prints with less noise than normal printing Though the Quiet Mode prints more quietly it also takes considerably longer than normal printing Switch 7 Not Used BANK B Switches 1 2 Print mode Turn...

Page 36: ...24 is enabled OFF or disabled ON Note that this setting controls the application software s tear off function only It does not affect the manual tear off function that is performed using the control p...

Page 37: ...sed as the control code OFF Switch 3 Zero Style Specifies whether a normal zero ON or a slashed zero OFF will be used Selecting Normal ON prints zeros without lines running through them while Slashed...

Page 38: ...OFF ON 17 0 inch ON OFF OFF OFF 8 0 inch OFF OFF OFF OFF 11 7 inch A4 Switch 5 Top Margin Selects 1 6 inch ON or 1 inch OFF spacing as the top margin when execute Paper auto loading feature Switches 6...

Page 39: ...the CR centering position is long ON the carriage moves to the center of the platen before the paper is inserted or ejected When CR centering is short OFF the carriage moves to the left side of the p...

Page 40: ...FF ON Germany OFF ON OFF ON Denmark 2 ON ON OFF OFF England OFF ON OFF OFF Spain 2 ON OFF ON ON Denmark 1 OFF OFF ON ON Latin America ON OFF ON OFF Sweden OFF OFF ON OFF Korea ON OFF OFF ON Italy OFF...

Page 41: ...on about code pages ON ON ON ON ON 437 U S A ON ON ON ON OFF 737 Greek 737 ON ON ON OFF ON 772 Lithuanian 772 ON ON ON OFF OFF 774 Lithuanian 774 ON ON OFF ON ON 850 Multi Lingual ON ON OFF ON OFF 851...

Page 42: ...OFF 3844 CS2 OFF OFF OFF ON ON 3845 Hungarian OFF OFF OFF ON OFF 3846 Turkish OFF OFF OFF OFF ON 3847 Brazil ABNT OFF OFF OFF OFF OFF 3848 Brazil ABICOMP Switch 6 Saving Control Panel Status When sele...

Page 43: ...application you are using for details on how to select a printer for it o Start up the application and use the correct procedure for that application to select a printer The following is a list of pr...

Page 44: ...sheet feeding o Clearing paper jams Selecting paper types Use the following information when selecting paper Cut Sheet Paper Manual Feed Width 7 0 to 16 54 178 to 420mm Length 5 5 to 14 140 to 356mm...

Page 45: ...lbs 52 to 82g m 2 45 to 70 kg one ply 11 to 14 lbs 40 to 52g m 2 34 to 45 kg multi ply Copies Original 1 or 2 Normal Mode Original 3 or 4 Multi Part Mode Multi part Mode and an optional pull tractor...

Page 46: ...ms per square meter or lbs pounds Some forms paper also have multiple pages that make them quite thick Use the following procedure to change the gap between the print head and the platen and adjust fo...

Page 47: ...See Loading fanfold paper on page 12 for details on using fanfold paper Manual sheet feeding You can use the following procedure to manually feed single sheets of paper into the printer o Make sure th...

Page 48: ...nter until you feel it stop o Press the SET EJECT PARK button to feed the paper to the starting position o If you want to move the paper to another position use the micro feed function described under...

Reviews: