background image

5

IL1269

CHANGING FACTORY TEMP PRESET

The dispenser is preset at the factory for a temperature of 150°F (65°C).  If a different temperature is 

required, the setpoint can be changed in a range from 145°F to 162°F (60°C to 72°C).   

To change the temperature:

1.  Press and hold the SET button for 3 seconds until the display flashes.

2.  Using the UP or DOWN buttons, set the temperature to the desired value.
3.  Press the SET button to exit the programming mode.

The dispenser is designed to operate 24 hours a day.  Once the product is placed in the dispenser it 

should not be removed until the bag is empty, or the holding period of the product has expired.

NOTE:  To increase the evacuation, open the dispenser and  pull the product towards the 

bottom of the bag and the outlet fitment once or twice during operation.

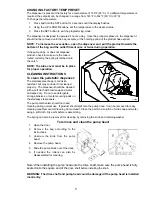
If the pump drips, or does not dispense 

product, check to make sure the tube is 

routed correctly, the spring is latched onto 

the catch. 

NOTE: The tube cover must be in place 

for proper operation.

CLEANING INSTRUCTIONS
To clean the peristaltic dispenser:

The stainless steel body is corrosion 

resistant, but may corrode if not cleaned 

properly.  The dispenser should be cleaned 

with a soft cloth with mild soap and water 

and wiped dry.  Do not use detergents, 

strong abrasives, or metal scouring pads on 

the stainless steel panels.  
The pump mechanism should not need 

cleaning during normal use.  If product should spill onto the pump head, it can be removed for easy 

cleaning 

(see Removal & Cleaning Pump Head)

. Clean the parts in a solution of mild soap and water 

using a soft cloth. Dry parts before reassembling.  
The spring can also be removed for cleaning by removing the knob and retaining washer.

To remove and clean the pump head:

1.   Open the door.
2.  Remove the bag according to the 

instructions.

3.  Unscrew the knob from the pump 

head.

4.  Remove the pump head.
5.  Slide the pump block out of the track.

6.  If  needed  the  rollers  can  also  be 

disassembled for cleaning.

Note: When installing the pump head onto the drive shaft, make sure the pump head is fully 

seated onto the square end of the 

drive shaft before installing the knob.

WARNING: The drive shaft and pump head could be damaged if the pump head is installed 

incorrectly. 

Summary of Contents for HPDE1

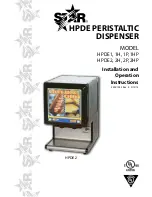
Page 1: ...1 HPDE PERISTALTIC DISPENSER MODEL HPDE1 1H 1P 1HP HPDE2 2H 2P 2HP Installation and Operation Instructions 2M Z7245 Rev K 2 13 13 HPDE2...

Page 2: ...te we are not responsible for errors or omissions in information provided or conclusions reached as a result of using the specifications By using the information provided the user assumes all risks in...

Page 3: ...erature and condition and provide any necessary utensils trays or other apparatus in a safe and convenient location with appropriate instructions This appliance is not intended for repair cleaning mai...

Page 4: ...kwise for less product 5 Repeat steps 3 and 4 until the desired amount is reached Operation Notes The dispenser is a holding cabinet not a warmer It is intended to hold the food product at no less tha...

Page 5: ...TRUCTIONS To clean the peristaltic dispenser The stainless steel body is corrosion resistant but may corrode if not cleaned properly The dispenser should be cleaned with a soft cloth with mild soap an...

Page 6: ...e cleaners abrasive pads product identifiers and point of sale attachments or any other non food object tha comes in continuous contact with the roller coating This warranty does not apply to the non...

Page 7: ...1 I F TEMPERATURE CONTROL W PROBE 10 J NO NC COM 3 8 7 G L 8 7 G 11 PZSMS0P1E1 CAREL R U ROHS 1 2 3 4 5 6 7 8 9 10 11 NTC PROBES L N 115V L R MATERIAL DR DATE FINISH MODEL NO TITLE PART NO TOLERANCES...

Page 8: ...V ONLY A B C D E H I J K L HEATING ELEMENT 1 I 9 8 7 G L 18 8 7 G 17 PZSMS0P1E1 CAREL R U ROHS 1 2 3 4 5 6 7 8 9 10 11 NTC PROBES L N 115V L R MATERIAL DR DATE FINISH MODEL NO TITLE PART NO TOLERANCES...

Page 9: ...URING INTERNATIONAL INC 10 SUNNEN DRIVE ST LOUIS MO 63143 USA 1 2 GREEN BLACK 14 15 BLACK WHITE GREEN FOR 230V FOR 120V A B C D 1 3 9 7 5 4 RED WHITE 10 DOOR 11 RED NC NO COM BLACK SW 2 FOR 240V HOT N...

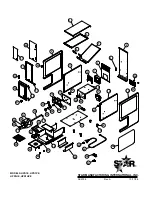
Page 10: ...STAR MANUFACTURING INTERNATIONAL INC SK2008 Rev A 10 17 06 34 32 50 28 28 29 23 24 25 21 17 18 51 36 35 31 57 49 45 6 1 2 3 5 11 16 12 15 30 60 20 45 26 22 58 45 44 54 53 52 27 9 8 4 56 55 13 14 7 10...

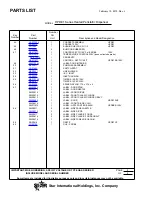
Page 11: ...75 RPM CCW 230V HPDE1 PS Z10009 1 MOTOR 120 RPM CCW HPDE1HPR 16 2P 9615 1 BEARING SELF ALIGN 51 ID HPDE1 17 M2 PD1004 1 PUMP WALL ASSEMBLY HPDE1 18 M2 22049 1 ASSEMBLY BLOCK RIGHT HPDE1 19 2I Y6709 1...

Page 12: ...150 F HPDE1BE 120V 49 2M Z13395 1 LABEL DOOR INTERIOR 50 M2 22017 1 PUMP HEAD ASSEMBLY 51 2E Z1684 1 SWITCH SPDT 52 M2 Z5031 2 LINER LOWER 53 2E Z3034 1 I E C INLET 54 A3 Z4357 1 INLET HOUSING 55 M2...

Page 13: ...AR MANUFACTURING INTERNATIONAL INC SK2009 Rev C 11 11 11 1 2 3 5 6 62 45 35 61 49 31 36 11 10 7 8 4 56 15 57 13 12 14 30 48 18 16 17 18 59 21 25 24 28 33 23 29 32 34 41 51 37 50 28 38 63 42 46 60 47 4...

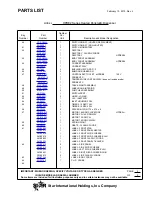
Page 14: ...T 12 M2 Z7234 1 WALL MOTOR 13 2L Z4592 1 RIGHT SIDE PANEL 14 M2 Z4637 1 LINER RIGHT 15 PS Z10009 1 MOTOR 165 RPM COUNTERCLOCKWISE HPDE2H PS Z10013 1 MOTOR CCW 165 RPM 230V PS Z10007 1 MOTOR 75 RPM CCW...

Page 15: ...es not include probe 2E Z13215 1 PROBE NTC 48 M2 PD2005 1 TRACK RIGHT ASSEMBLY 49 2M Z13394 1 LABEL DOOR INTERIOR 50 M2 22017 2 PUMP HEAD ASSEMBLY 51 2E Z1684 1 SWITCH SPDT 52 M2 Z5031 2 LINER LOWER 5...

Page 16: ...16 STAR INTERNATIONAL HOLDINGS INC COMPANY Star Holman Lang Wells Bloomfield Toastmaster 10 Sunnen Drive St Louis MO 63143 U S A 314 678 6303 www star mfg com...

Reviews: