background image

%%  


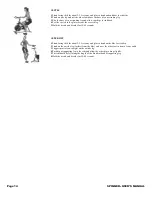
BIKE SETUP  


Proper bike setup gives you a more comfortable ride and reduces your risk of injury.  


SEAT HEIGHT  
 

At the proper height, there should be a slight bend in your knee when you’re at the 
bottom of a pedal stroke.  


FORE/AFT POSITION  

 
Once the proper height has been achieved, adjust the seat forward or back so that when 
the feet are in the 3 o'clock and 9 o'clock positions, the forward knee is directly over the 
pedal axle.  Recheck the seat height again after making the fore/aft adjustment, as 
moving the seat forward and backward can have the same effect as moving it higher or 
lower.  


HANDLEBAR HEIGHT  

 
Position the handlebar at the same height as your seat, or higher if you feel any discomfort in your back.  

 
FOOT POSITION  

 
Place the balls of your feet securely in the toe cages, with the ball of the foot (or the widest part of your shoe) over the center of the pedals. As you pedal, 
concentrate on keeping feet flat, which enables a more powerful pedal stroke. The front of the shoe may not completely fill the toe cage.  
 

RESISTANCE CONTROL  
 

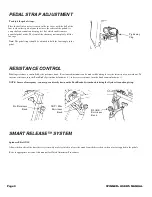
Pedaling resistance is controlled by the Push Brake System knob located below the handlebar. Resistance adjustments can be made while riding to vary 
the intensity of your workout. To increase resistance, turn the Push Brake System knob clockwise (+); to decrease resistance, turn the knob 
counterclockwise (-).  


SEAT FORE-AND-AFT 
POP-PIN 

SEAT HEIGHT 
POP-PIN 

Summary of Contents for Spinner Blade

Page 1: ...STAR TRAC 14410 MYFORD ROAD IRVINE CA 92606 USA d Z dZ dE W EE Z h Z D Eh W EE Z Eyd W EE Z W EE Z Eyd Z W EE Z WZK...

Page 2: ......

Page 3: ...8 Pedal Strap Adjustment 9 Resistance Control 9 Smart Release System 9 Training Information 10 User Information 11 15 Bike Setup 11 Hand Positions 12 Riding Positions 12 Stretching 13 14 Heart Rate G...

Page 4: ...he information and instructions for your specific model before assembly using or servicing your indoor cycling bike WARNING Your Spinner indoor cycling bike is designed for aerobic exercise Please che...

Page 5: ...he pedals and the flywheel have stopped completely Failure to comply may lead to loss of control and serious injury After exercising turn the resistance knob to increase resistance so the pedals will...

Page 6: ...el will continue to spin after you pedal and the crank arms and pedals will rotate with the flywheel Brake tension is adjustable using the red resistance knob in the front of the bike Pressing down on...

Page 7: ...e knee joint is slightly flexed when the extended leg is at the bottom of the pedal stroke Once the proper height has been achieved adjust the seat forward or back so that when the feet are in the 3 o...

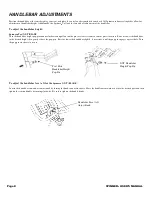
Page 8: ...m its current preset location Raise or lower the handlebar to the desired height then gently release the pop pin Raise or lower the handlebar slightly if necessary until the pop pin engages a preset h...

Page 9: ...nce knob Resistance adjustments can be made while riding to vary the intensity of your workout To increase resistance turn the Push Brake System knob clockwise to decrease resistance turn the knob cou...

Page 10: ...ages 23 24 for more information WORK OUT A brisk and rhythmic workout will train the muscles and cardiovascular system to perform at a higher efficiency The key is to exercise aerobically typically at...

Page 11: ...NDLEBAR HEIGHT Position the handlebar at the same height as your seat or higher if you feel any discomfort in your back FOOT POSITION Place the balls of your feet securely in the toe cages with the ba...

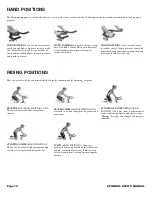
Page 12: ...STANDING CLIMB HAND POSITION 3 This out of the saddle climb incorporates high resistance to strengthen and define the legs JUMPS HAND POSITION 2 Jumps are performed by moving off and on the saddle wit...

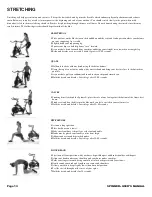
Page 13: ...e hand and bring your heel as close to the buttocks as possible 3 As you exhale pull your abdominals in and tuck your hips underneath you 4 Hold the stretch and breathe Switch legs after 30 60 seconds...

Page 14: ...Hold the stretch and breathe for 30 60 seconds OUTER HIP 1 Stand facing the bike about 2 3 feet away and place a hand on the bike for stability 2 Stand on the outside leg farthest from the bike and cr...

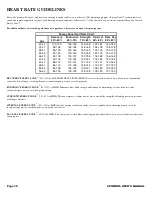
Page 15: ...of MHR This zone improves cardiovascular fitness and builds strength by blending increased resistance with longer distances INTERVAL ENERGY ZONE 65 92 of MHR Interval training teaches your body to rec...

Page 16: ...ts chain tensioner brake pad and crank bolts Crescent adjustable Wrench Adjust chain tension Torque Wrench Adjust crank arm Available at local bike or fitness related stores DAILY MAINTENANCE The serv...

Page 17: ...y o Remove chain guard and check for loose chain Adjust chain as necessary refer to Chain Adjustment on pages 23 24 o Inspect The Bottom Bracket Assembly BBA The BBA will come loose periodically and r...

Page 18: ...end wrench 5 To loosen the chain turn the adjustment screws on both sides counter clockwise using a 10mm open end wrench 6 While adjusting the chain tension work on both sides of the flywheel Adjust t...

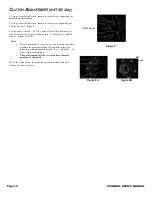
Page 19: ...little clockwise turn A little turn is about 10 degrees Figure 8A 8B Note Be sure and turn all 5 set screws so they have equal pressure to obtain the proper adjustment Recheck the torque for differen...

Page 20: ...cian should perform the following 1 Remove the chain guard by unscrewing the chain guards screws 2 Apply tension to the brake knob by turning it all the way clockwise so the flywheel does not turn 3 U...

Page 21: ......

Page 22: ...STAR TRAC 14410 Myford Road Irvine California 92606 Telephone 800 228 6635 714 669 1660 Fax 714 508 3303 http www startrac com Document Number 620 8068 Rev A...

Reviews: